


Introduction
Workload Identity Federation is a feature provided by Google Cloud Platform (GCP) that allows you to securely authenticate and authorize workloads running outside of GCP. It enables the use of service accounts and permissions within your applications, eliminating the need for managing separate sets of credentials.
Prerequisites 📚
You need to enable the following APIs:
- Identity and Access Management (IAM) API
- Cloud Resource Manager API
- IAM Service Account Credentials API
- Security Token Service API
Create service account 💼
You can connect a service account to the identity pool. Later the workloads will assume the service account and can utilize the same roles attached to the service account. For a detailed guide on how to create service accounts, visit my previous article:
 Alexander Hose
You can just assign the roles required for your application architecture.

Configure Identity Provider 🔒
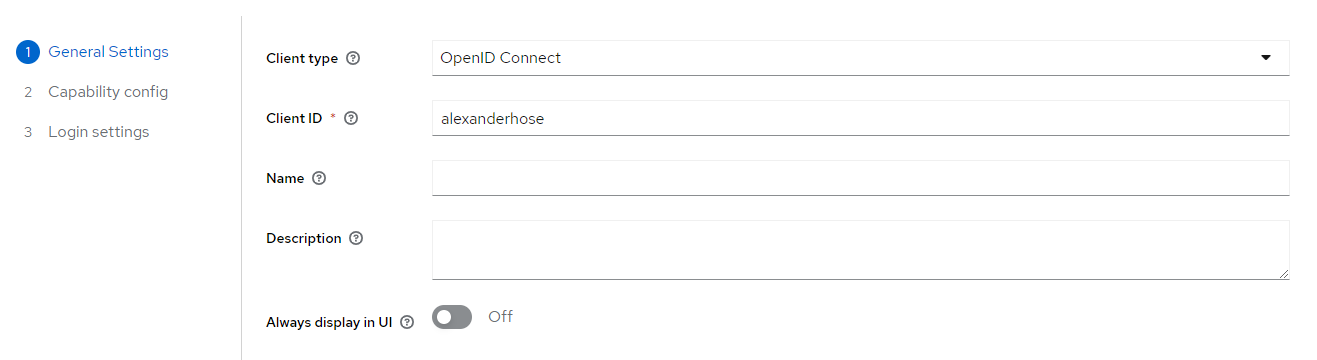
First, we need to create a new OpenID Connect (OIDC) client in our Identity Provider. In my test environment, we are using Keycloak for that. The client represents your application that needs to integrate with Keycloak for authentication and GCP for assuming the service account. First, we give the client a name.
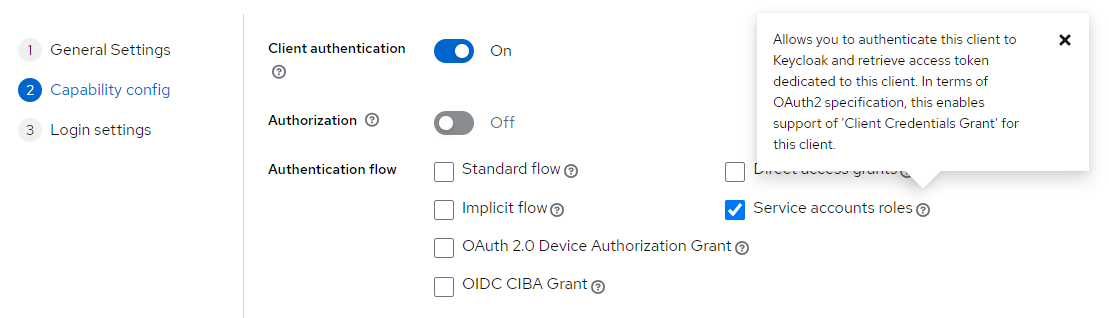
Afterward, we chose the OAuth 2.0 Client Credentials Grant Type. This flow is used when an application authenticates itself and obtains an access token directly from the authorization server. The application presents its own credentials (client ID and client secret), without involving a user. This grant type is used for server-to-server communication or when the client application needs to access protected resources on its behalf.
After the client is created, you need to note down the client ID and client secret.
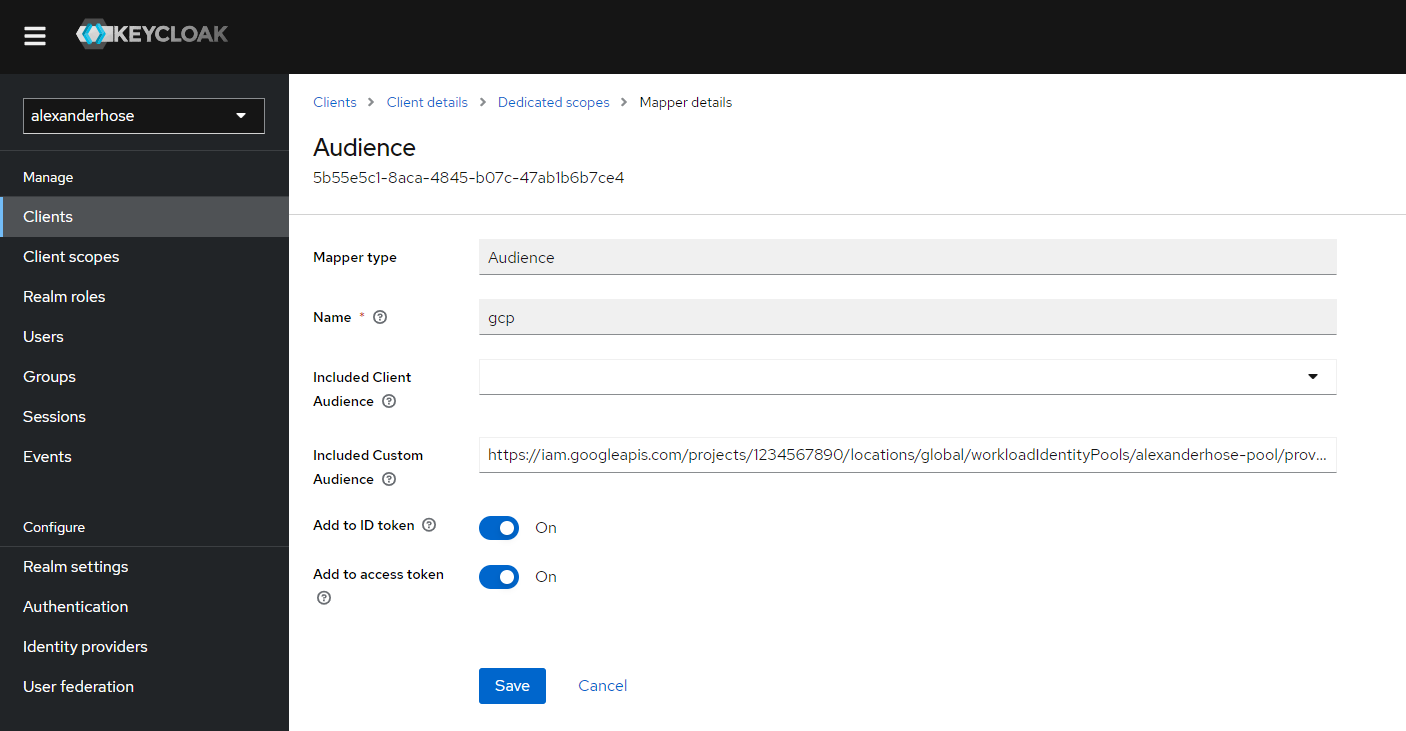
Lastly, we need to add a custom Audience mapper. I recommend performing this step later, as we can copy this value while we create the GCP workload provider. The aud claim has a format like this: https://iam.googleapis.com/projects/<projectID>/locations/global/workloadIdentityPools/<poolName>/providers/<providerName>
Configure Workload Identity Federation ⚙️
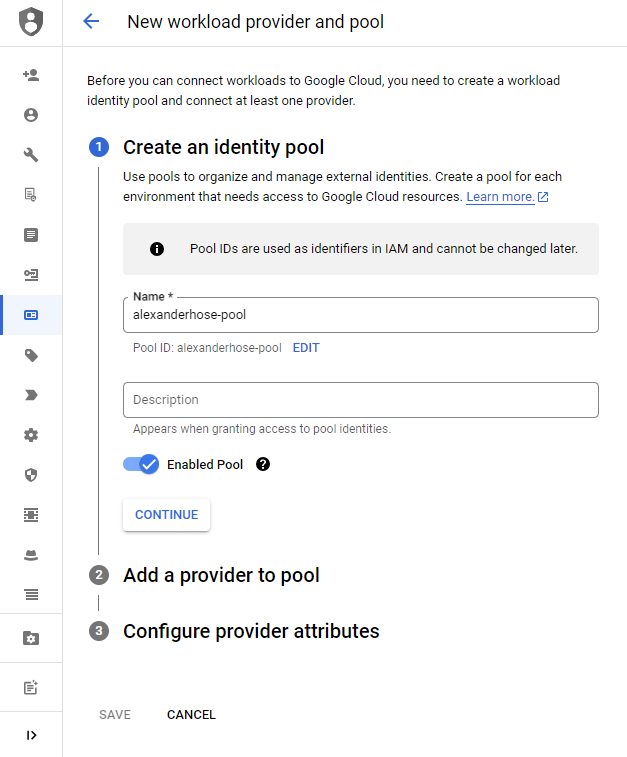
Create an identity pool
After creating the service account and client in our IDP, we can finally configure the Workload Identity Federation. First, we create a new pool. Here we can choose a custom name and description.
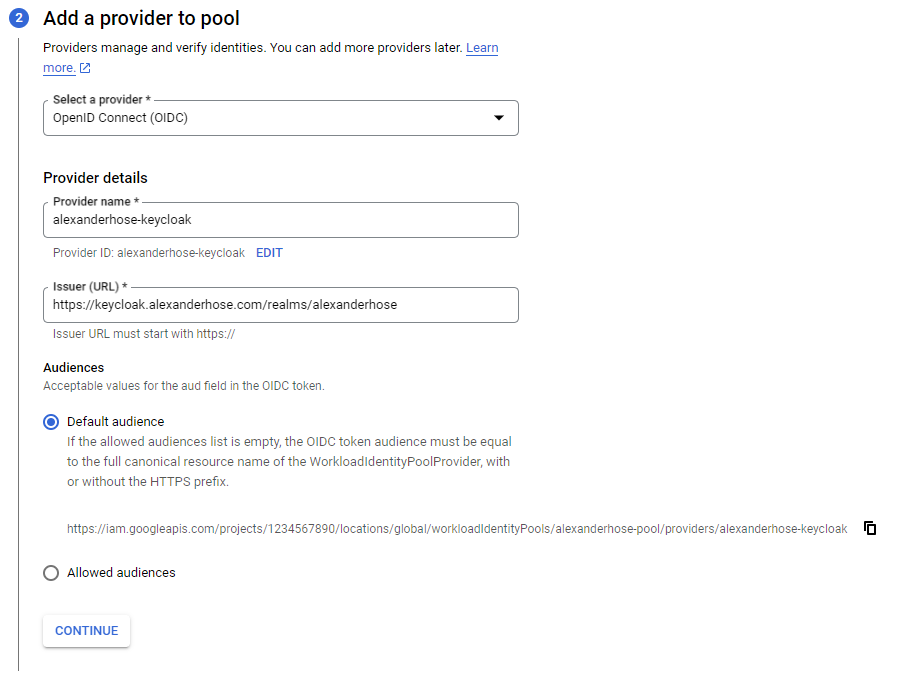
Add a provider to pool
The next step depends on the provider we want to configure. In our case, we will choose OIDC. The provider name can be freely chosen again. The issuer URL depends on your IDP. You can identify the issuer by getting a token from your IDP:
curl --request POST --url 'https://keycloak.alexanderhose.com/realms/alexanderhose/protocol/openid-connect/token' --header 'content-type: application/x-www-form-urlencoded' --data grant_type=client_credentials --data client_id=alexanderhose --data client_secret=<clientSecret> | jq -r .access_tokenWe will be presented with a base64url encoded token. If we decode the token we need to search for the iss claim:
{
  [...]
  "iss": "https://keycloak.alexanderhose.com/realms/alexanderhose",
  [...]
}
The iss claim needs to be added to the configuration.
You can keep the default audience in the configuration. Make sure the audience is added as an aud claim to the IDP client we created earlier. We can copy the URL to make sure we won't have any typos in the claim when creating the aud claim mapper.
Configure provider attributes
Depending on your use case, you may change the provider attribute mapping. In my case, I go with the default values.

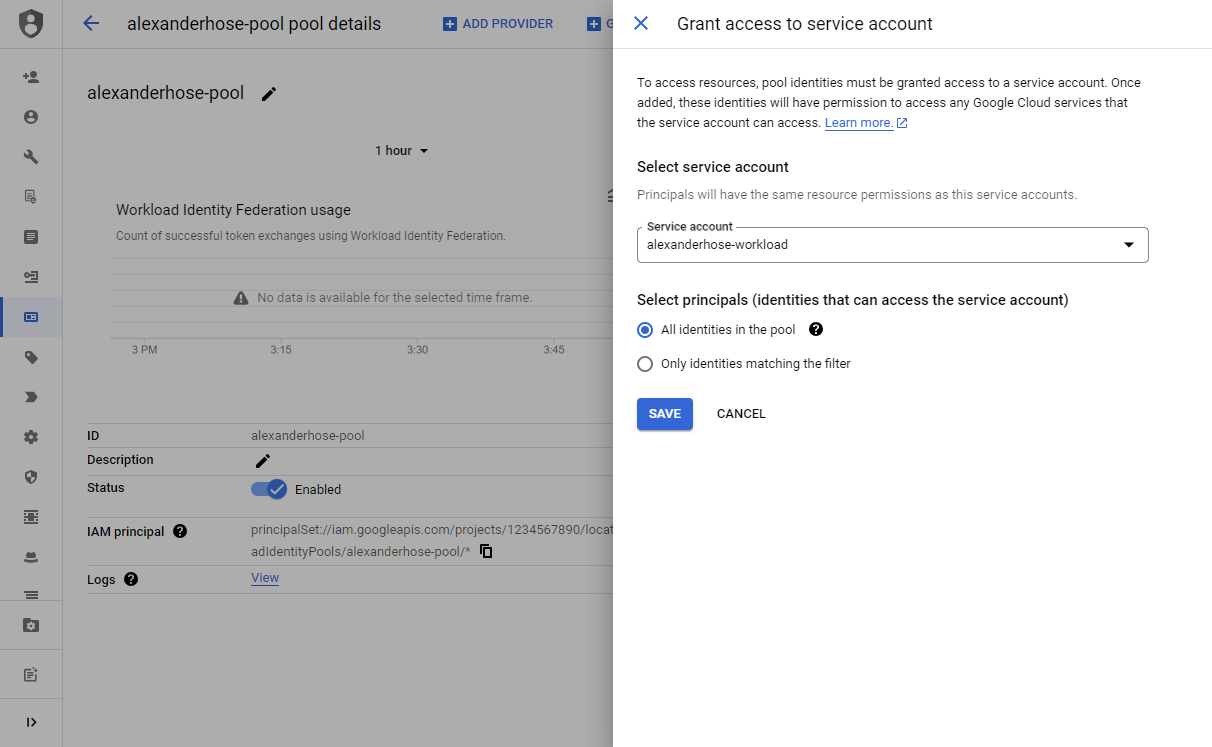
Grant access to service account 🚪
Now we can grant the pool access to the service account we created earlier. We just choose our newly created pool and click on Grant Access. We choose our service account and define which identities from the pool should have access.
After saving we can generate a configuration for our application. The OIDC ID token path is the path where we later will save the access token from the IDP. In my case, this will be in a file called token. The token will be saved in JSON format and can be identified by the access_token attribute. We can change the configuration anytime, so don't worry if it doesn't make sense right now.
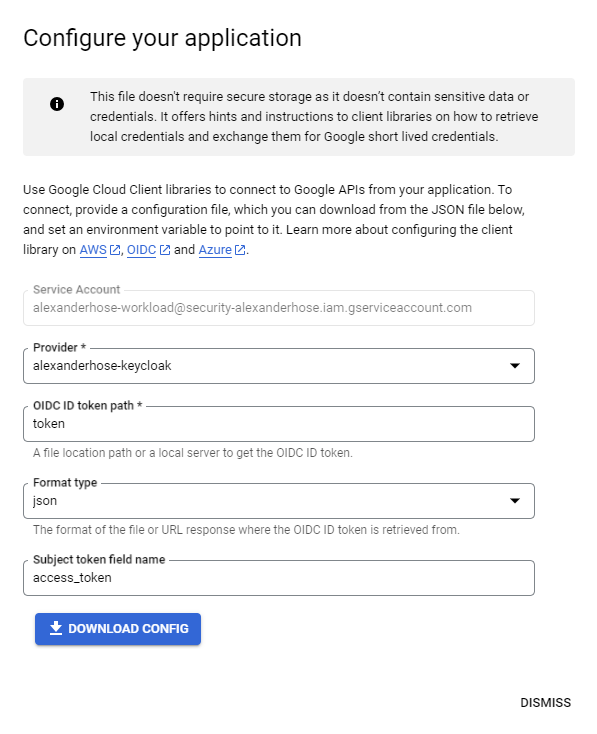
Let's download the configuration and move on to configuring our application. I have saved the configuration as clientLibConfig.json. My configuration looks like this:
{
  "type": "external_account",
  "audience": "//iam.googleapis.com/projects/1234567890/locations/global/workloadIdentityPools/alexanderhose-pool/providers/alexanderhose-keycloak",
  "subject_token_type": "urn:ietf:params:oauth:token-type:jwt",
  "token_url": "https://sts.googleapis.com/v1/token",
  "service_account_impersonation_url": "https://iamcredentials.googleapis.com/v1/projects/-/serviceAccounts/alexanderhose-workload@security-alexanderhose.iam.gserviceaccount.com:generateAccessToken",
  "credential_source": {
    "file": "token",
    "format": {
      "type": "json",
      "subject_token_field_name": "access_token"
    }
  }
}
Join our community of cloud security professionals. 🔐
Subscribe to our newsletterSetup workload federation in our application 🌐
First, we need to get a token from our IDP. I perform all tests in the shell, but you can also directly set it up in your application. For Keycloak we need to call the following URL to get a token https://keycloak.alexanderhose.com/realms/alexanderhose/protocol/openid-connect/token. I also directly save the token in the file with the name token:
curl --request POST --url 'https://keycloak.alexanderhose.com/realms/alexanderhose/protocol/openid-connect/token' --header 'content-type: application/x-www-form-urlencoded' --data grant_type=client_credentials --data client_id=alexanderhose --data client_secret=<clientSecret> > tokenIf we look into the content of the file, we will see the access token and some additional information. We will also see the access_token field again, which we have defined above in the configuration file.
{"access_token":"ey...","expires_in":14400,"refresh_expires_in":0,"token_type":"Bearer","not-before-policy":0,"scope":"profile email"}With the access token ready we can finally perform the authentication. In gcloud we can use the following command: gcloud auth login --cred-file=clientLibConfig.json to authenticate with workload identity federation. Next, we can use the command gcloud auth list to see which service account is used for performing the API calls and if our login was successful:
me@cloudshell:~ (alexanderhose)$ gcloud auth login --cred-file=clientLibConfig.json

You are already authenticated with gcloud when running
inside the Cloud Shell and so do not need to run this
command. Do you wish to proceed anyway?

Do you want to continue (Y/n)?  Y


Authenticated with external account credentials for: [alexanderhose-workload@security-alexanderhose.iam.gserviceaccount.com].
Your current project is [alexanderhose].  You can change this setting by running:
  $ gcloud config set project PROJECT_ID

me@cloudshell:~ (alexanderhose)$ gcloud auth list
Credentialed Accounts

ACTIVE: *
ACCOUNT: alexanderhose-workload@security-alexanderhose.iam.gserviceaccount.com
Test the setup 🧪
As an example, we can get a list of all GCP SCC findings. Set the argument --verbosity debug to see all steps the API call takes. Here we can see how gcloud is using the https://sts.googleapis.com/v1/token endpoint to get a token from the workload identity federation and successfully lists all findings. It utilizes the service account we have defined.
me@cloudshell:~ (alexanderhose)$ gcloud scc findings list projects/alexanderhose --verbosity debug
DEBUG: Running [gcloud.scc.findings.list] with arguments: [--verbosity: "debug", PARENT: "projects/alexanderhose"]
DEBUG: Making request: POST https://sts.googleapis.com/v1/token
DEBUG: Starting new HTTPS connection (1): sts.googleapis.com:443
DEBUG: https://sts.googleapis.com:443 "POST /v1/token HTTP/1.1" 200 None
DEBUG: Making request: POST https://iamcredentials.googleapis.com/v1/projects/-/serviceAccounts/alexanderhose-workload@security-alexanderhose.iam.gserviceaccount.com:generateAccessToken
DEBUG: Starting new HTTPS connection (1): iamcredentials.googleapis.com:443
DEBUG: https://iamcredentials.googleapis.com:443 "POST /v1/projects/-/serviceAccounts/alexanderhose-workload@security-alexanderhose.iam.gserviceaccount.com:generateAccessToken HTTP/1.1" 200 None
DEBUG: Chosen display Format:default
INFO: Display format: "default"
DEBUG: Starting new HTTPS connection (1): securitycenter.googleapis.com:443
DEBUG: https://securitycenter.googleapis.com:443 "GET /v1/projects/security-alexanderhose/sources/-/findings?alt=json HTTP/1.1" 200 None
Conclusion 🎓
Workload Identity Federation provides a secure and streamlined way to authenticate and authorize workloads running outside of GCP. By leveraging IAM roles, you can simplify access control and enhance security while seamlessly integrating with other GCP services. Follow the step-by-step guide provided in this article to set up Workload Identity Federation and enjoy the benefits it offers.


Member discussion