Software development is a dynamic process that involves multiple stages, from writing code to testing and deployment. Code quality plays a crucial role in software development, as it determines the overall performance and reliability of the software. Poor code quality can lead to bugs, crashes, and security vulnerabilities. SonarQube is a powerful code quality management tool that helps developers identify and fix code quality and security issues. In this article, we will explore how to use SonarQube on AWS Elastic Container Service (ECS).
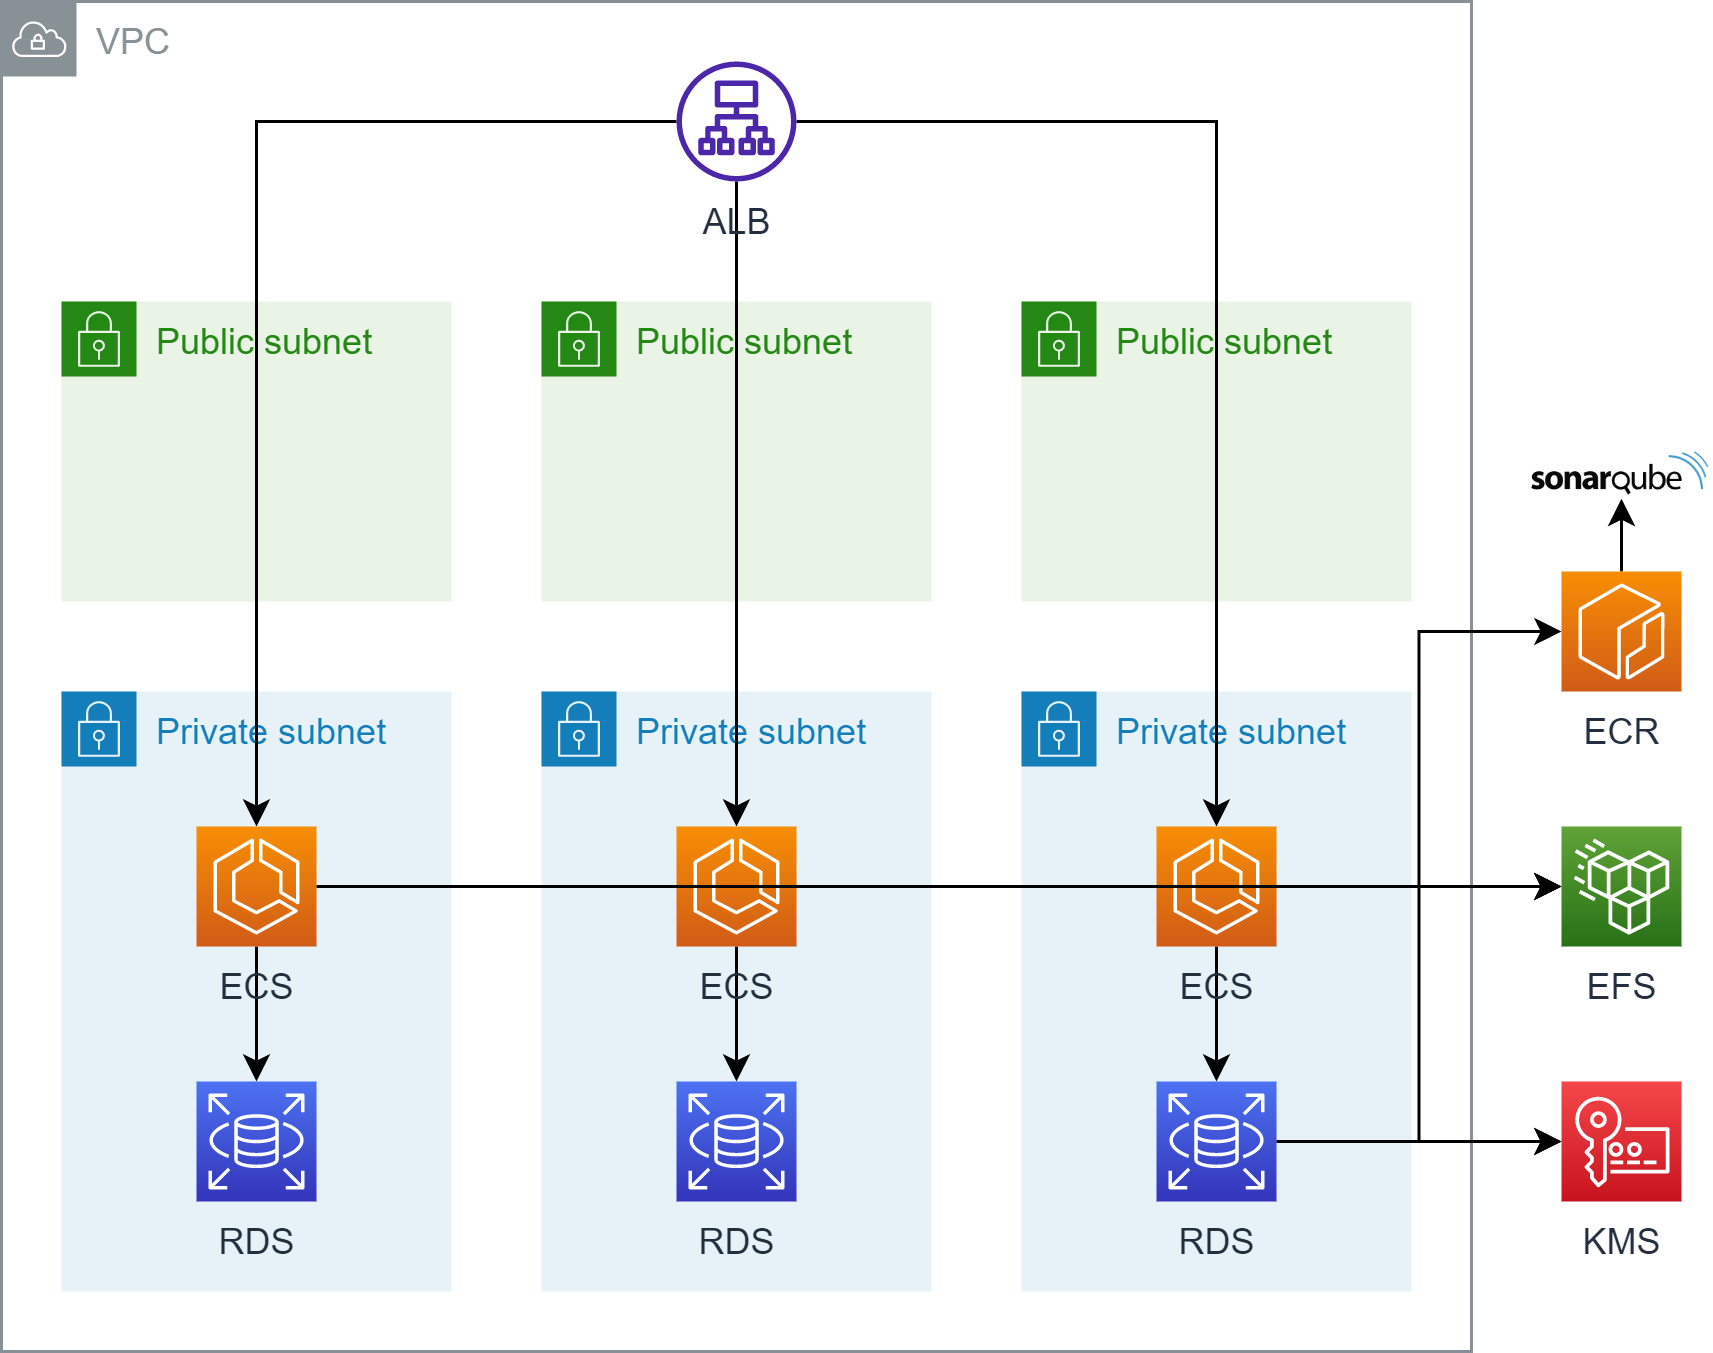
Table of contents
Setup Virtual Private Cloud (VPC) 🌐
Create KMS encryption key 🔒
Setup AWS RDS database 🗃️
Setup Application Load Balancer 🏋️
Setup AWS EFS 💾
Setup IAM roles 👥
Upload SonarQube image to ECR 🚀
Create ECS Workload ⚙️
Connect to SonarQube 🔗
Setup Virtual Private Cloud (VPC) 🌐
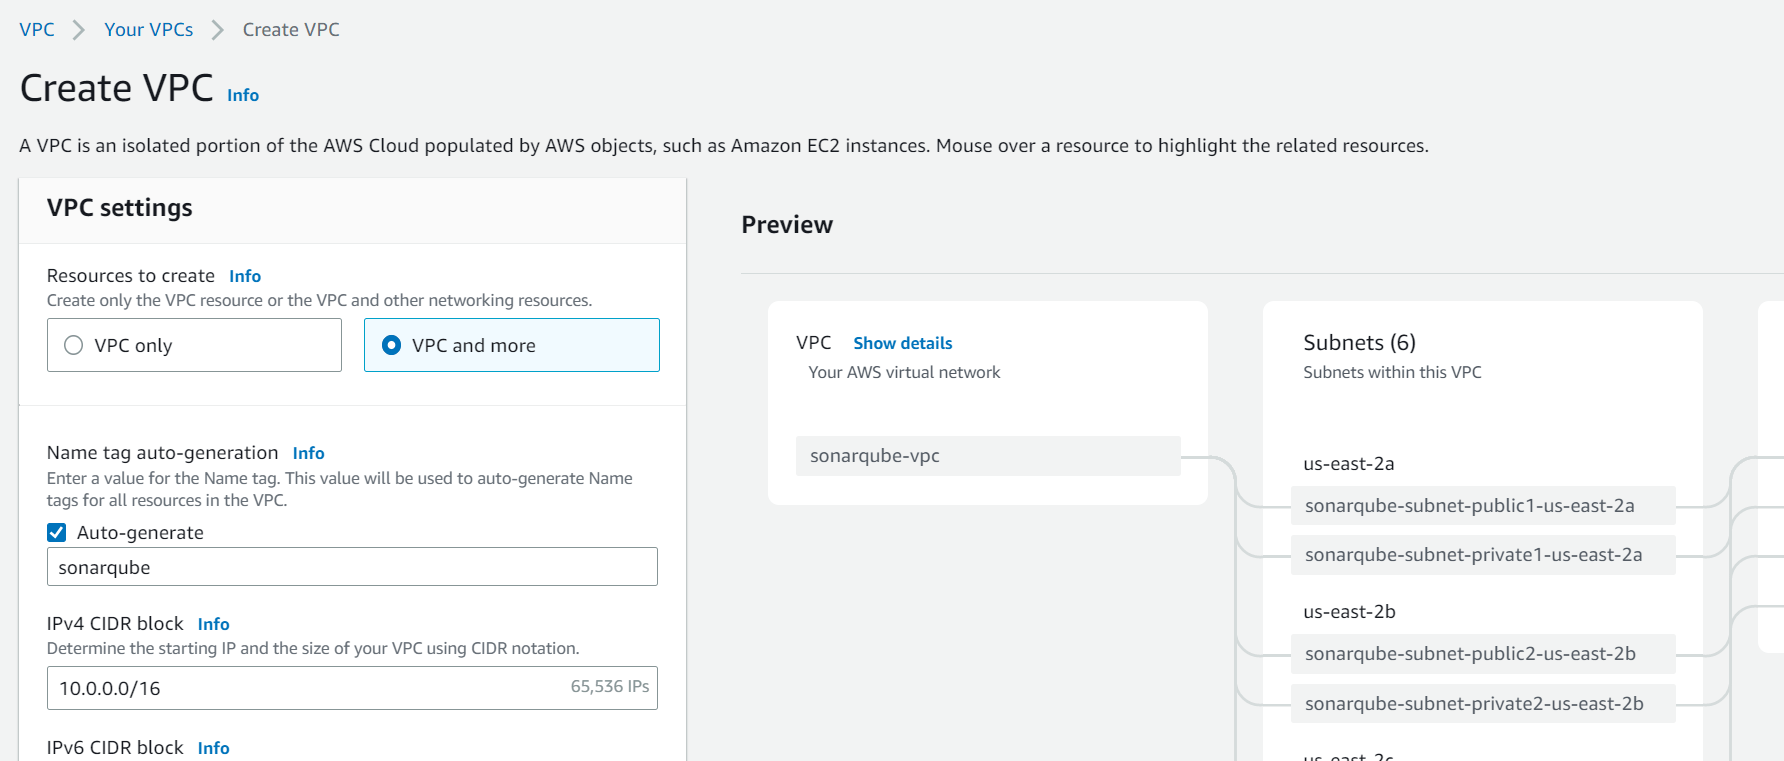
When setting up a new AWS environment for our project, one of the first things you'll need to do is create a VPC. The VPC will consist of 6 subnets in 3 Availability Zones (AZs), with 3 private, and 3 public ones. Additionally, we need 1 Internet Gateway (IG) and 1 NAT Gateway.
Setup security groups
When setting up the VPC, it is essential to configure security groups to control inbound and outbound traffic to and from the VPC. Security groups act as virtual firewalls, allowing only authorized traffic to pass through. In total, we need to set up four security groups:
default
This security group will be used for the EFS filesystem.
| GroupName | Type | IpProtocol | Port | IpRanges / UserIdGroupPairs |
|---|---|---|---|---|
| default | Inbound/Ingress | tcp | 2049 | sonarqube-sg |
sonarqube-lb
This security group will be attached to the application load balancer.
| GroupName | Type | IpProtocol | Port | IpRanges / UserIdGroupPairs |
|---|---|---|---|---|
| sonarqube-lb | Inbound/Ingress | tcp | 80 | <Company Network> |
| sonarqube-lb | Outbound/Egress | tcp | 9000 | sonarqube-sg |
sonarqube-sg
This security group will be used for the ECS cluster.
| GroupName | Type | IpProtocol | Port | IpRanges / UserIdGroupPairs |
|---|---|---|---|---|
| sonarqube-sg | Inbound/Ingress | tcp | 9000 | sonarqube-lb |
| sonarqube-sg | Outbound/Egress | tcp | 5432 | sonarqube-db |
| sonarqube-sg | Outbound/Egress | tcp | 443 | 0.0.0.0/0 |
| sonarqube-sg | Outbound/Egress | tcp | 2049 | default |
sonarqube-db
This security group will be attached to the AWS RDS database.
| GroupName | Type | IpProtocol | Port | IpRanges / UserIdGroupPairs |
|---|---|---|---|---|
| sonarqube-db | Inbound/Ingress | tcp | 5432 | sonarqube-sg |
Create KMS encryption key 🔒
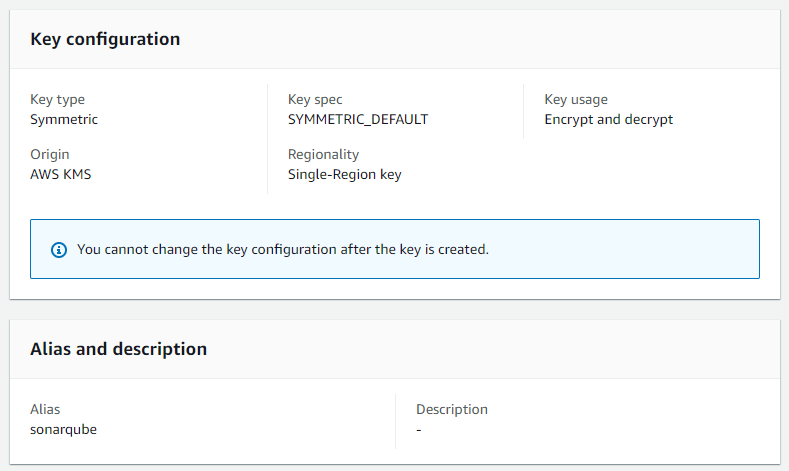
In this section, we'll cover the process of creating an AWS Key Management Service (KMS) key. This key will be used to encrypt our database credentials. Choose the symmetric encryption and name it sonarqube.
The key needs have the following key policy attached:
{
    "Id": "key-consolepolicy-3",
    "Version": "2012-10-17",
    "Statement": [
        {
            "Sid": "Enable IAM User Permissions",
            "Effect": "Allow",
            "Principal": {
                "AWS": "arn:aws:iam::0123456789:root"
            },
            "Action": "kms:*",
            "Resource": "*"
        }
    ]
}
Setup AWS RDS database 🗃️
In this section, we'll discuss how to set up an Amazon Relational Database Service (RDS) instance to host the SonarQube database. We'll go through the process of creating an RDS instance and configuring it to meet the SonarQube requirements.
Create Subnet Group
First, we create a subnet group within the previously created three private subnets. You can find this option on the left-hand side in the AWS RDS console.

Create AWS RDS Database
All supported database engines for SonarQube can be found in the official documentation:

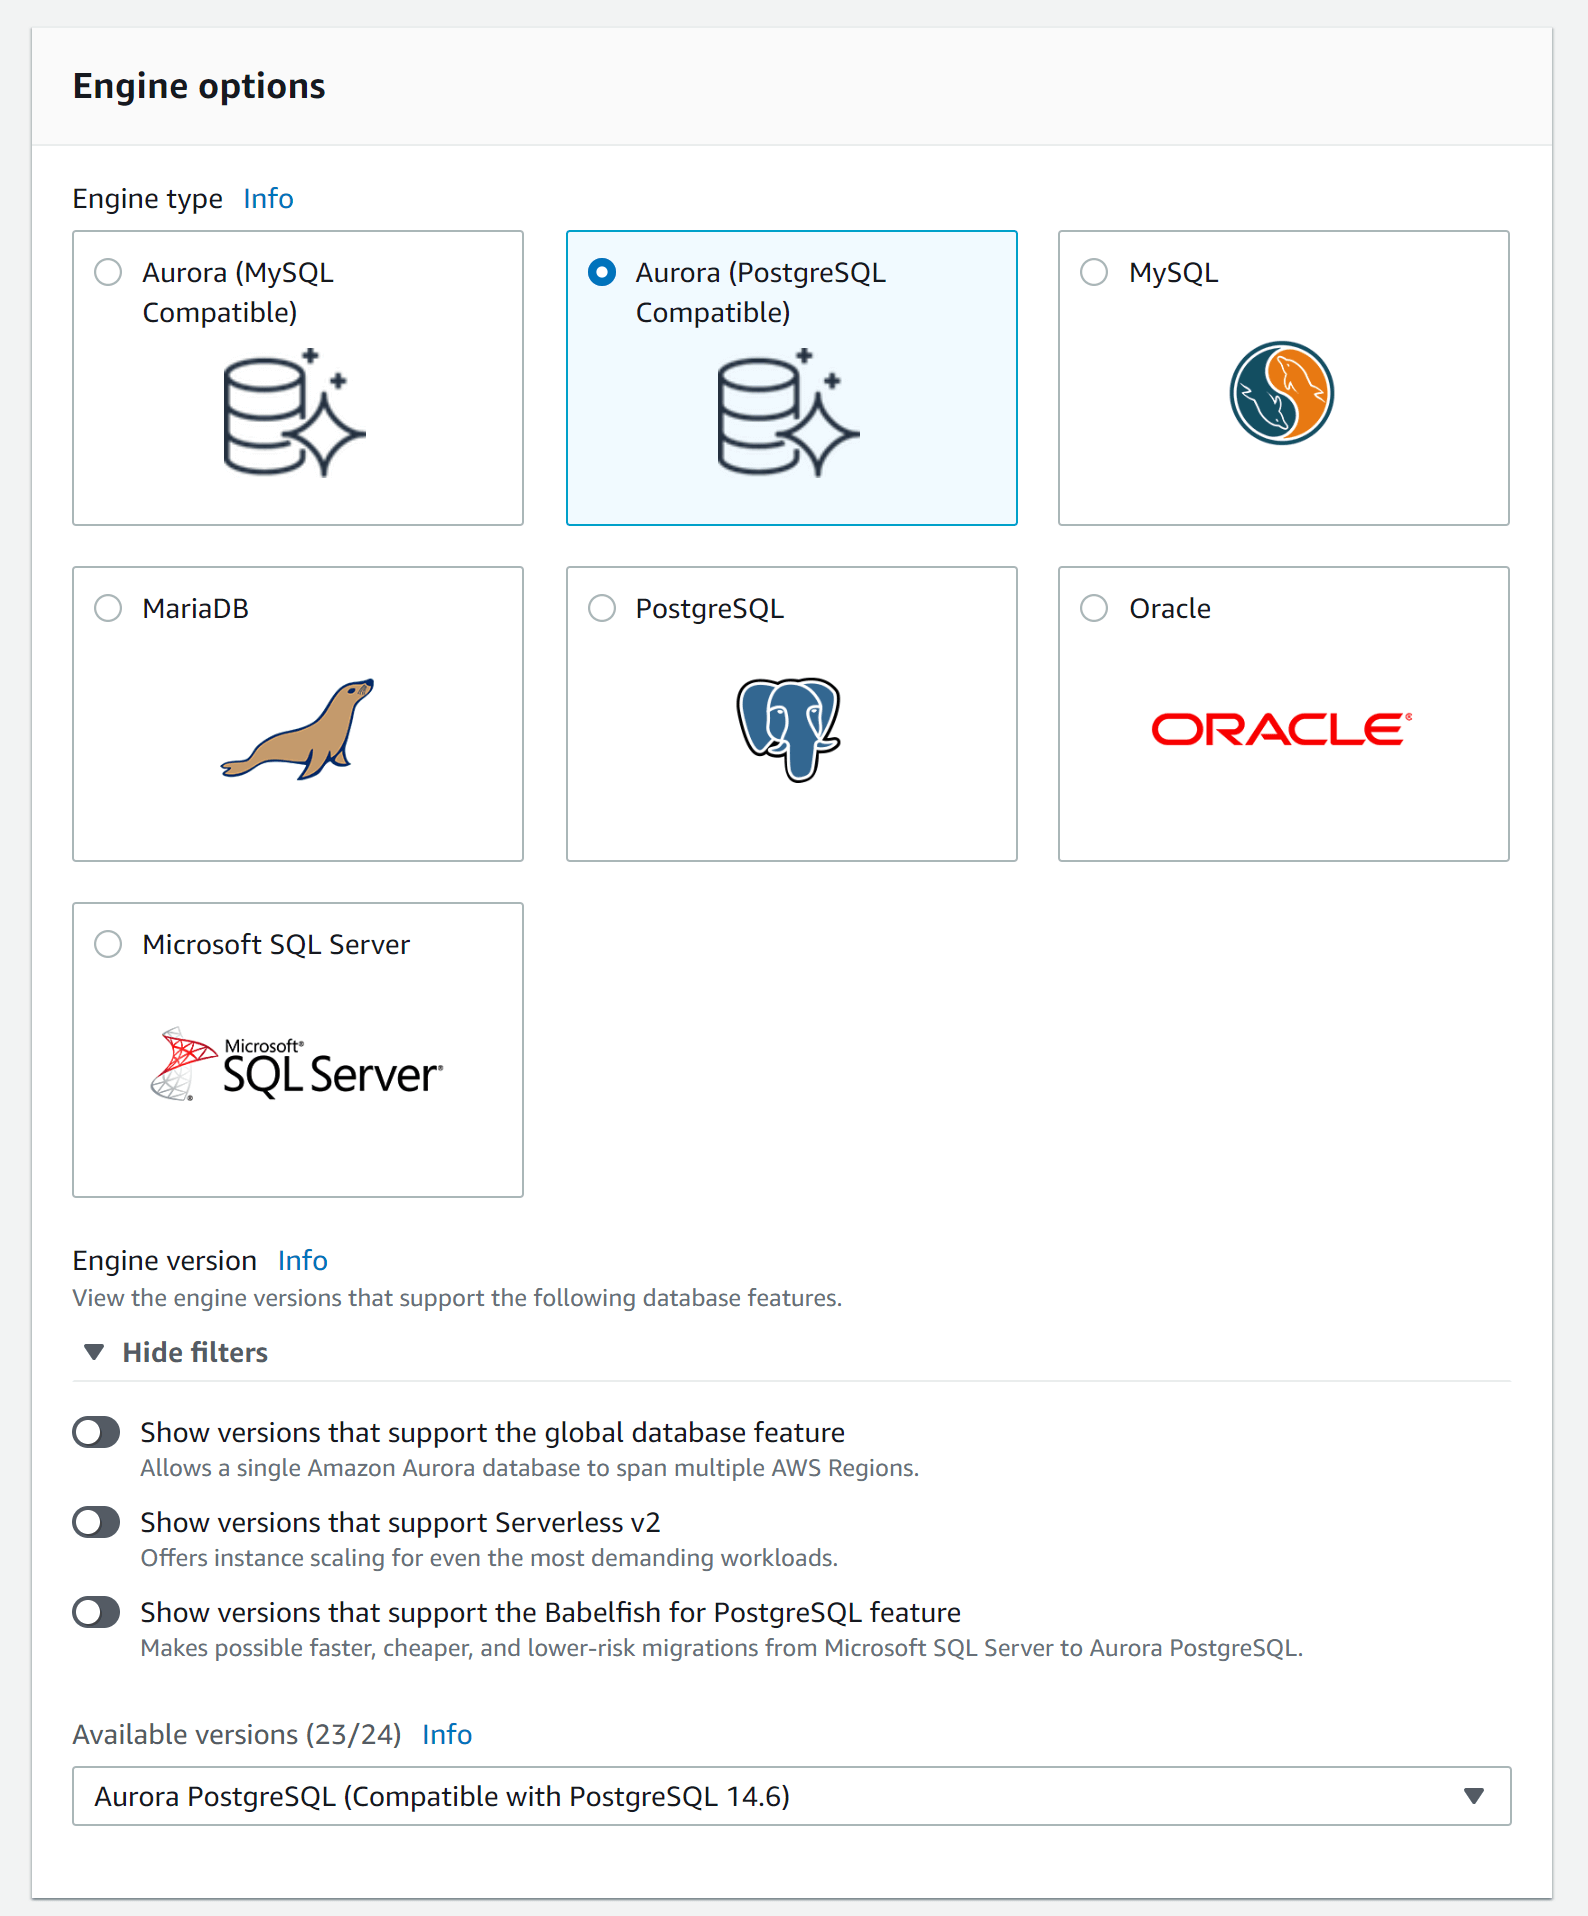
In our case, we have chosen the Aurora/PostgreSQL Compatible AWS RDS database.
Database settings
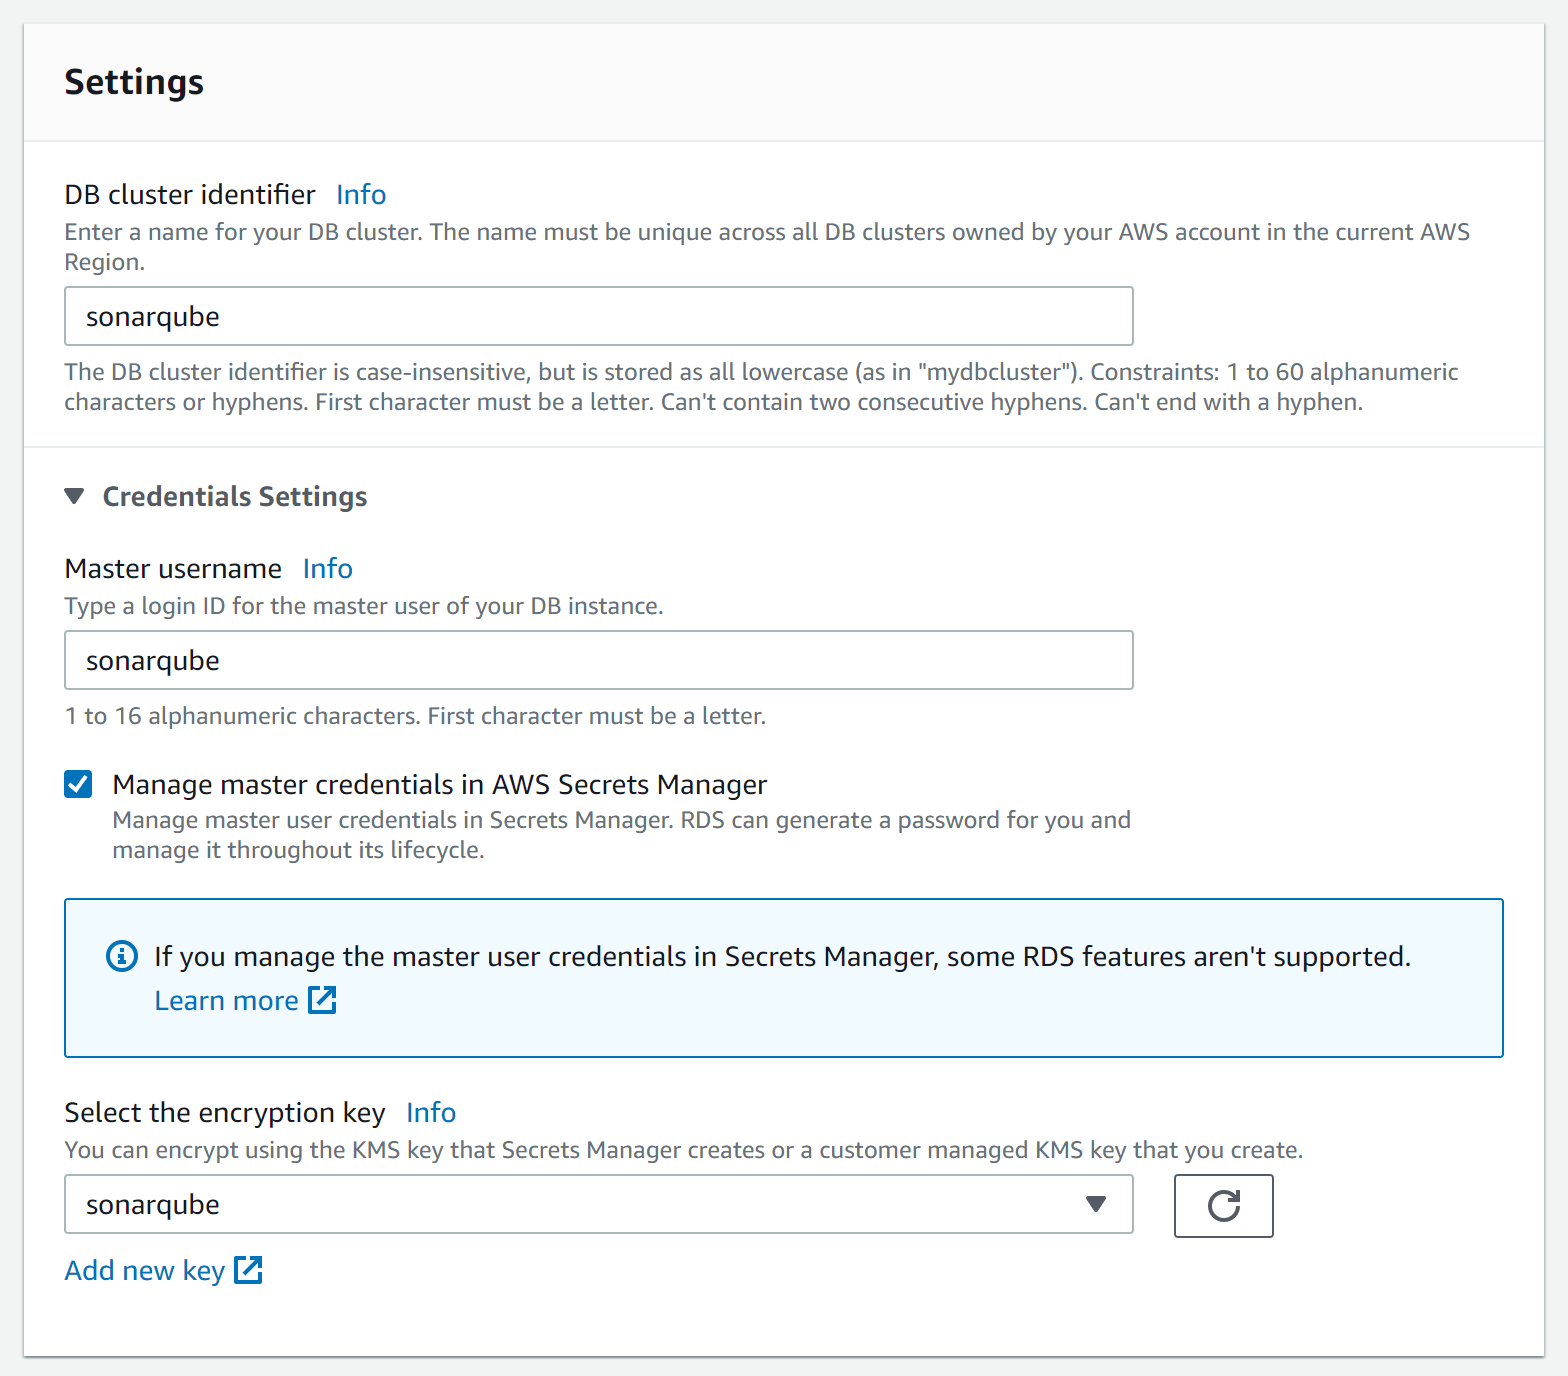
In the settings section, we need to set the username as sonarqube and choose "Manage master credentials in AWS Secrets Manager". Now we can reference the encryption key that we created earlier.
Database connectivity
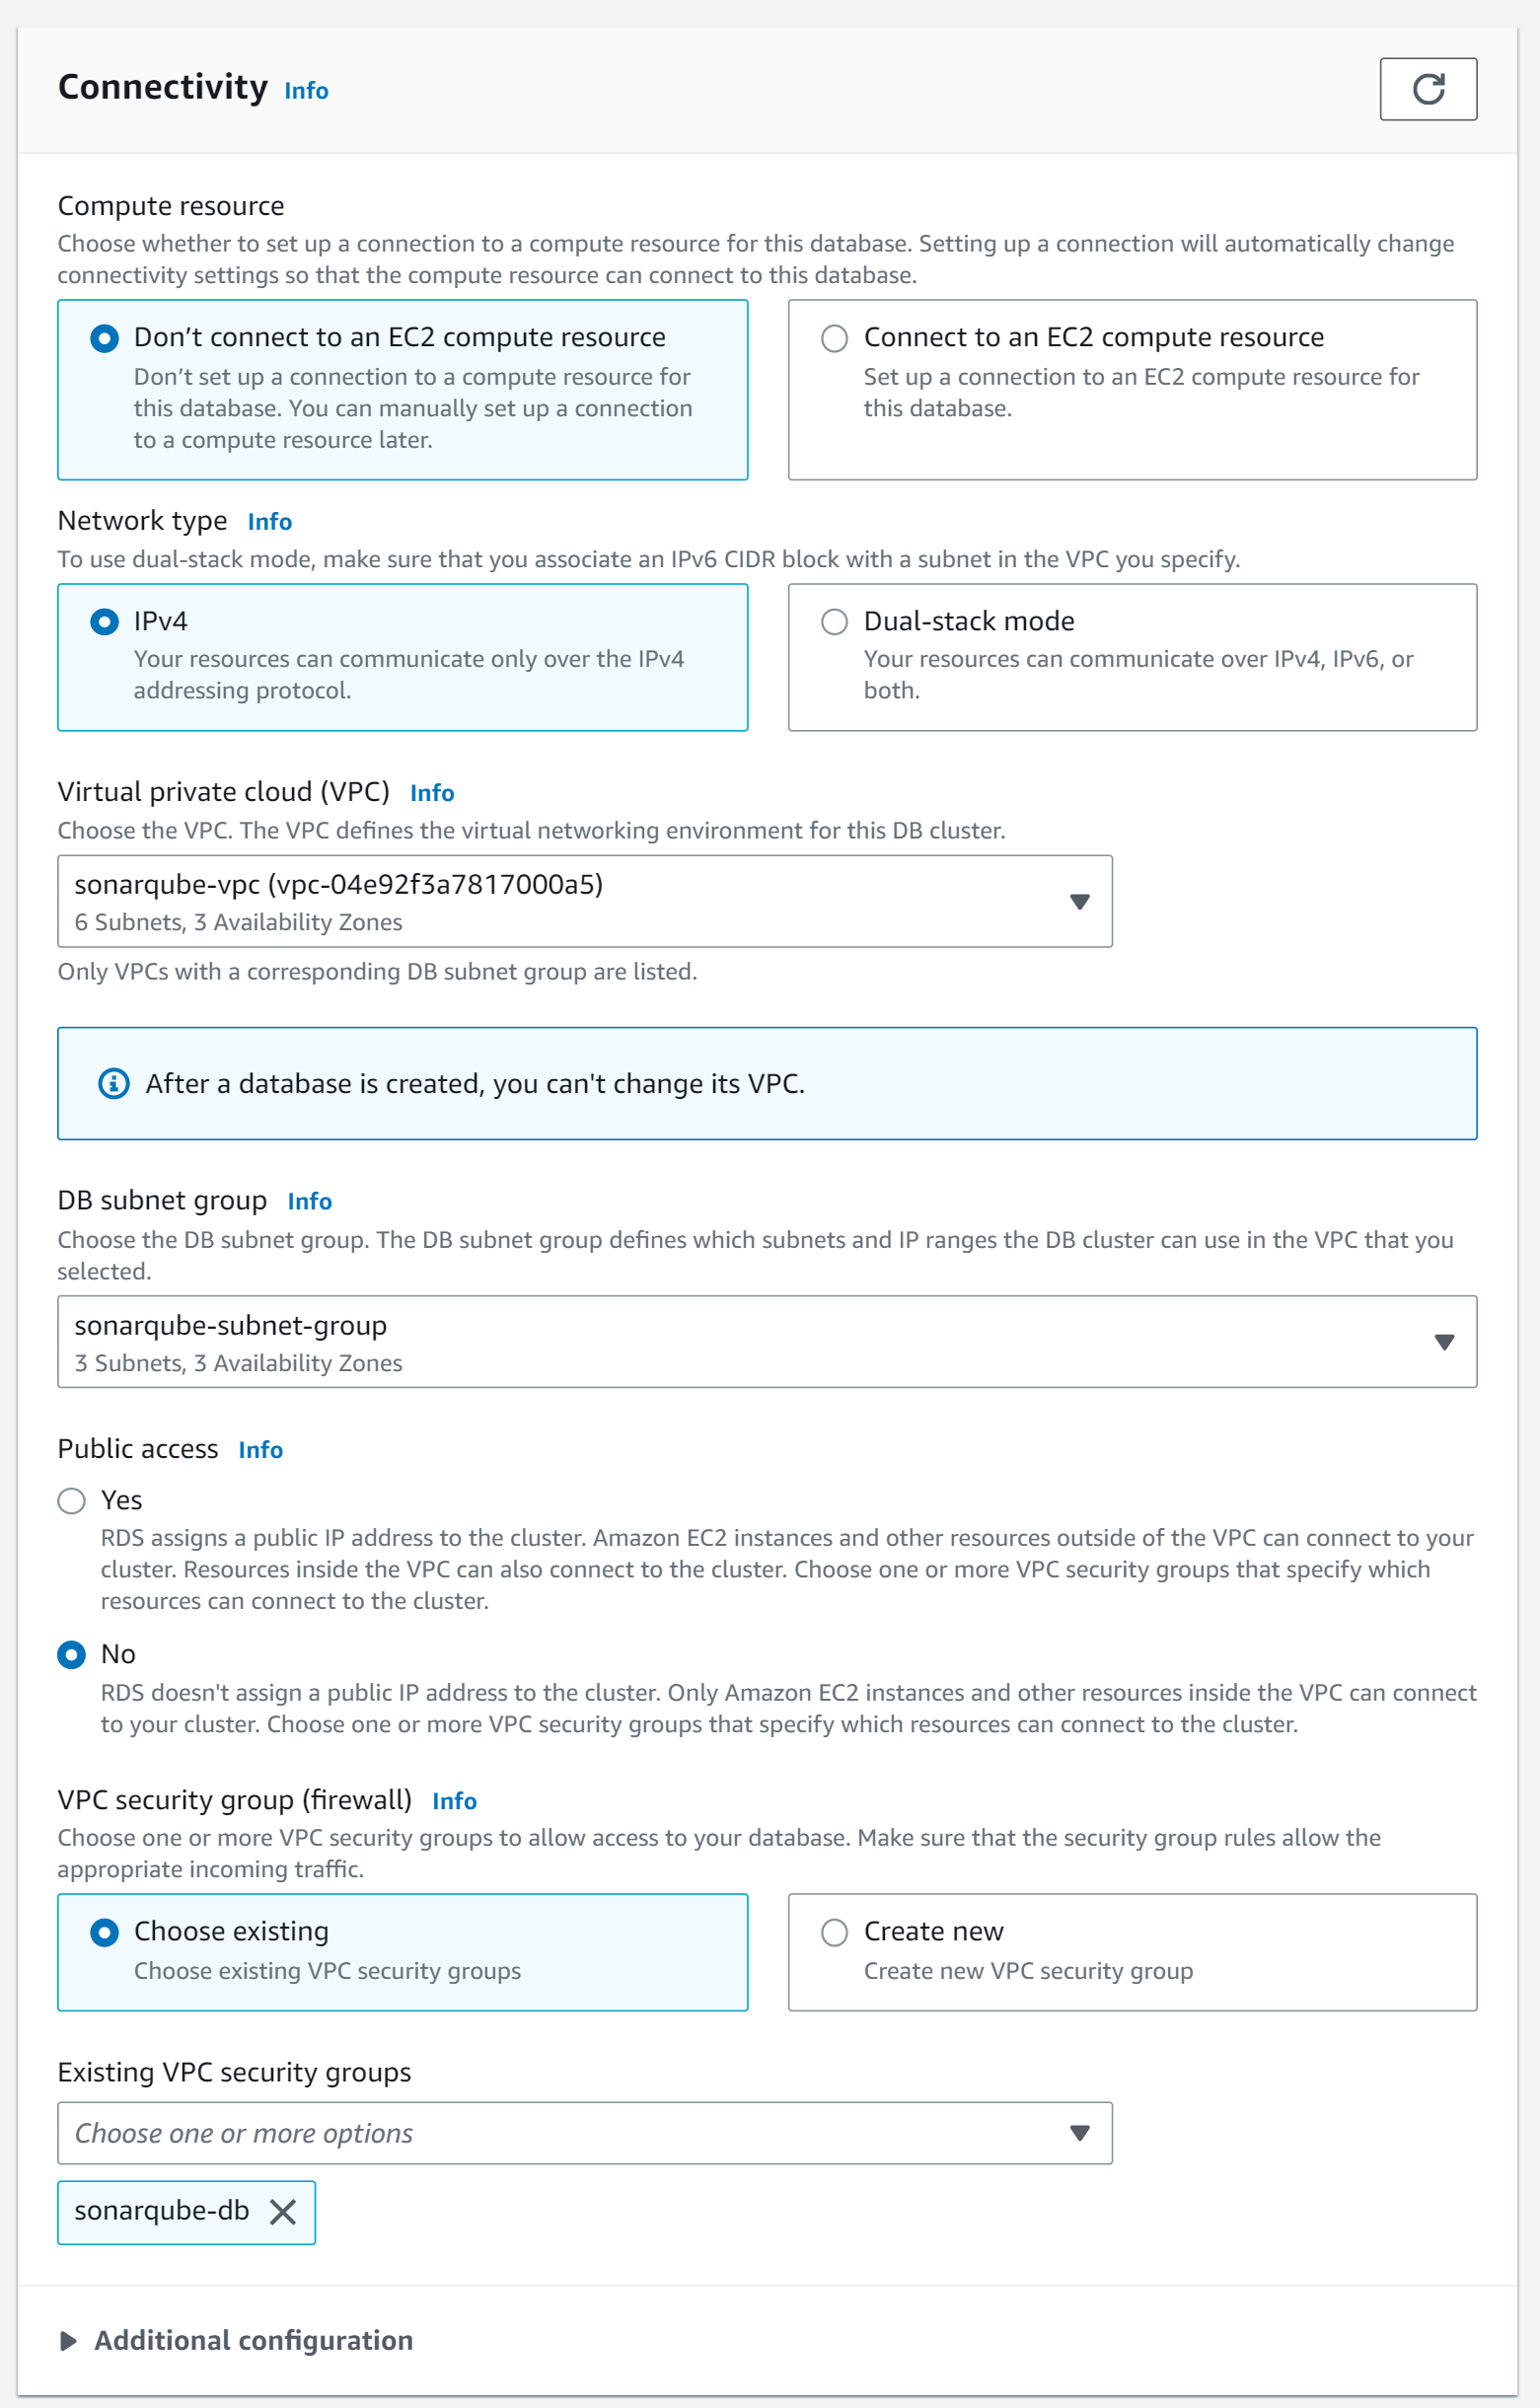
In the connectivity section, we chose the VPC, subnet group and security group we created.
Additional Configuration
In the "Additional Configuration" section, we will create an initial database with the name sonar . Afterward, we can choose to encrypt the database.


Join our community of cloud security professionals. 🔐
Subscribe to our newsletterSetup Application Load Balancer 🏋️
In this section, we'll cover how to set up an AWS Application Load Balancer (ALB) to distribute incoming traffic to the SonarQube instances running on AWS ECS. We'll go through the process of creating an ALB and configuring target groups and listeners.
Create Target Group
Before creating the application load balancer, we must set up a target group. In the case of ECS, we need to set the target type as IP addresses and choose the VPC created earlier.

We can remove all IP addresses from the second step and create the target group.
Create Application Load Balancer
When creating the Application Load Balancer choose the correct scheme configuration depending on if it should be internet-facing or internal. In our case, we want to be internet-facing. In the case of a corporate network, it should be internal.

Make sure to choose all public subnets for routing in the Mapping section. For the security group, you choose sonarqube-lb.
For the listeners, we chose the newly created target group.

Setup AWS EFS 💾
In this section, we'll discuss how to use Amazon Elastic File System (EFS) to share the SonarQube data directory between multiple ECS instances. We'll go through the process of creating an EFS file system, access points, and configuring the required directory structure for storing data.
SonarQube saves plugins and other data on the EFS. For a detailed explanation of EFS check out my previous article:

First, we create a new EFS file system in the EFS console:

The new file systems will automatically attach the default security group of the VPC. That's why we adjusted it earlier.
Next, we create three access points to the file system. Make sure to have the same setup as on the screenshot. Otherwise, it can happen that SonarQube is not able to write anything on the file system.

Setup IAM roles 👥
In this section, we'll cover the process of creating AWS Identity and Access Management (IAM) roles for the ECS task and task execution roles. We'll go through the steps of creating the roles and defining the necessary policies. This will allow the ECS tasks to interact securely with other AWS services, such as accessing the AWS Secrets Manager secret or KMS key.
Trust relationship
Both roles need to have a trust relationship with ECS:
{
    "Version": "2012-10-17",
    "Statement": [
        {
            "Sid": "",
            "Effect": "Allow",
            "Principal": {
                "Service": "ecs-tasks.amazonaws.com"
            },
            "Action": "sts:AssumeRole"
        }
    ]
}
Create SonarQubeTaskRole
The task role, which we configure in the ECS task definition, doesn't need to have any policies attached.

SonarQubeTaskExecutionRole
The second role, we need to create is the task execution role which will be configured in the ECS task definition. Here we need a custom policy that allows access to the KMS key and Secrets Manager secret.
{
    "Version": "2012-10-17",
    "Statement": [
        {
            "Effect": "Allow",
            "Action": [
                "kms:Decrypt",
                "secretsmanager:GetSecretValue"
            ],
            "Resource": [
                "arn:aws:kms:<region>:<accountID>:key/<keyID>",
                "arn:aws:secretsmanager:<region>:<accountID>:secret:rds!cluster-<clusterID>"
            ]
        }
    ]
}
Additionally, you need to attach the two AWS-managed roles AmazonEC2ContainerRegistryReadOnly and AWSOpsWorksCloudWatchLogs.

Upload SonarQube image to ECR 🚀
In this section, we'll discuss using Amazon Elastic Container Registry (ECR) to store and manage the Docker images used for running the SonarQube instances on ECS. This will simplify the management of the Docker images, enabling versioning and secure access control.
To manage the lifecycle of the SonarQube docker image more easily, just check out my previous article:
Otherwise, we can also manually upload the image after creating a new ECR repository:
docker pull sonarqube:latestaws ecr get-login-password --region <region> | docker login --username AWS --password-stdin <accountID>.dkr.ecr.us-east-2.amazonaws.comdocker tag sonarqube:latest <accountID>.dkr.ecr.<region>.amazonaws.com/sonarqube:latestdocker push <accountID>.dkr.ecr.<region>.amazonaws.com/sonarqube:latest
Create ECS Workload ⚙️
In this section, we will create an ECS cluster to run our containerized SonarQube instance. First, we create a task definition, then the ECS cluster, and finally the ECS service.
Create ECS task definition
Below you can find a CloudFormation template that will create the task definition. As we need to set some custom values for the ulimits we require a CloudFormation template. Please exchange the database information with the writer instance of your RDS cluster and the database password with the secrets manage secret that was created for you by RDS. You can retrieve this information from the AWS Secrets Manager console.
{
   "AWSTemplateFormatVersion":"2010-09-09",
   "Description":"Template Creates a ECS task definition for SonarQube",
   "Resources":{
      "taskdefinition":{
         "Type":"AWS::ECS::TaskDefinition",
         "Properties":{
            "ContainerDefinitions":[
               {
                  "name":"sonarqube",
                  "image":"<accountID>.dkr.ecr.<region>.amazonaws.com/sonarqube:latest",
                  "portMappings":[
                     {
                        "name":"sonarqube-9000-tcp",
                        "containerPort":9000,
                        "hostPort":9000,
                        "protocol":"tcp",
                        "appProtocol":"http"
                     }
                  ],
                  "essential":true,
                  "environment":[
                     {
                        "name":"SONAR_JDBC_URL",
                        "value":"jdbc:postgresql://sonarqube.cluster-bs1928dsnm1.<region>.rds.amazonaws.com:5432/sonar"
                     },
                     {
                        "name":"SONAR_JDBC_USERNAME",
                        "value":"sonarqube"
                     },
                     {
                        "name":"SONAR_SEARCH_JAVAADDITIONALOPTS",
                        "value":"-Dnode.store.allow_mmap=false,-Ddiscovery.type=single-node"
                     }
                  ],
                  "mountPoints":[
                     {
                        "sourceVolume":"sonarqube_data",
                        "containerPath":"/opt/sonarqube/data",
                        "readOnly":false
                     },
                     {
                        "sourceVolume":"sonarqube_extensions",
                        "containerPath":"/opt/sonarqube/extensions",
                        "readOnly":false
                     },
                     {
                        "sourceVolume":"sonarqube_logs",
                        "containerPath":"/opt/sonarqube/logs",
                        "readOnly":false
                     }
                  ],
                  "secrets":[
                     {
                        "name":"SONAR_JDBC_PASSWORD",
                        "valueFrom":"arn:aws:secretsmanager:<region>:<accountID>:secret:rds!cluster-19jaksl21-IGFr6V:password::"
                     }
                  ],
                  "logConfiguration":{
                     "logDriver":"awslogs",
                     "options":{
                        "awslogs-create-group":"true",
                        "awslogs-group":"/ecs/sonarqube",
                        "awslogs-region":"<region>",
                        "awslogs-stream-prefix":"ecs"
                     }
                  },
                  "ulimits":[
                     {
                        "name":"nofile",
                        "softLimit":65535,
                        "hardLimit":65535
                     }
                  ]
               }
            ],
            "taskRoleArn":"arn:aws:iam::<accountID>:role/SonarQubeTaskRole",
            "executionRoleArn":"arn:aws:iam::<accountID>:role/SonarQubeTaskExecutionRole",
            "networkMode":"awsvpc",
            "volumes":[
               {
                  "name":"sonarqube_logs",
                  "efsVolumeConfiguration":{
                     "fileSystemId":"fs-0128vs291284fn121",
                     "rootDirectory":"/",
                     "transitEncryption":"ENABLED",
                     "authorizationConfig":{
                        "accessPointId":"fsap-<accessPointID>",
                        "iam":"DISABLED"
                     }
                  }
               },
               {
                  "name":"sonarqube_extensions",
                  "efsVolumeConfiguration":{
                     "fileSystemId":"fs-0128vs291284fn121",
                     "rootDirectory":"/",
                     "transitEncryption":"ENABLED",
                     "authorizationConfig":{
                        "accessPointId":"fsap-<accessPointID>",
                        "iam":"DISABLED"
                     }
                  }
               },
               {
                  "name":"sonarqube_data",
                  "efsVolumeConfiguration":{
                     "fileSystemId":"fs-0128vs291284fn121",
                     "rootDirectory":"/",
                     "transitEncryption":"ENABLED",
                     "authorizationConfig":{
                        "accessPointId":"fsap-<accessPointID>",
                        "iam":"DISABLED"
                     }
                  }
               }
            ],
            "family":"sonarqube",
            "requiresCompatibilities":[
               "FARGATE"
            ],
            "cpu":"1024",
            "memory":"3072",
            "runtimePlatform":{
               "cpuArchitecture":"X86_64",
               "operatingSystemFamily":"LINUX"
            }
         }
      }
   }
}
If you are running into issues with password retrieval, you can check out my detailed setup article:
Create ECS cluster
Next up, we're diving into setting up our ECS cluster. We'll go with AWS Fargate as our infrastructure choice.

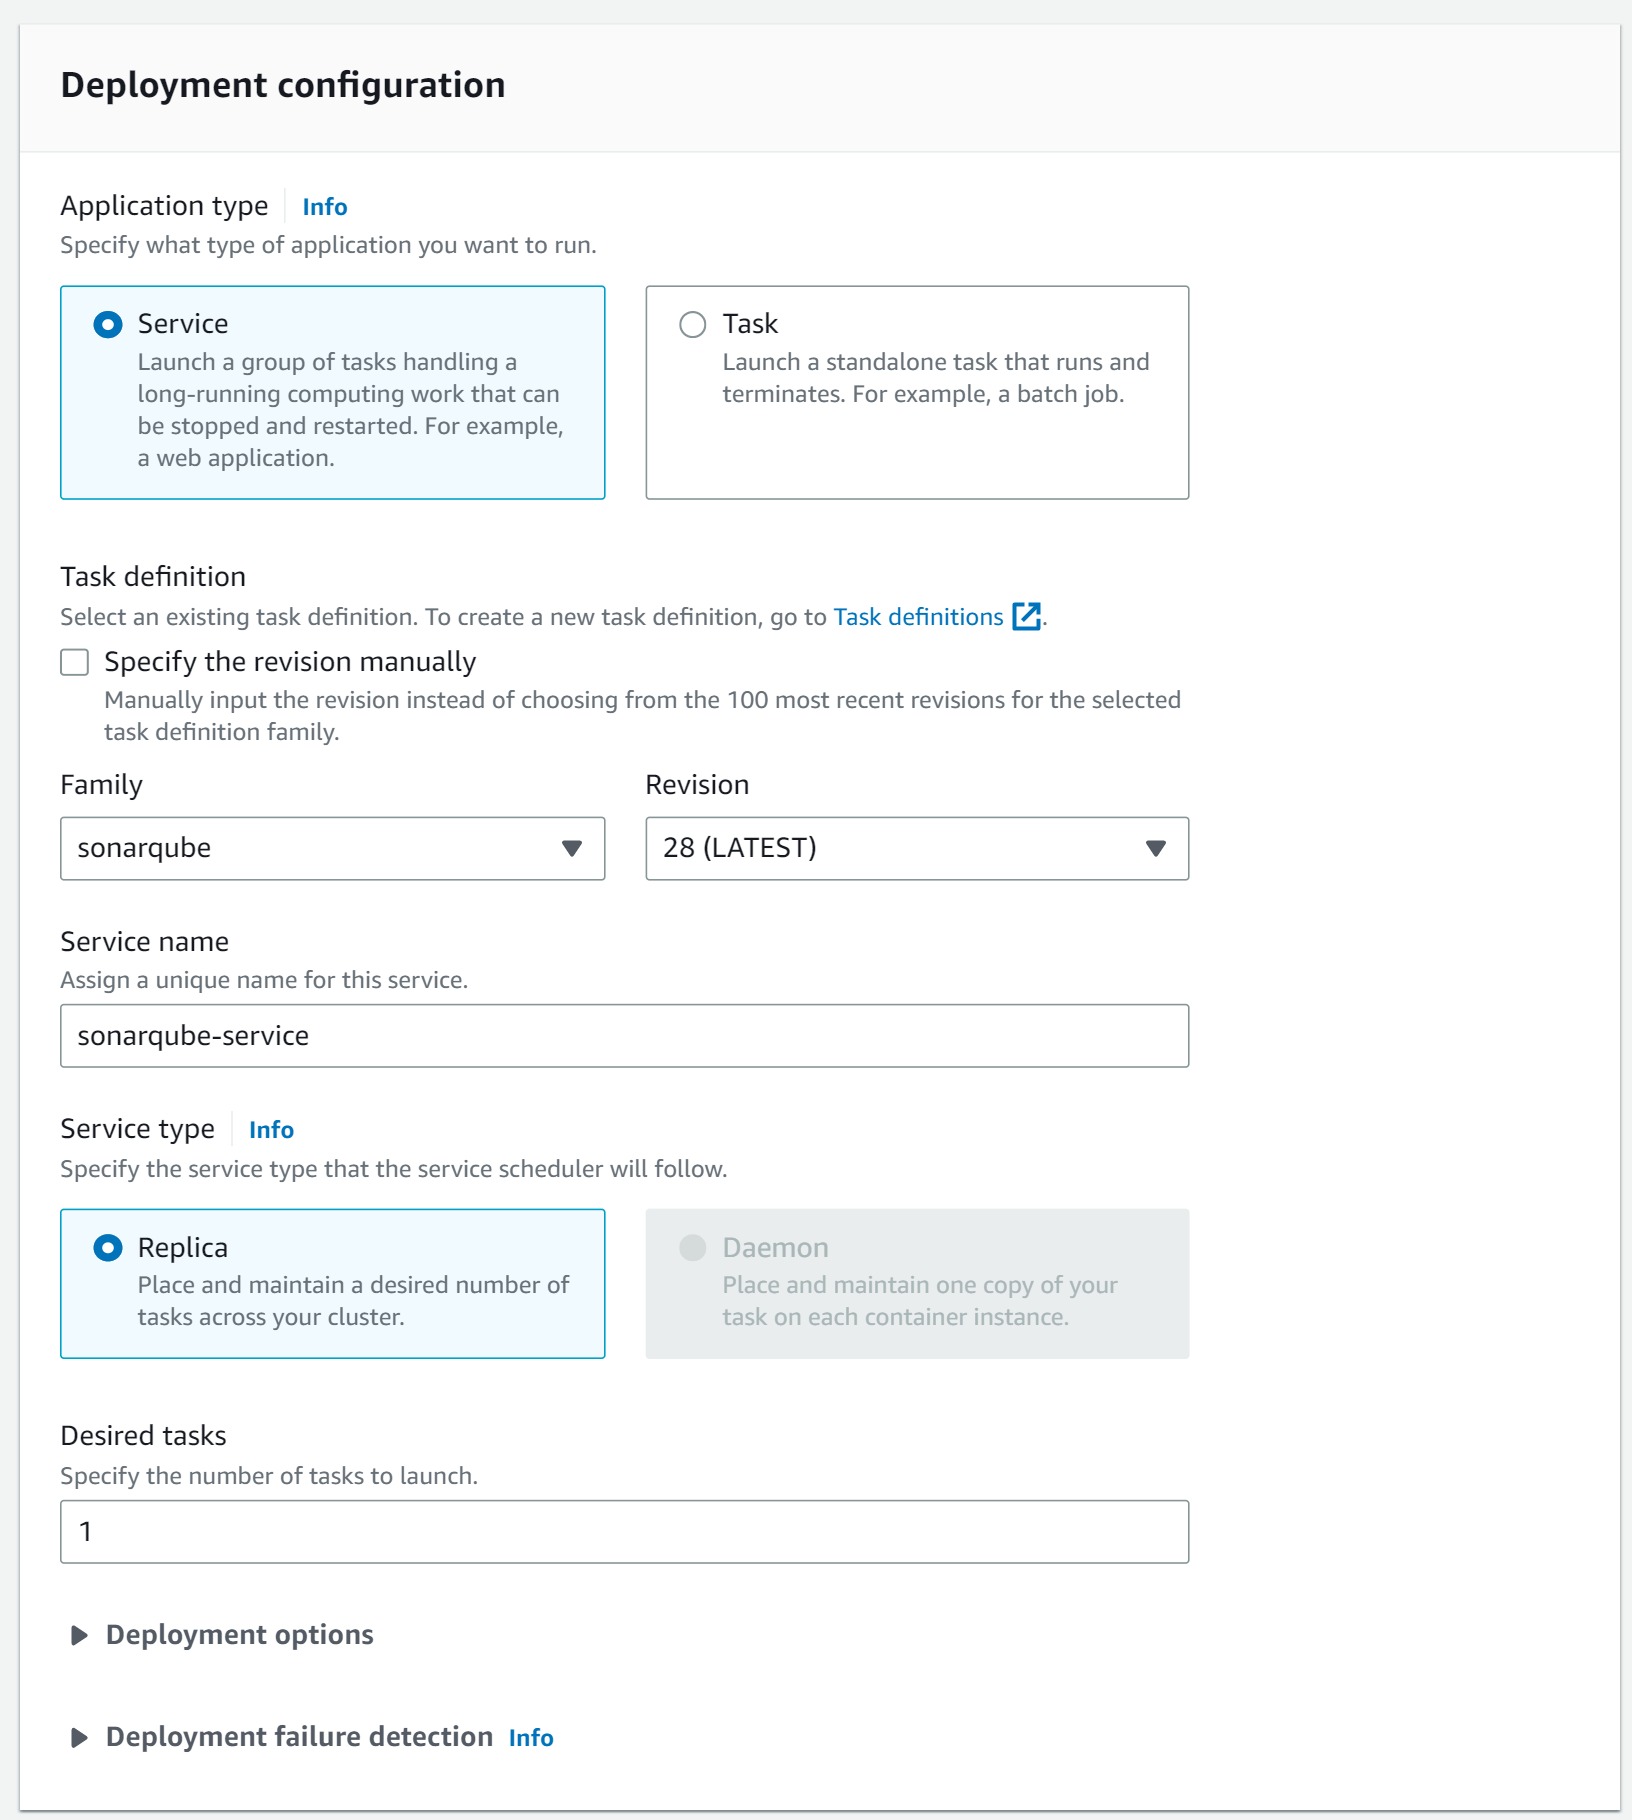
Create ECS service
Next, we create a new service for the ECS cluster. For the lunch type, we choose FARGATE.
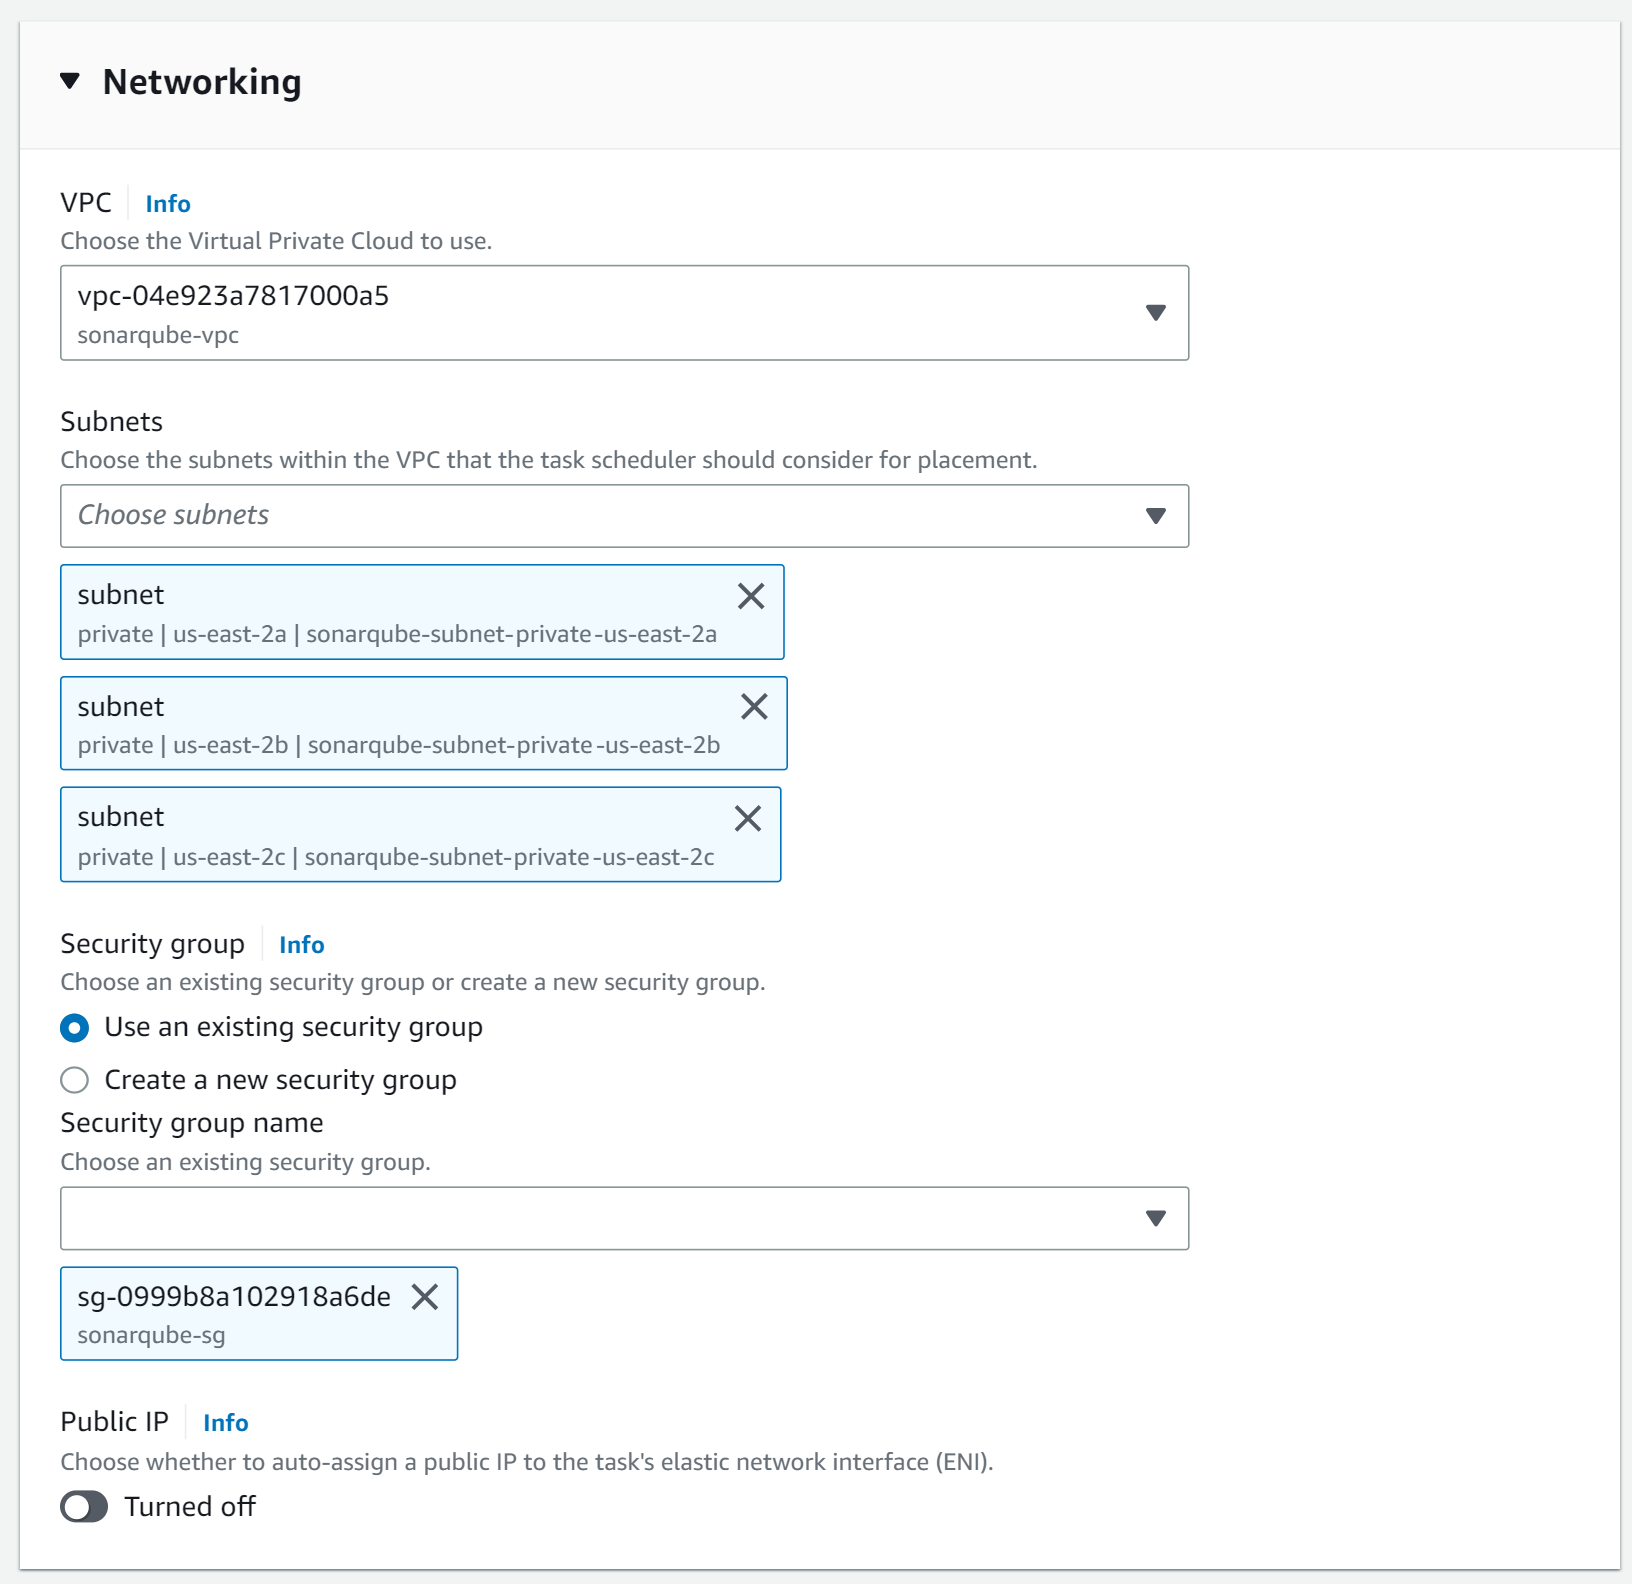
In the Networking section, you need to choose the private subnets of your SonarQube VPC. Also, deactivate to assign a public IP. This way we can ensure that the ECS tasks are running in a private subnet only.
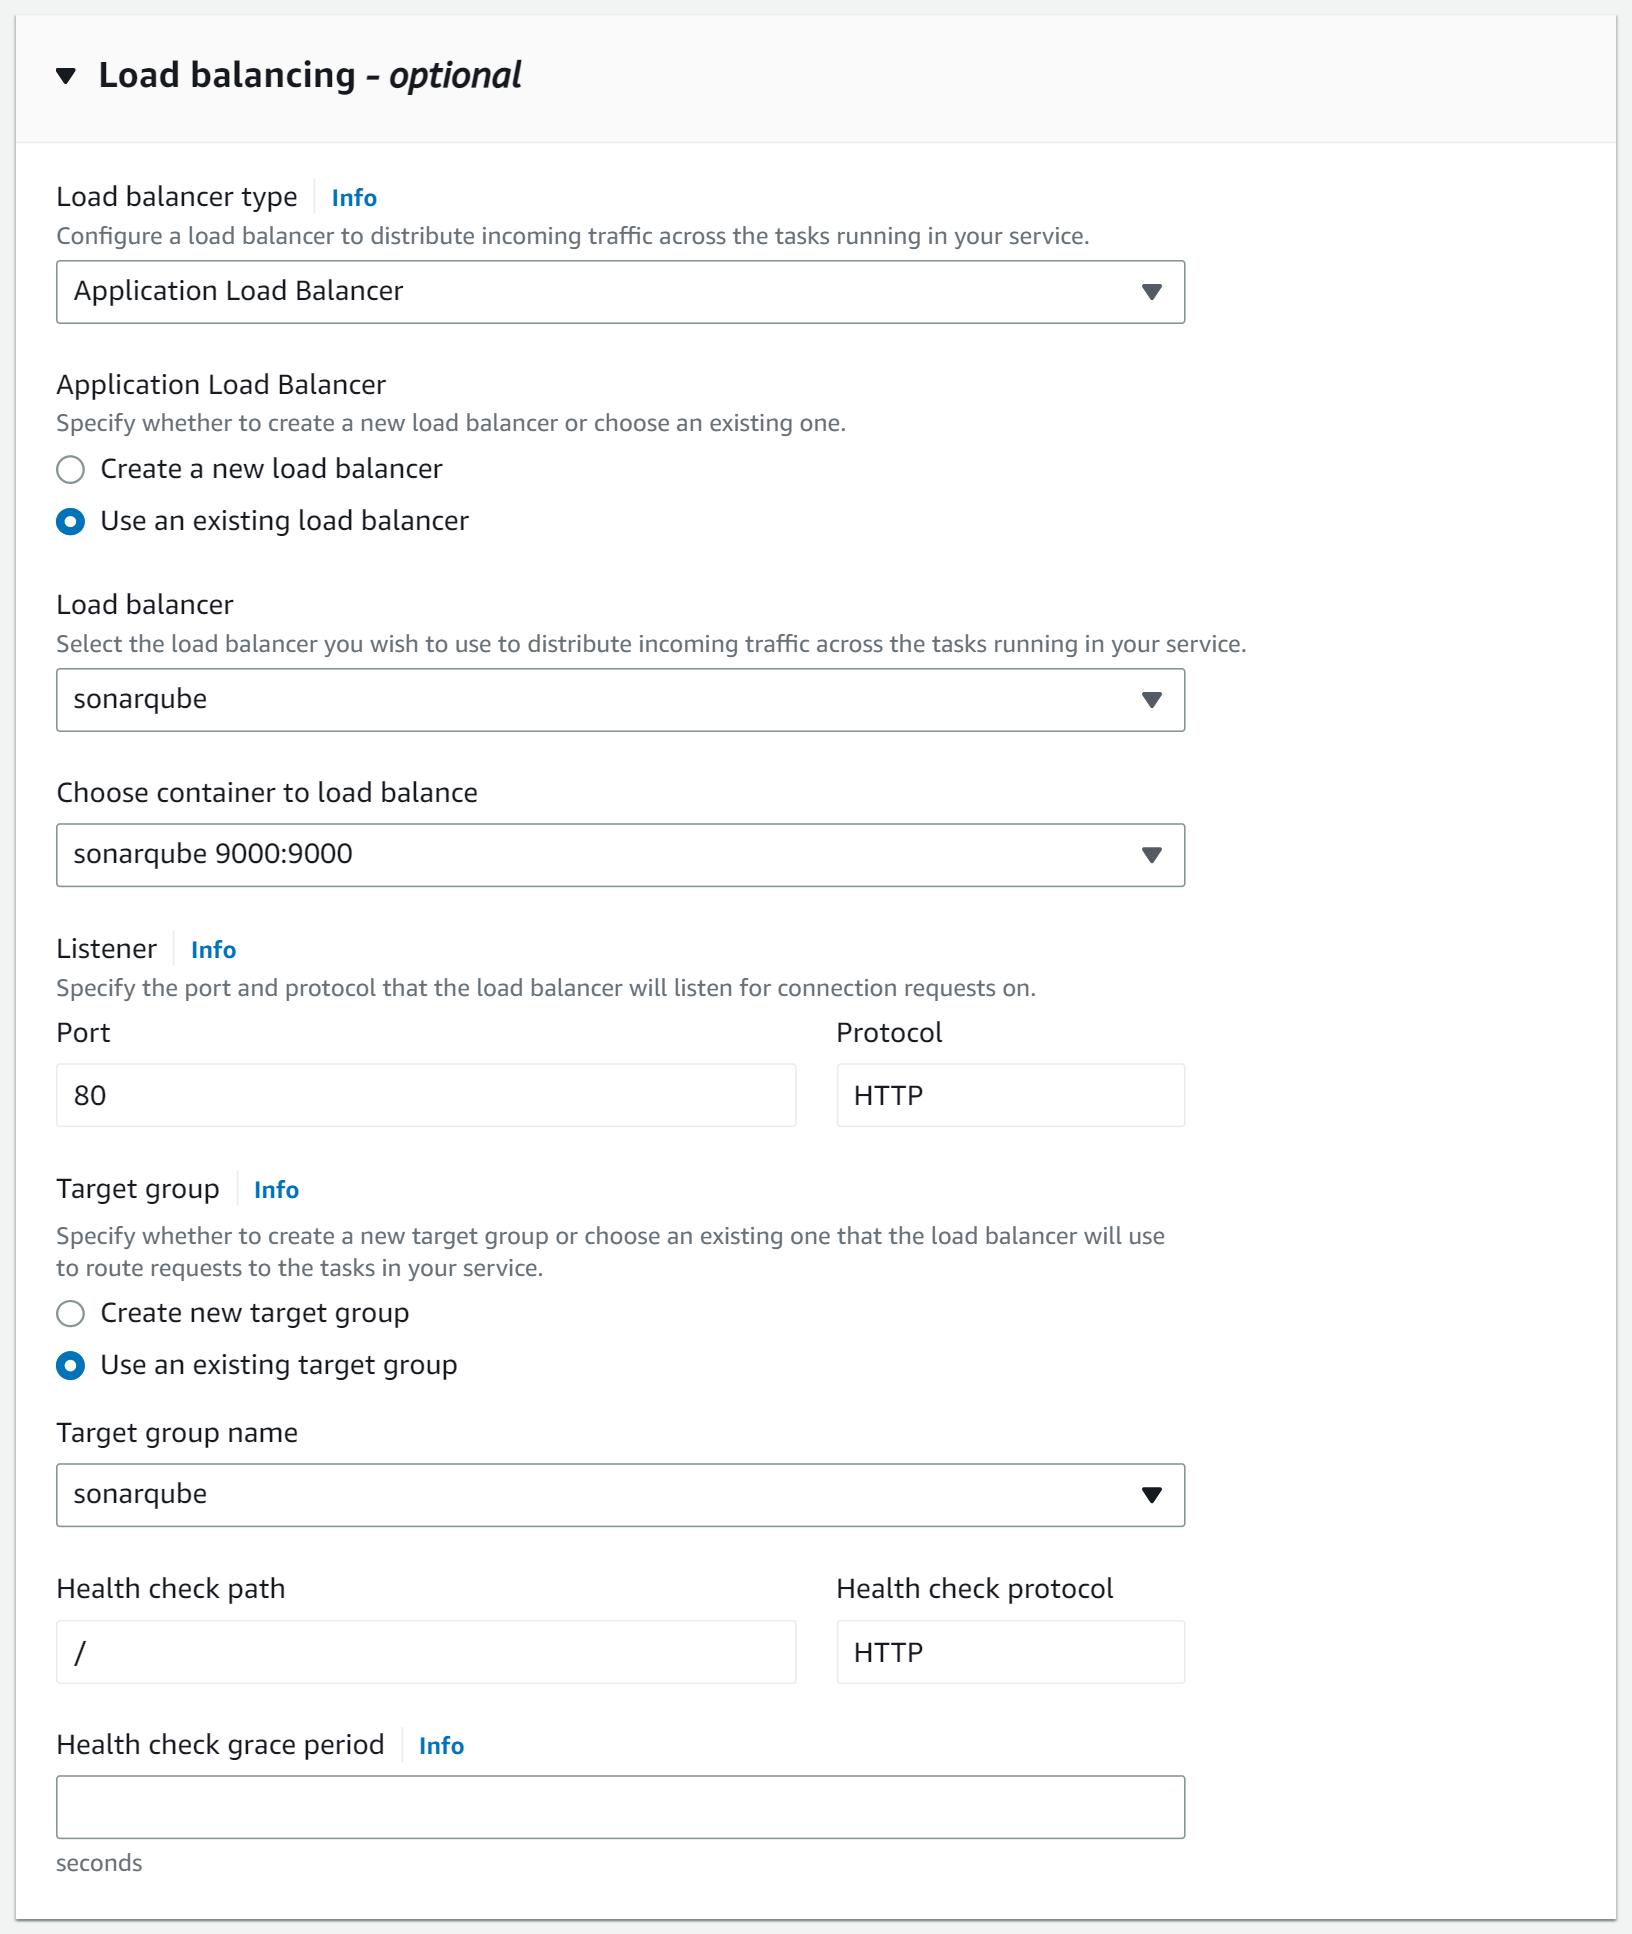
In the Load Balancing section, you need to reference the previously created ALB.
Connect to SonarQube 🔗
Now we can take the DNS name of the Application Load Balancer and connect to the SonarQube instance. 🎉




Member discussion