Introduction
Are you tired of manually pushing Docker images to Amazon Elastic Container Registry (ECR) every time you make changes to your images? It can be a tedious and time-consuming process that can slow down your development workflow. But fear not, because CodeBuild can simplify this process for you! 💪 In this ultimate how-to guide, we'll show you how to use CodeBuild to automatically build and push Docker images to ECR.
Before we dive into the technical details, let's first understand what CodeBuild and ECR are. And why they are important for your development process. 💡
Table of content
What is CodeBuild?
What is ECR?
Step 1: Create CodeCommit Repository 📂
Step 2: Set up IAM Roles and Permissions 🔐
Step 3: Create CodeBuild Project 🚧
Step 4: Run the CodeBuild build 🎉
What is CodeBuild?
CodeBuild is a fully managed continuous integration service that compiles source code, runs tests, and builds software packages that are ready to deploy. It is a powerful tool that can help you streamline your development process. It can automate repetitive tasks such as building and testing your code. Additionally, it can also build docker images. 🚀
What is ECR?
ECR is a fully-managed Docker container registry that makes it easy for developers to store, manage, and deploy Docker images. With ECR, you can store your Docker images in a secure and scalable environment. It is integrated with other AWS services such as Amazon Elastic Kubernetes Service (EKS) and Amazon Elastic Container Service (ECS). 📦
Now that we understand what CodeBuild and ECR are, let's dive into the technical details of how to use CodeBuild to push Docker images to ECR.
Step 1: Create CodeCommit Repository 📂
The first step is to set up a CodeCommit repository. To do that you need to navigate to the CodeCommit service and choose create repository. Afterward, we need to create a single file buildspec.yml. This file includes instructions for CodeBuild to perform.

In the buildspec.yml file, specify the commands to tag and push your Docker image to ECR. Here's an example buildspec.yml file:
version: 0.2

phases:
    install:
        commands:
             - pip3 install -q awscli --upgrade --user
             - yum -q install -y jq
    pre_build:
        commands:
            ### Login to Amazon ECR
             - echo Logging in to Amazon ECR...
             - aws ecr get-login-password --region $AWS_DEFAULT_REGION | docker login --username AWS --password-stdin $AWS_ACCOUNT_ID.dkr.ecr.$AWS_DEFAULT_REGION.amazonaws.com
            ### Pulling the image
             - echo Pulling latest image from Docker Hub
             - docker pull $IMAGE_REPO_NAME:$IMAGE_TAG
            ### Creating the ECR repository
             - aws ecr describe-repositories --repository-names ${IMAGE_REPO_NAME} || aws ecr create-repository --repository-name ${IMAGE_REPO_NAME}
    build:
        commands:
            ### Building the image
             - echo Build started on `date`
             - docker tag $IMAGE_REPO_NAME:$IMAGE_TAG $AWS_ACCOUNT_ID.dkr.ecr.$AWS_DEFAULT_REGION.amazonaws.com/$IMAGE_REPO_NAME:$IMAGE_TAG
             - echo Build completed on `date`
    post_build:
        commands:
            ### Publish the docker image to ECR
            - echo Pushing the Docker image...
            - docker push $AWS_ACCOUNT_ID.dkr.ecr.$AWS_DEFAULT_REGION.amazonaws.com/$IMAGE_REPO_NAME:$IMAGE_TAG
In our case, we take an image from Docker Hub and push it to our private ECR to be used in different deployments. This way we don't need to always make a connection to Docker Hub for each image we want to pull.
Note: As we set up this workflow, it’s worth noting that CodeCommit is set to be deprecated in the near future. While CodeCommit is still available, you may want to consider alternative source control solutions like GitHub or Bitbucket for a more future-proof setup. Alternatively, you can use the built-in editor within CodeBuild to edit your pipeline and manage code directly.

Step 2: Set up IAM Roles and Permissions 🔐
To allow CodeBuild to push Docker images to ECR, we need to set up IAM roles and permissions.
First, create an IAM role for CodeBuild with the following permissions:
- ECR permissions to push Docker images to your repository. You can choose the aws-managed
AmazonEC2ContainerRegistryPowerUserrole - CloudWatch Logs permissions to write build logs to CloudWatch Logs. If you activate CloudWatch during the setup, the appropriate policies will be added automatically
Step 3: Create CodeBuild Project 🚧
The next step is to create a CodeBuild project that will push your Docker images to ECR.
To create a CodeBuild project, navigate to the CodeBuild service, and click on "Create build project".
Give your project a name and description, and select the source code location as the newly created AWS CodeCommit repository.
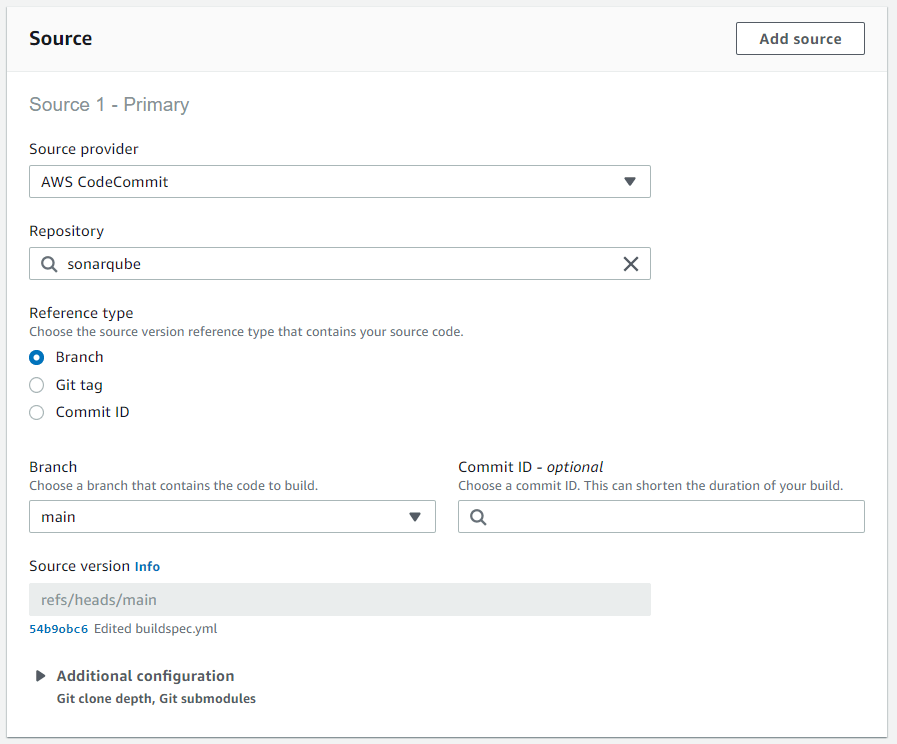
Under the "Environment" section, select the following settings:
- Managed image: Amazon Linux 2
- Privileged: Active
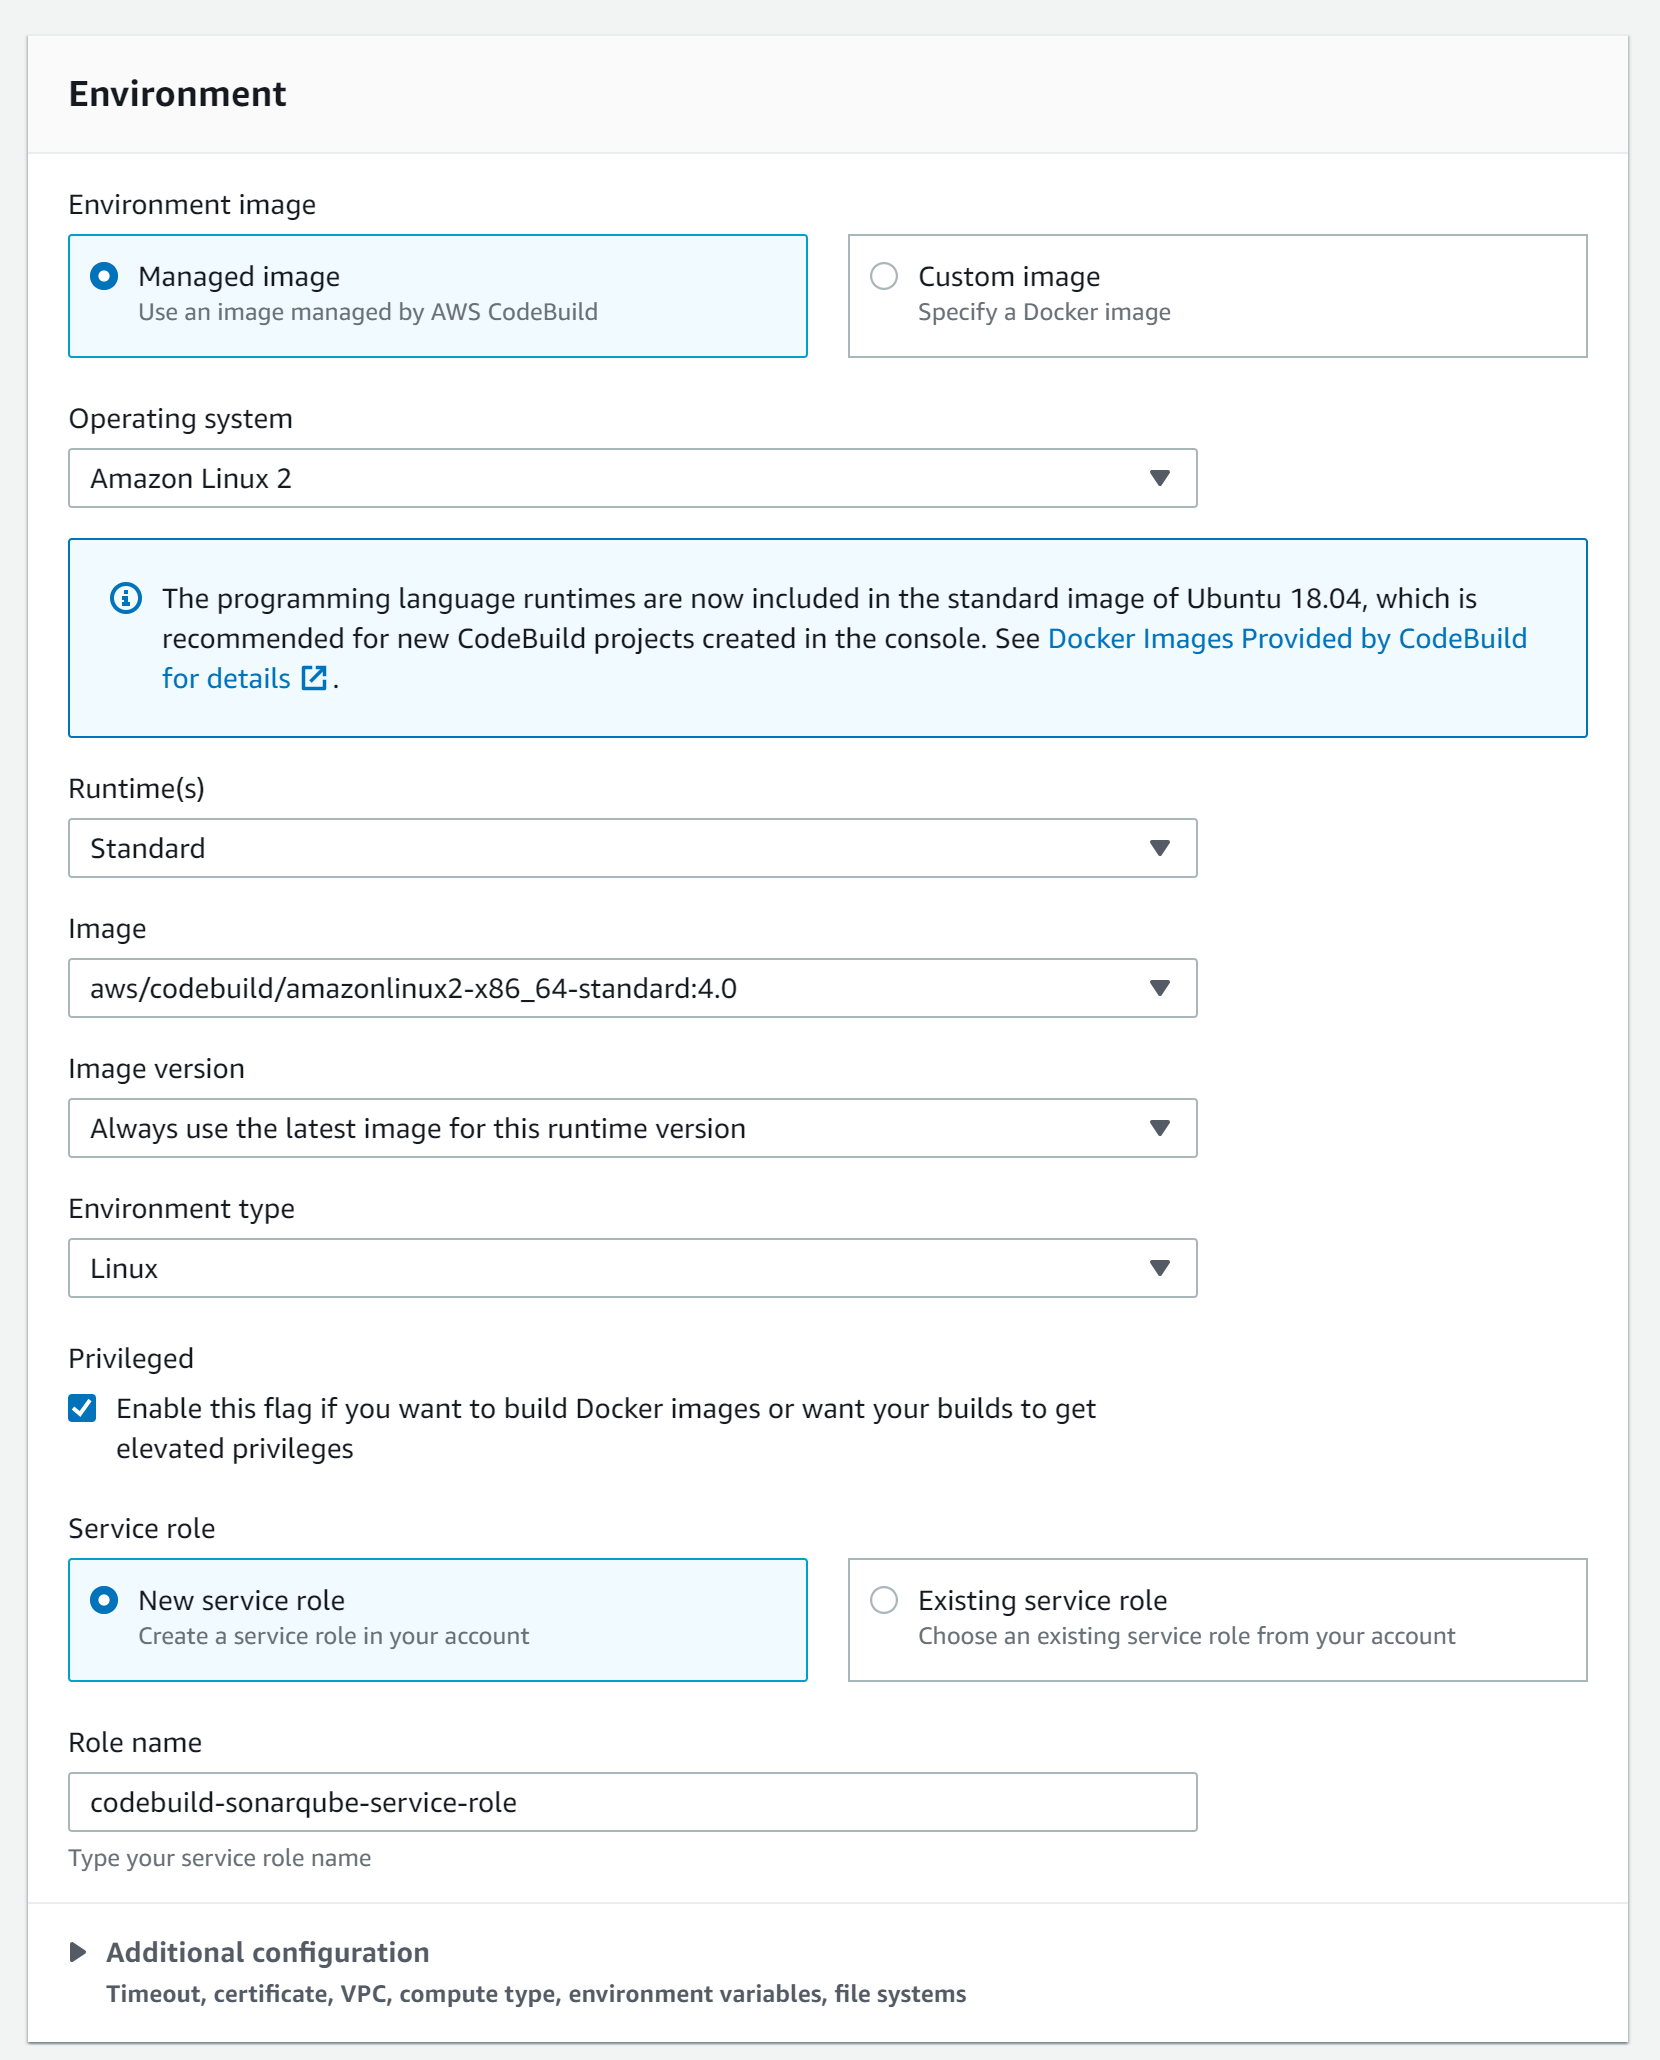
Next, open the additional configuration of the environment section. We need to set the environment variables here. The IMAGE_REPO_NAME will be the image that is pulled from Docker Hub. Change it based on the images you require. The buildspec file will also create a new ECR repository based on the image name.


Join our community of cloud security professionals. 🔐
Subscribe to our newsletterStep 4: Run the CodeBuild build 🎉
Now we can start the build. We need to wait about a minute until we see the success message:




Member discussion