


Introduction
Have you ever wondered how to scale your Google Cloud Platform (GCP) network while keeping it secure and efficient? If so, you're in the right place! In this blog post, we're going to explore the fascinating world of the GCP Hub and Spoke architecture and how it can take your network to the next level. We'll guide you through the process step by step, explaining the key concepts and benefits along the way. So, let's dive in and transform your GCP network into a well-oiled, scalable machine! 🛡️
🌐 The Hub and Spoke Architecture Unveiled
🌟 The Hub: The Center of the Universe
In the networking world, the "Hub" is like the sun in our solar system. It's at the center, radiating control and authority to every other network component. The Hub is where all the major network services and resources are centralized, making it the central point for managing your GCP network. This hub and spoke model simplifies network management by consolidating key components and controls in one location.
Why is this important? Well, by concentrating essential network services in the Hub, you gain a single point of control, which not only streamlines management but also enhances security. You can enforce consistent security policies and ensure that data traffic flows through a controlled and secure path. This not only simplifies network security but also allows for easy monitoring and auditing of network activities. 🔒
💫 The Spokes: Connecting the Dots
Now that we've got our Hub, let's talk about the "Spokes." Spokes are like the planets orbiting the sun – where the action happens. In GCP, the spokes represent the various projects including workloads, services, and applications that need network connectivity. Each spoke connects to the Hub to access shared resources, such as VPNs, firewalls, and more.
The flexibility of the spokes is a key benefit of the hub and spoke architecture. You can have multiple spokes, each tailored to specific needs or regions, making it an ideal solution for businesses with diverse workloads or global operations. Spokes can be quickly added or removed, allowing your network to adapt to the changing needs of your organization, whether you're expanding into new regions or need to support different application stacks.
However, like many things in life, there's a flip side to consider. Managing such a network structure isn't without its challenges. It demands meticulous planning and comprehensive architecture diagrams to ensure smooth and secure operation. 💼
📐 Designing Your Hub and Spoke Architecture
To get started with the hub and spoke architecture, you'll need to design your central hub carefully. Create a Virtual Private Cloud (VPC) to serve as the hub. This is where all your core resources will be hosted. I recommend hosting this VPC in a separate project within your organization. I have created a project called hub-network:
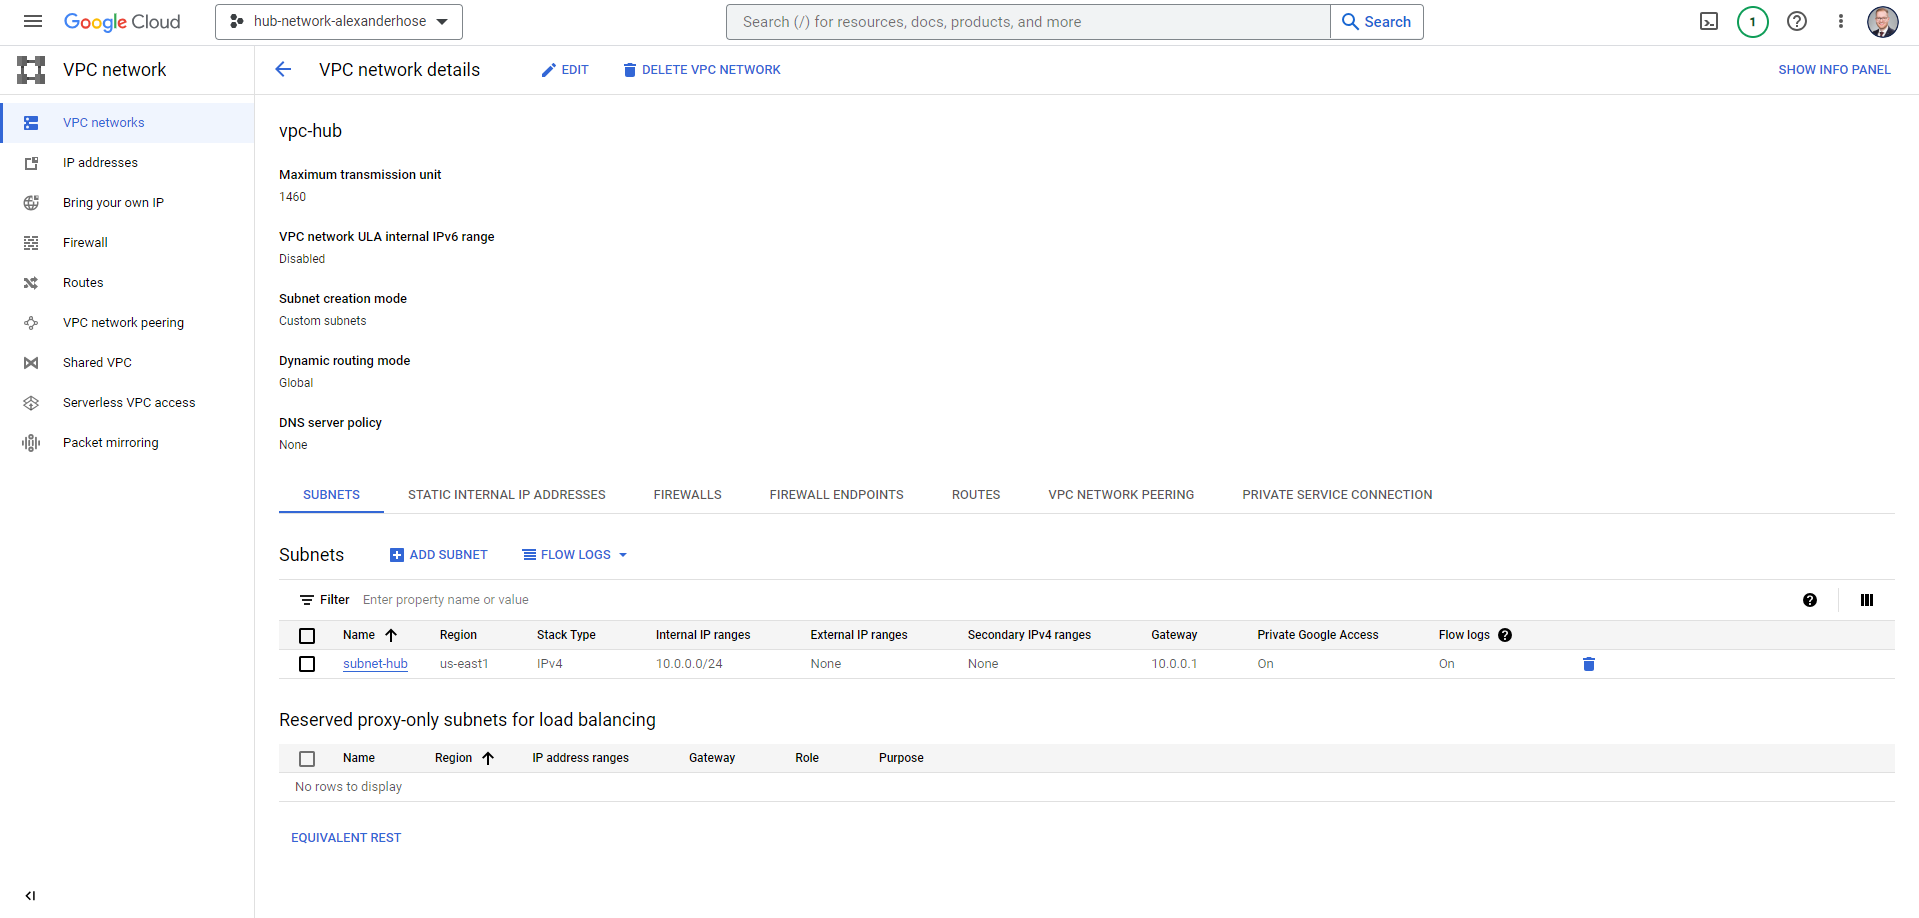
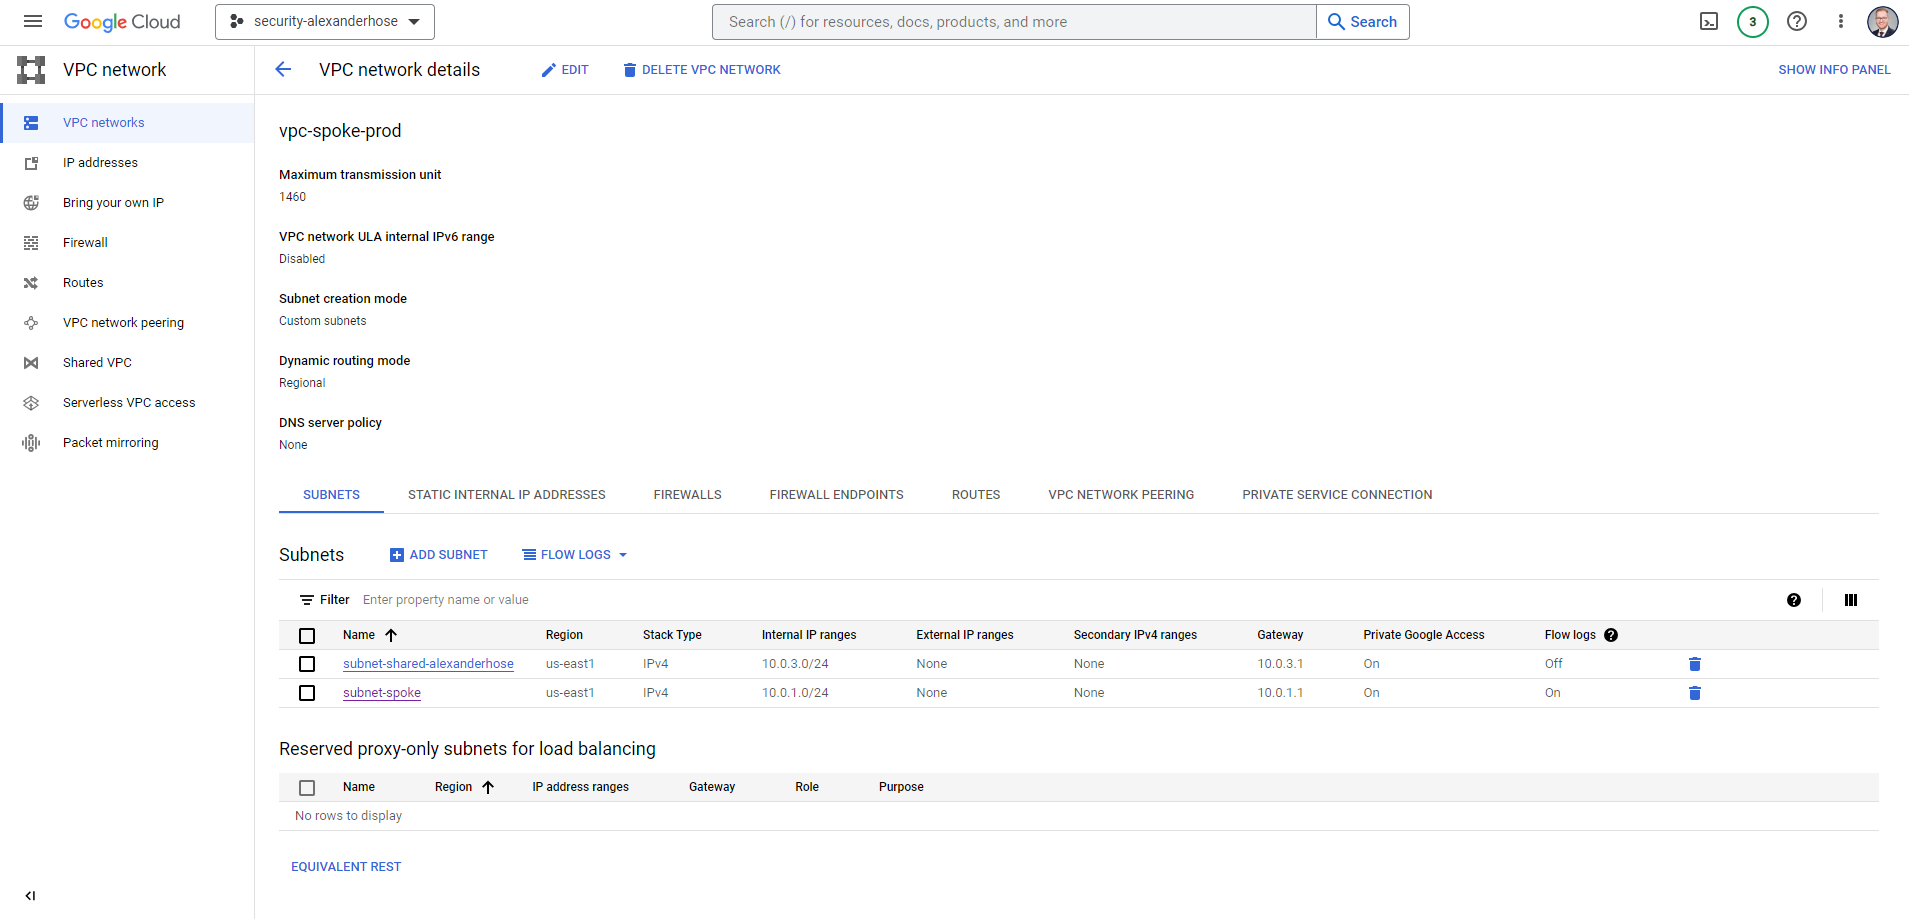
With the hub in place, it's time to add the spokes. Spokes are specialized VPCs that serve different purposes in your network. For example, you might have separate spokes for development, testing, and production environments.
Let's create a new VPC in a separate project. The subnets that we create for the VPC could be later shared with the different development projects I have in my organization.
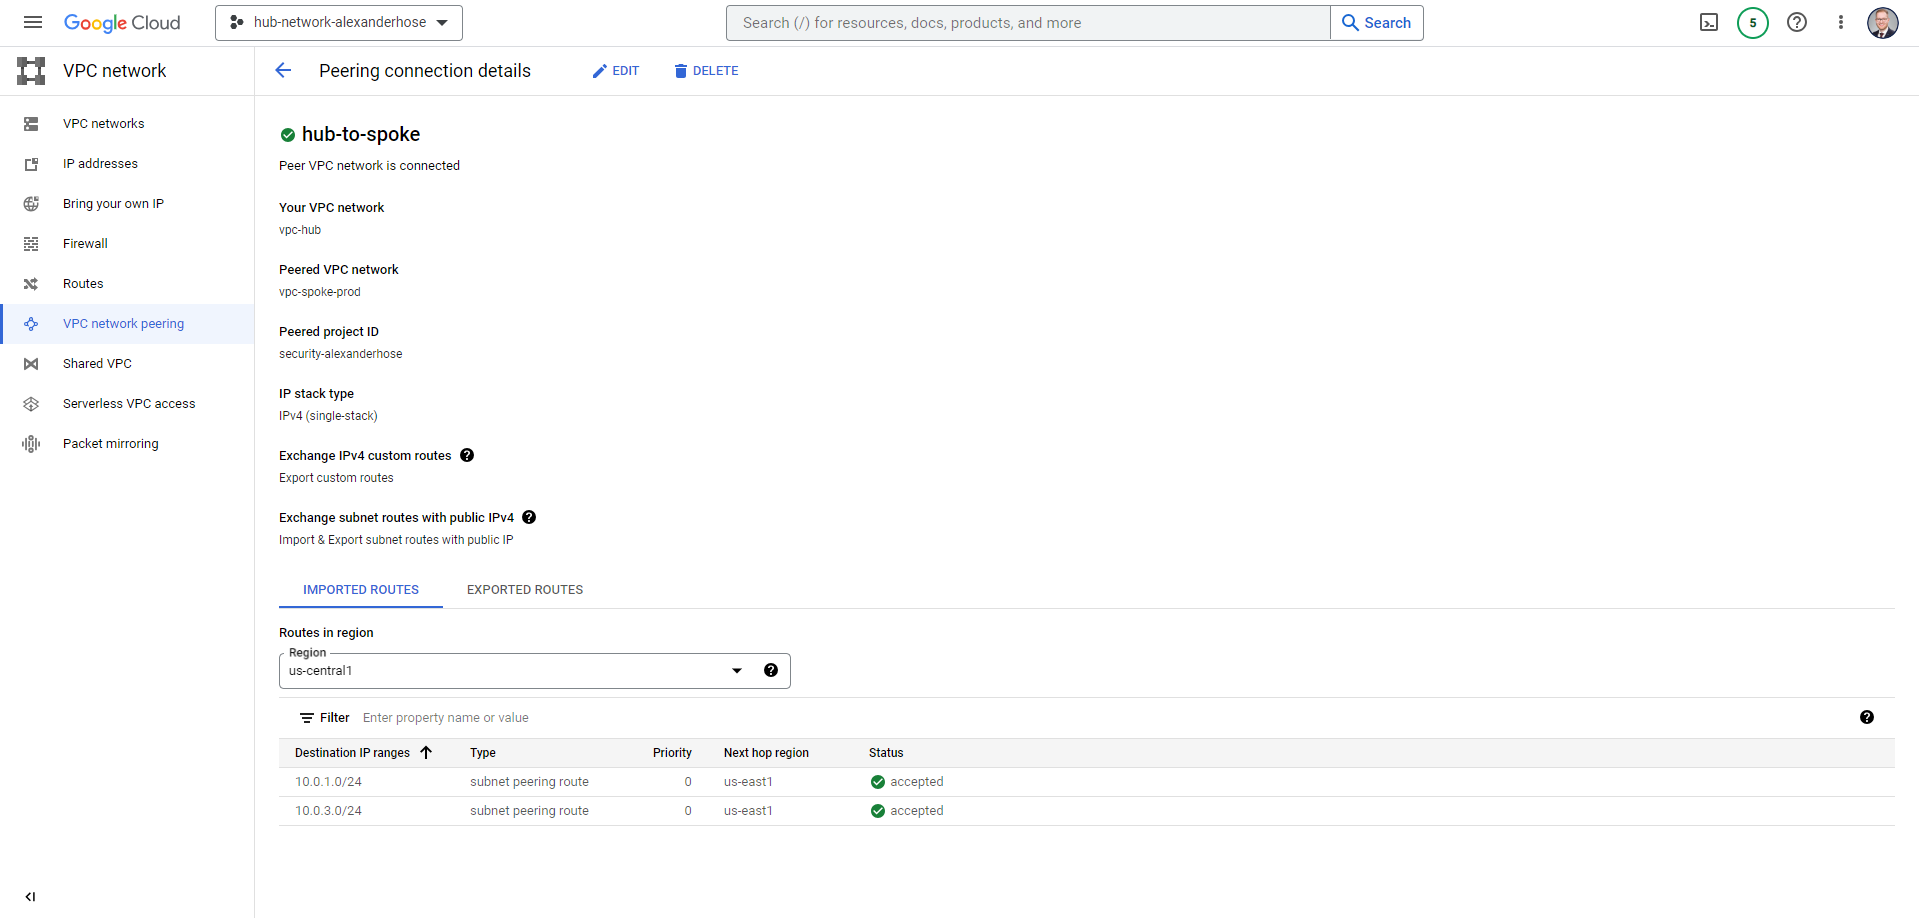
Now we have created the hub and the spoke - are we done? Almost - we now need to connect both networks with each other. Here we can utilize the VPC peering capabilities. In our hub network, we create a peering connection. It is essential to activate Export custom routes and Import & Export subnet routes with public IP.
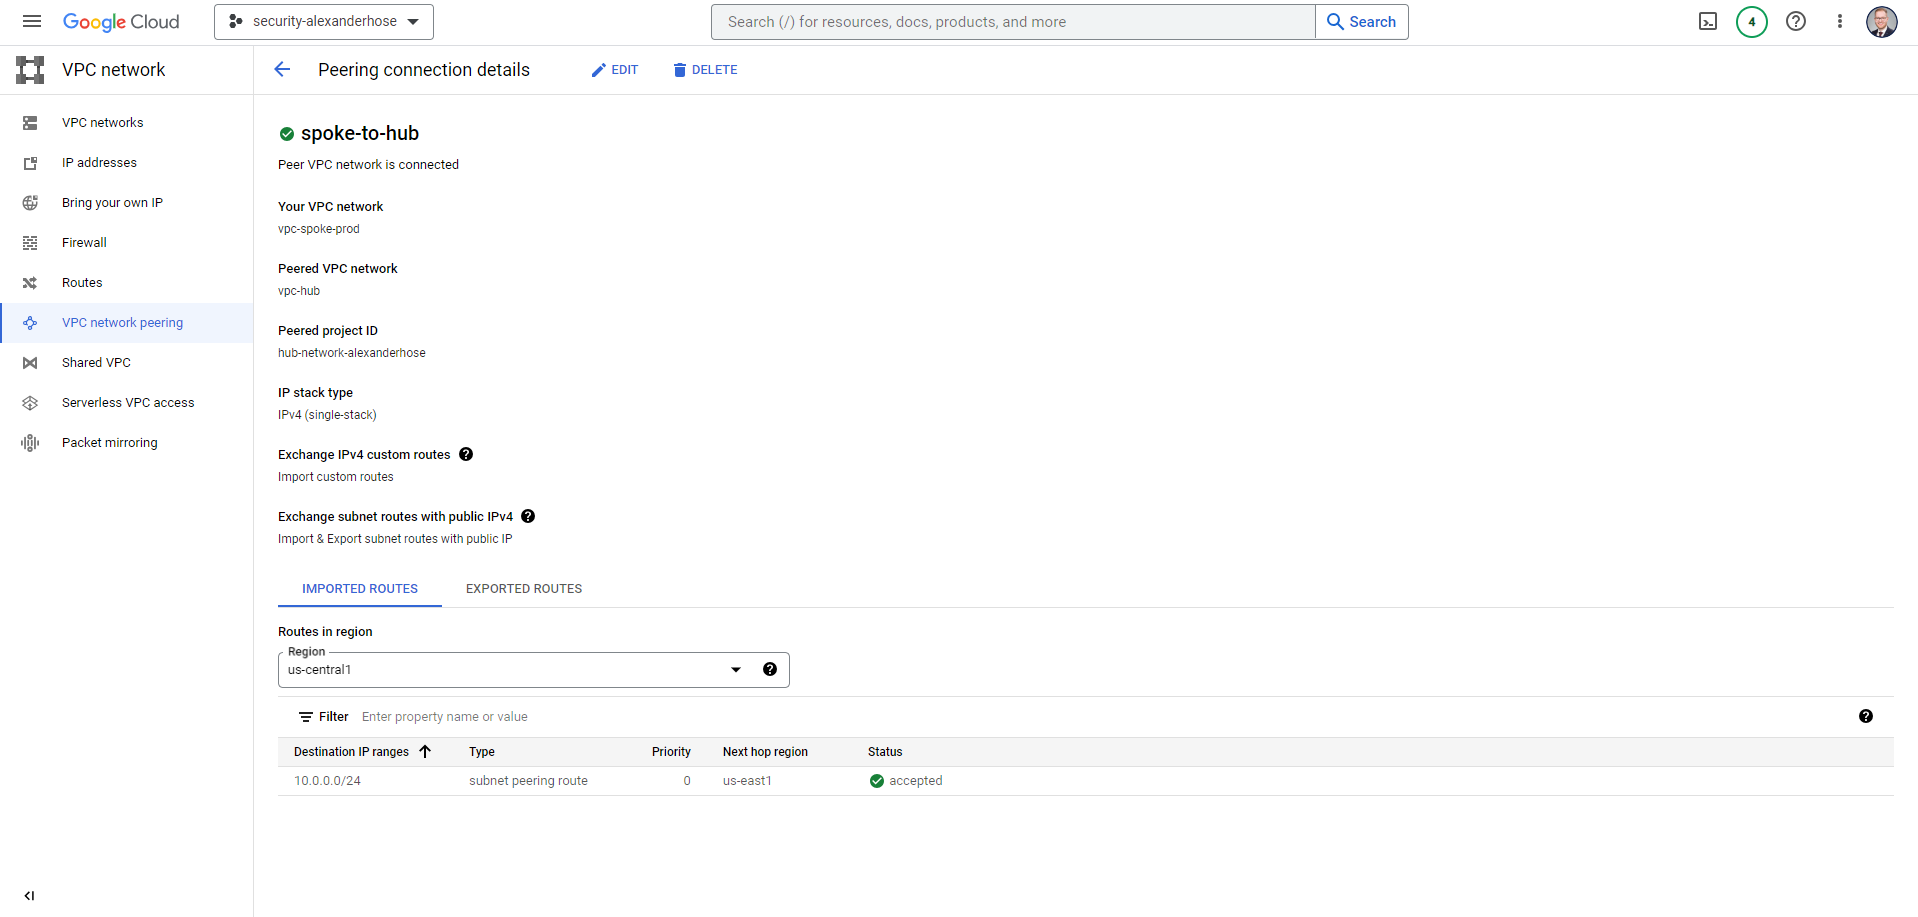
Now we have changed to the spoke project again. Here we need to accept the peering connection and configure Import custom routes and Import & Export subnet routes with public IP.

Join our community of cloud security professionals. 🔐
Subscribe to our newsletter🌍 Add centralized internet access via the hub network
One of the key advantages of using a hub-and-spoke architecture in GCP is the ability to centralize network management and security. In this section, we will explore how to implement centralized internet access via the hub network using a Squid proxy server. This solution can help you control and secure outbound traffic while maintaining the flexibility and scalability offered by the hub and spoke network model.
The first step is to delete all default internet gateway routes in our spoke networks. This should be automated when we provision new projects. We don't want to have any workload exposed to the internet directly.
For easier management and scalability, we create an instance group for the Squid proxy. Make sure to customize Squid's settings to meet your organization's requirements, including access controls, content filtering, and caching policies.

To create an instance group, we need to create an instance template first. We will choose Debian as the base image and add a small shell script that will be run once a new instance is spun up:
#!/bin/bash
apt-get update && apt-get install -y squid
echo "http_access allow localnet" >> /etc/squid/squid.conf
systemctl restart squid
The script will install the squid proxy and then add the localnet to the allowed list of connections. Otherwise, you have all the freedom to configure the machine to your liking. Make sure you add a network tag like squid-proxy so we can allow certain ports via firewall rules in the next step.
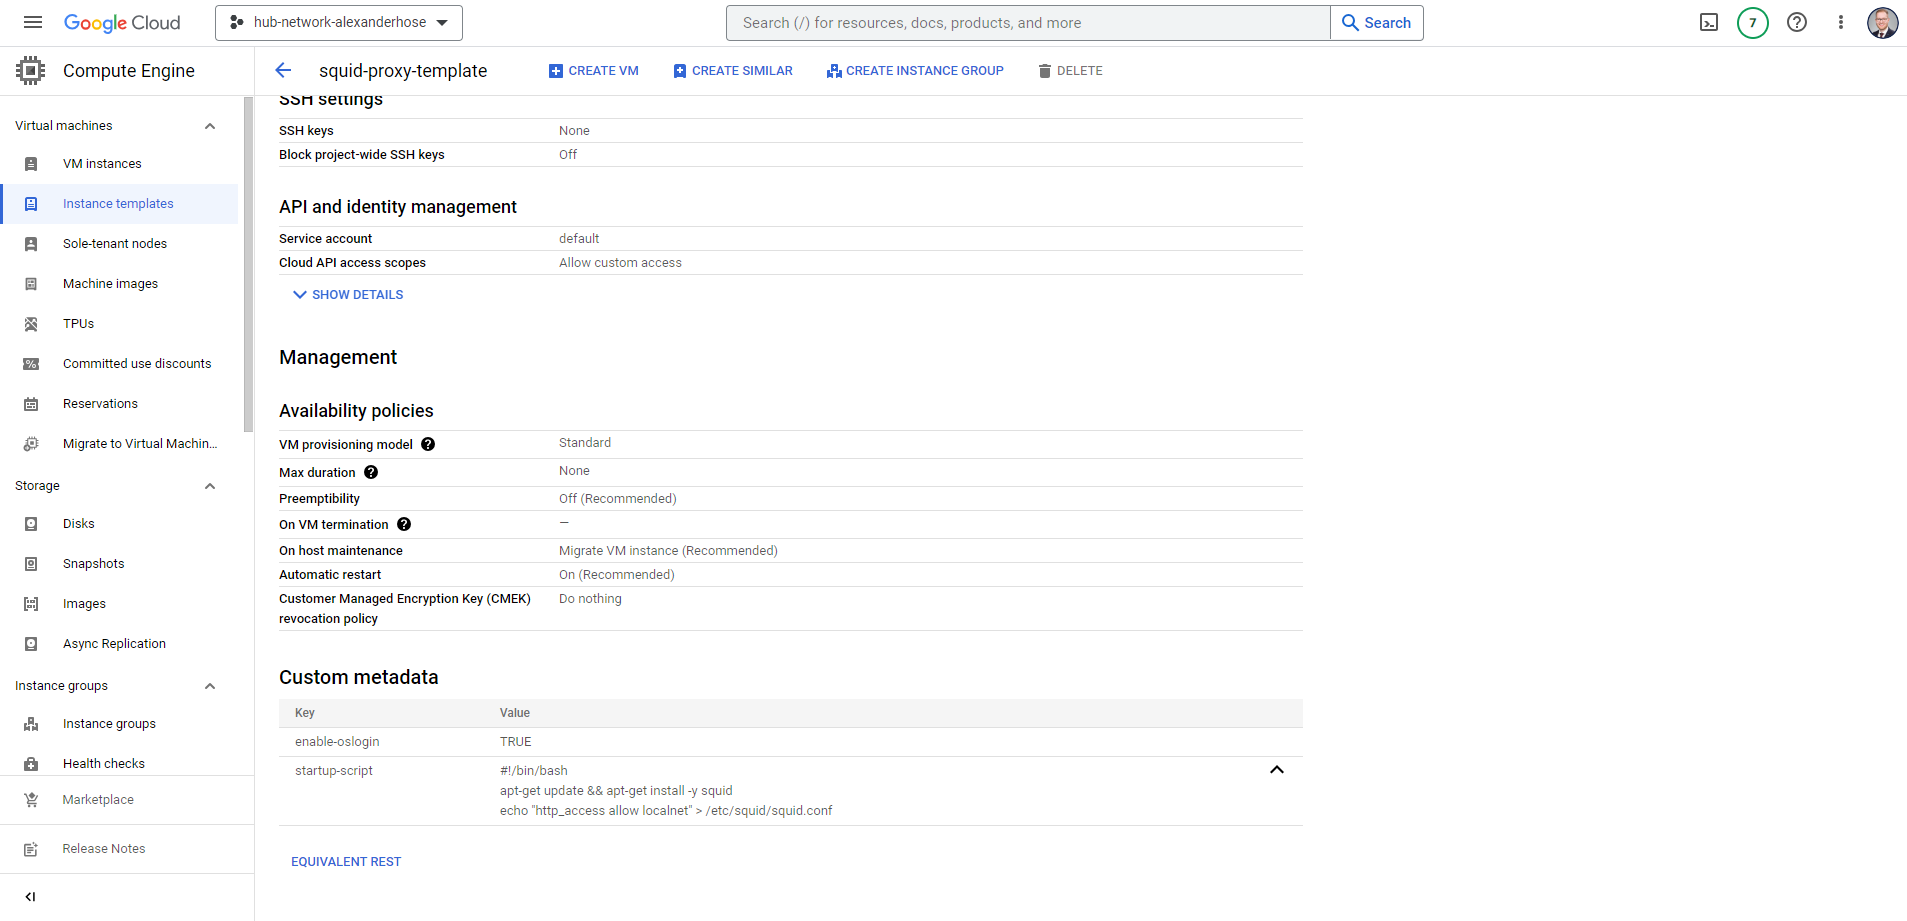
Update the firewall rules within your hub network to allow access to your squid server from workloads and Google health checks. I recommend creating three firewall rules for our squid server:

The two IP ranges 35.191.0.0/16 and 130.211.0.0/22 are from Google and are required for the health checks we will create later. The other one is for all internal traffic to the Squid proxy port. The standard port of Squid is 3128.
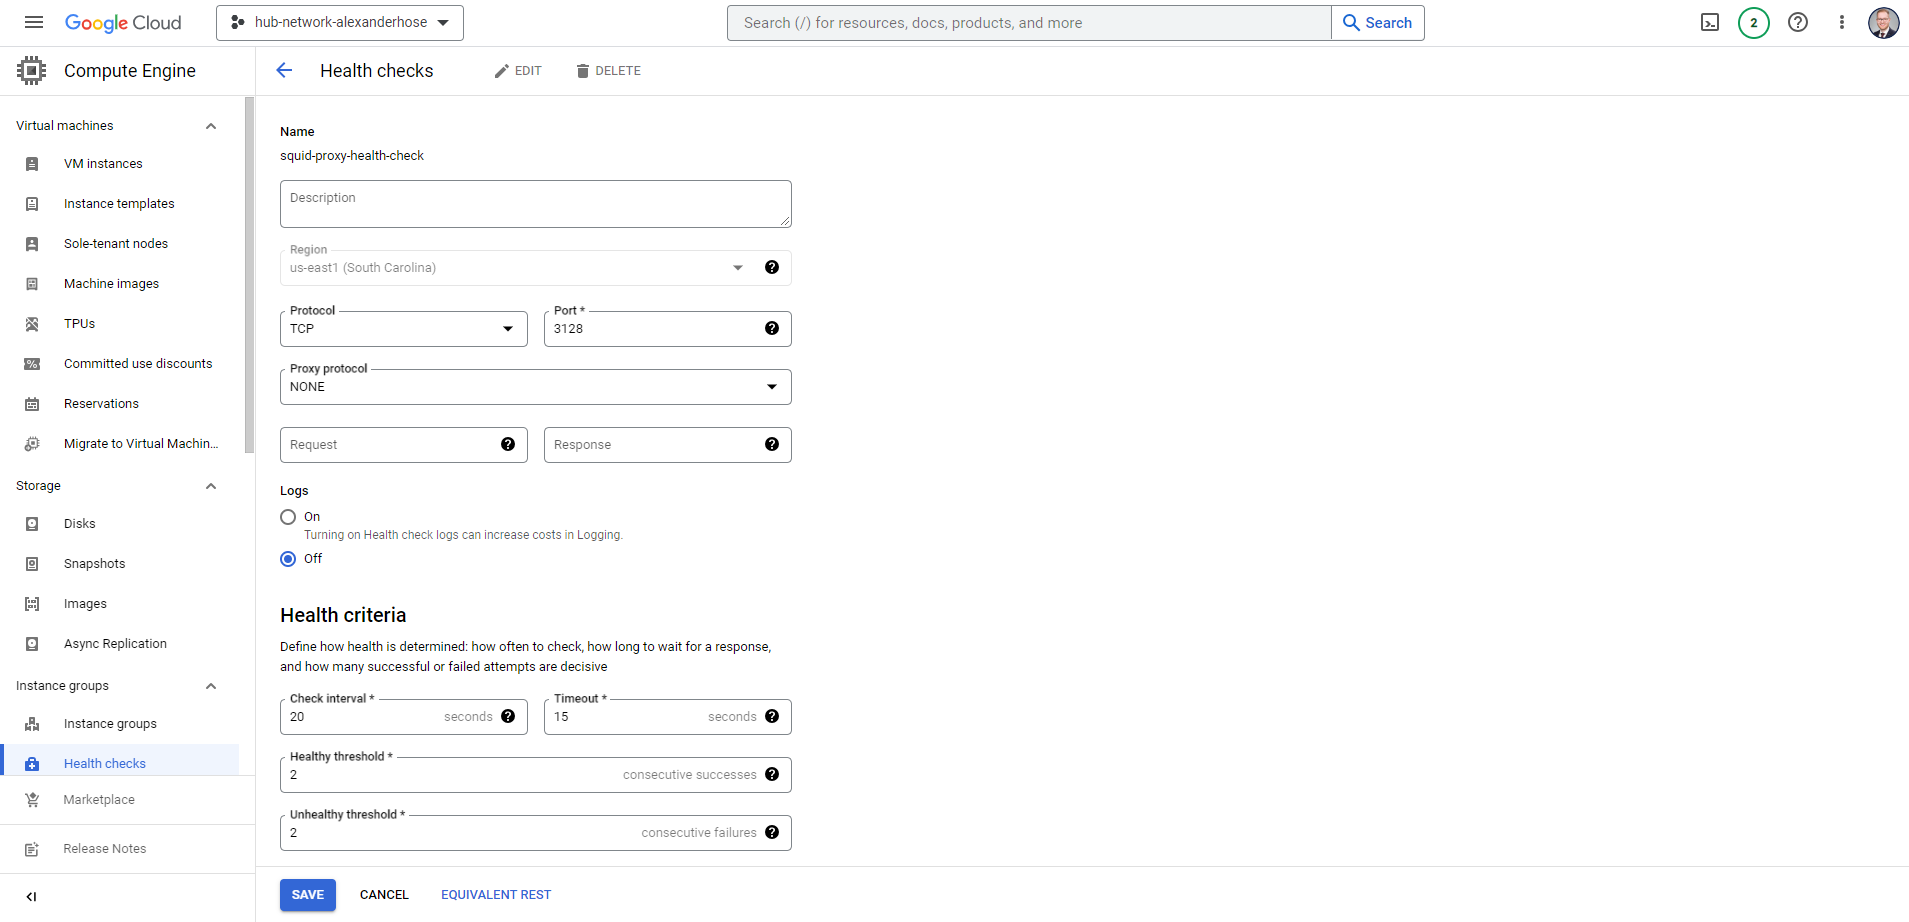
Next, we need to create the health check rules. For the port, we need to choose 3128 and adjust the timeouts to your liking. You only need to make sure it is a regional health check rule.
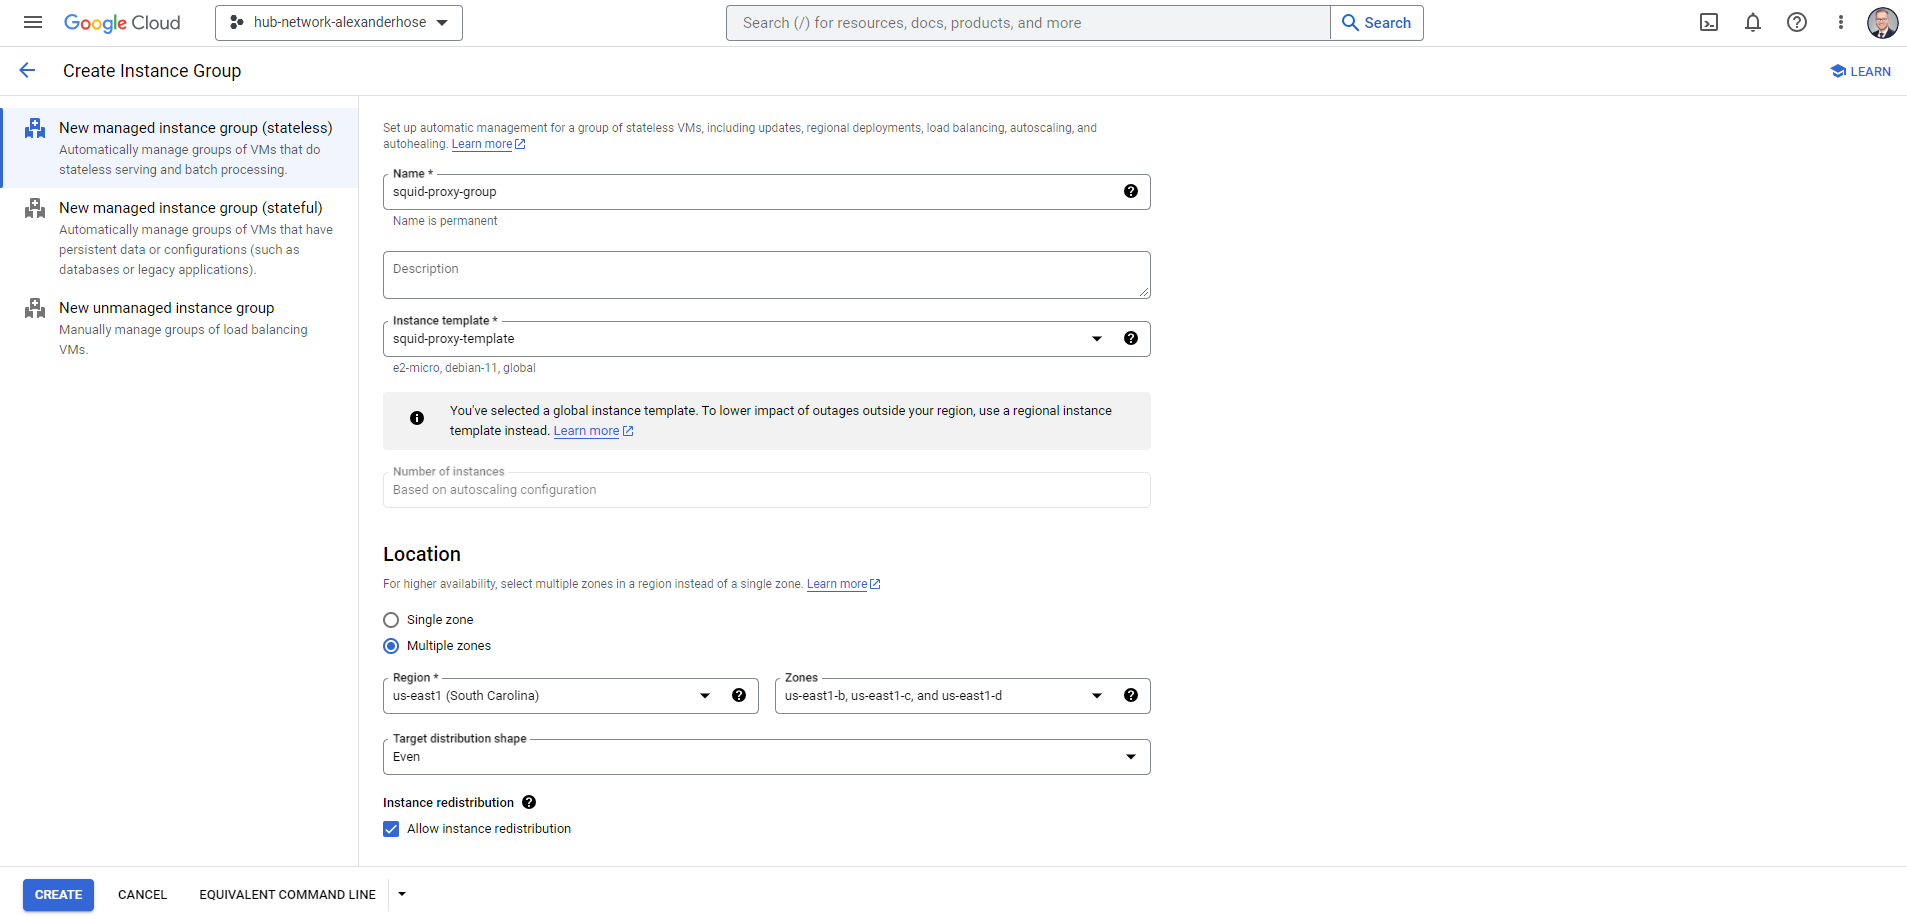
Finally, we are done with the prerequisite and can create the instance group. Choose the instance template and health check we created. After creating the instance group, the instances will automatically appear in your VM instances overview. The instance group will always dynamically scale based on your requirements.
In scenarios where application owners from different spoke networks need to connect to your Squid proxy, not knowing the IP address of the individual instances can be a significant hurdle.
To address this issue and streamline the access to resources hosted within instance groups, one effective solution is to implement a Load Balancer. Load balancers act as intermediaries between client requests and the instances, distributing incoming traffic across multiple instances. This not only enhances the availability and reliability of the service but also simplifies the connection process for end-users. By doing so, a single IP address can be used to access the resources provided by the instance group.
In Google Cloud, you can streamline the creation process by leveraging the gcloud command line tool, which provides a convenient and programmatic way to set up and manage resources. Here's a step-by-step guide on how to create a new Internal Application Load Balancer (HTTP/S) using the gcloud command line tool.
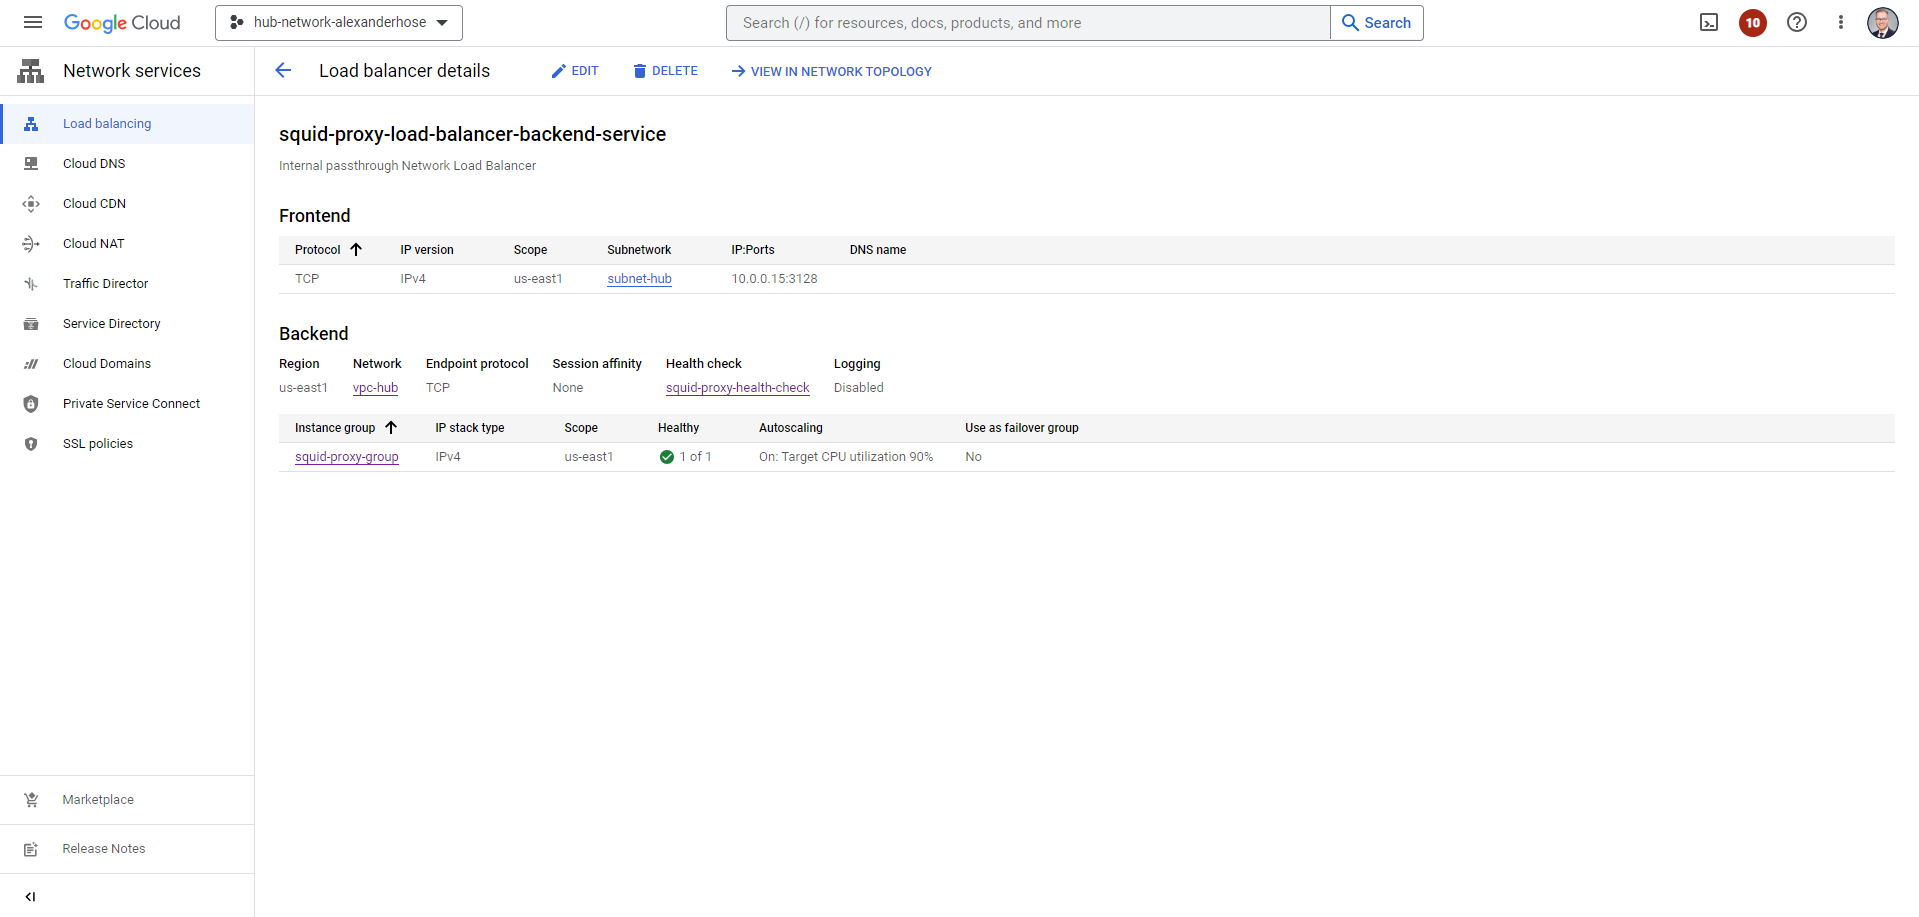
The Backend Service is the key component of your Load Balancer configuration. It defines how incoming traffic should be distributed to the instances.
gcloud compute backend-services create squid-proxy-load-balancer-backend-service \
    --project=hub-network-alexanderhose \
    --protocol=TCP \
    --region=us-east1 \
    --load-balancing-scheme=INTERNAL \
    --health-checks-region=us-east1 \
    --health-checks=squid-proxy-health-check
Next, we specify which instances should receive traffic from the Load Balancer:
gcloud compute backend-services add-backend squid-proxy-load-balancer-backend-service \
    --project=hub-network-alexanderhose \
    --region=us-east1 \
    --instance-group=squid-proxy-group
Lastly, a forwarding rule defines how incoming traffic should be directed to backend services or instances.
gcloud compute forwarding-rules create squid-proxy-load-balancer-forwarding-rule \
    --project=hub-network-alexanderhose \
    --region=us-east1 \
    --load-balancing-scheme=internal \
    --subnet=subnet-hub \
    --backend-service=squid-proxy-load-balancer-backend-service \
    --ip-protocol=TCP \
    --ports=3128
Load Balancers are essential tools for enhancing the availability and reliability of our application by simplifying access through a single IP address. In the end, we'll observe the load balancer configuration:
You can employ the load balancer's IP address as a convenient means to access any URL from the spoke network. Simply configure it as the proxy for internet requests. As an example, consider a scenario where we've launched a virtual machine within our spoke network. By using the curl command to access ifconfig.me/all. We can observe the forwarded addresses, which include both the private IP address of the machine and the IP of the proxy.
$ curl -x 10.0.0.15:3128 ifconfig.me/all
ip_addr: 34.148.3.184
remote_host: unavailable
user_agent: curl/7.74.0
port: 46204
language:
referer:
connection:
keep_alive:
method: GET
encoding:
mime: */*
charset:
via: 1.1 squid-proxy-group-gm6c (squid/4.13), 1.1 google
forwarded: 10.0.1.5, 34.148.3.184, 34.160.111.145,130.211.3.150
🏢 Connect on-premise with GCP
Now we have created our network topology and connected our spoke networks to the internet. Did we miss anything?
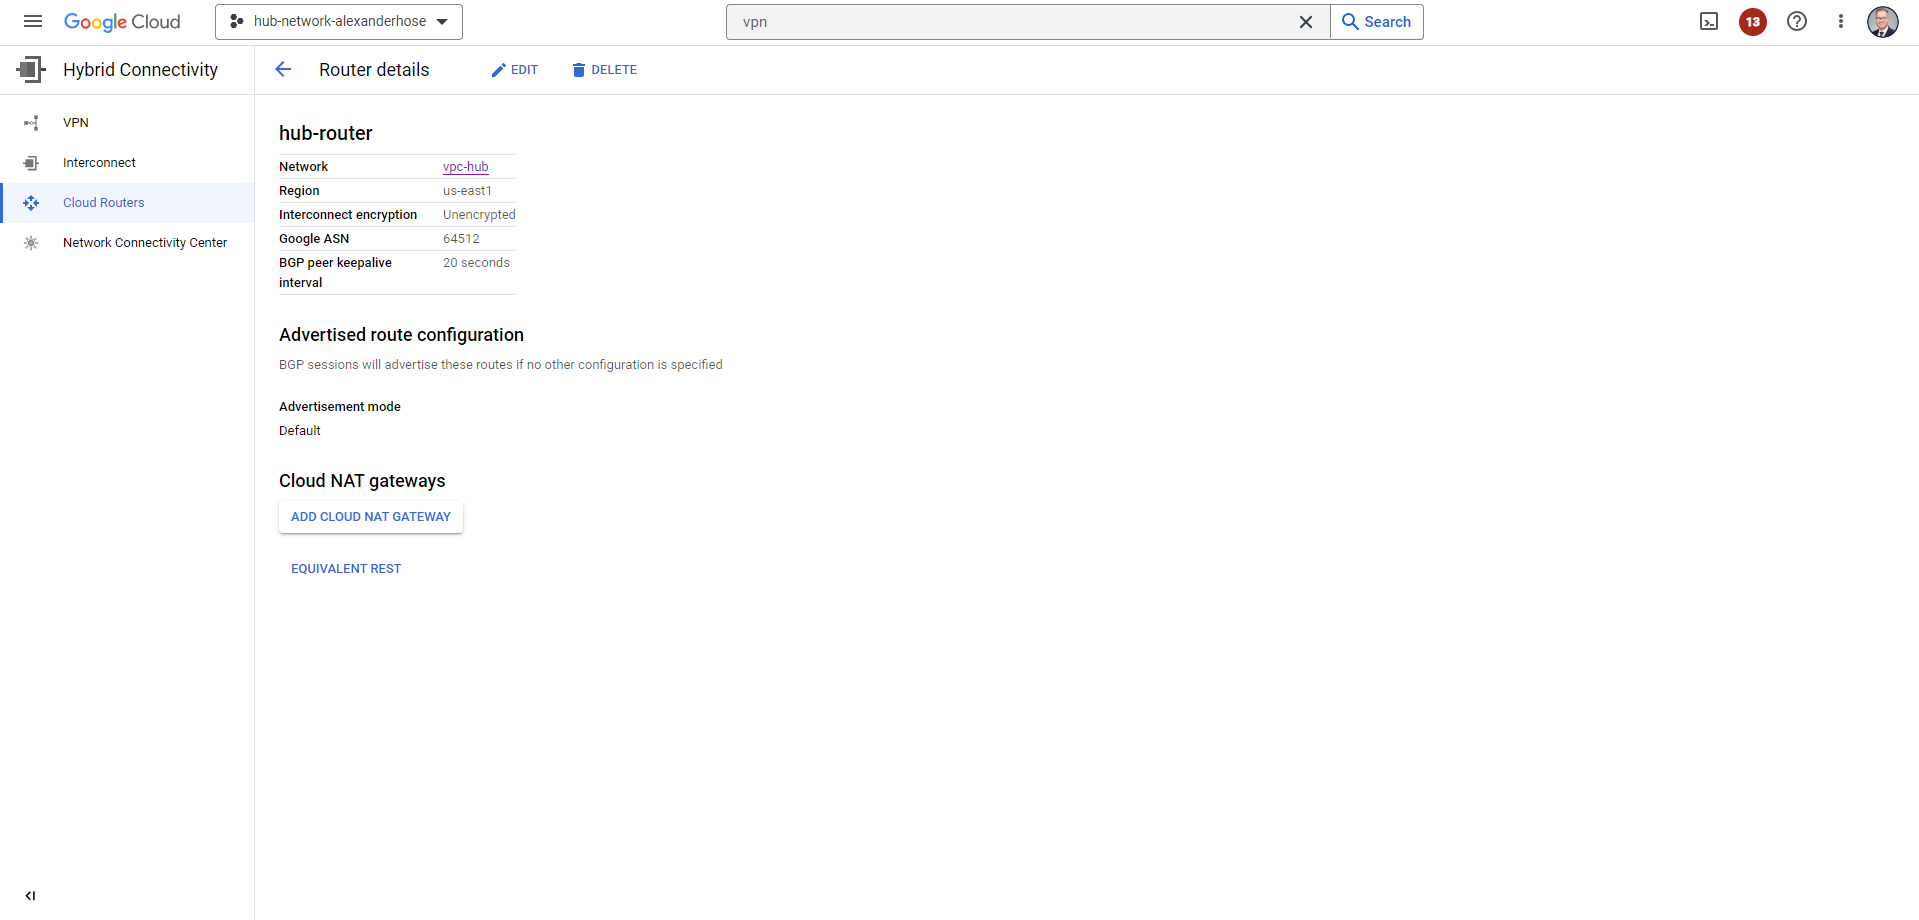
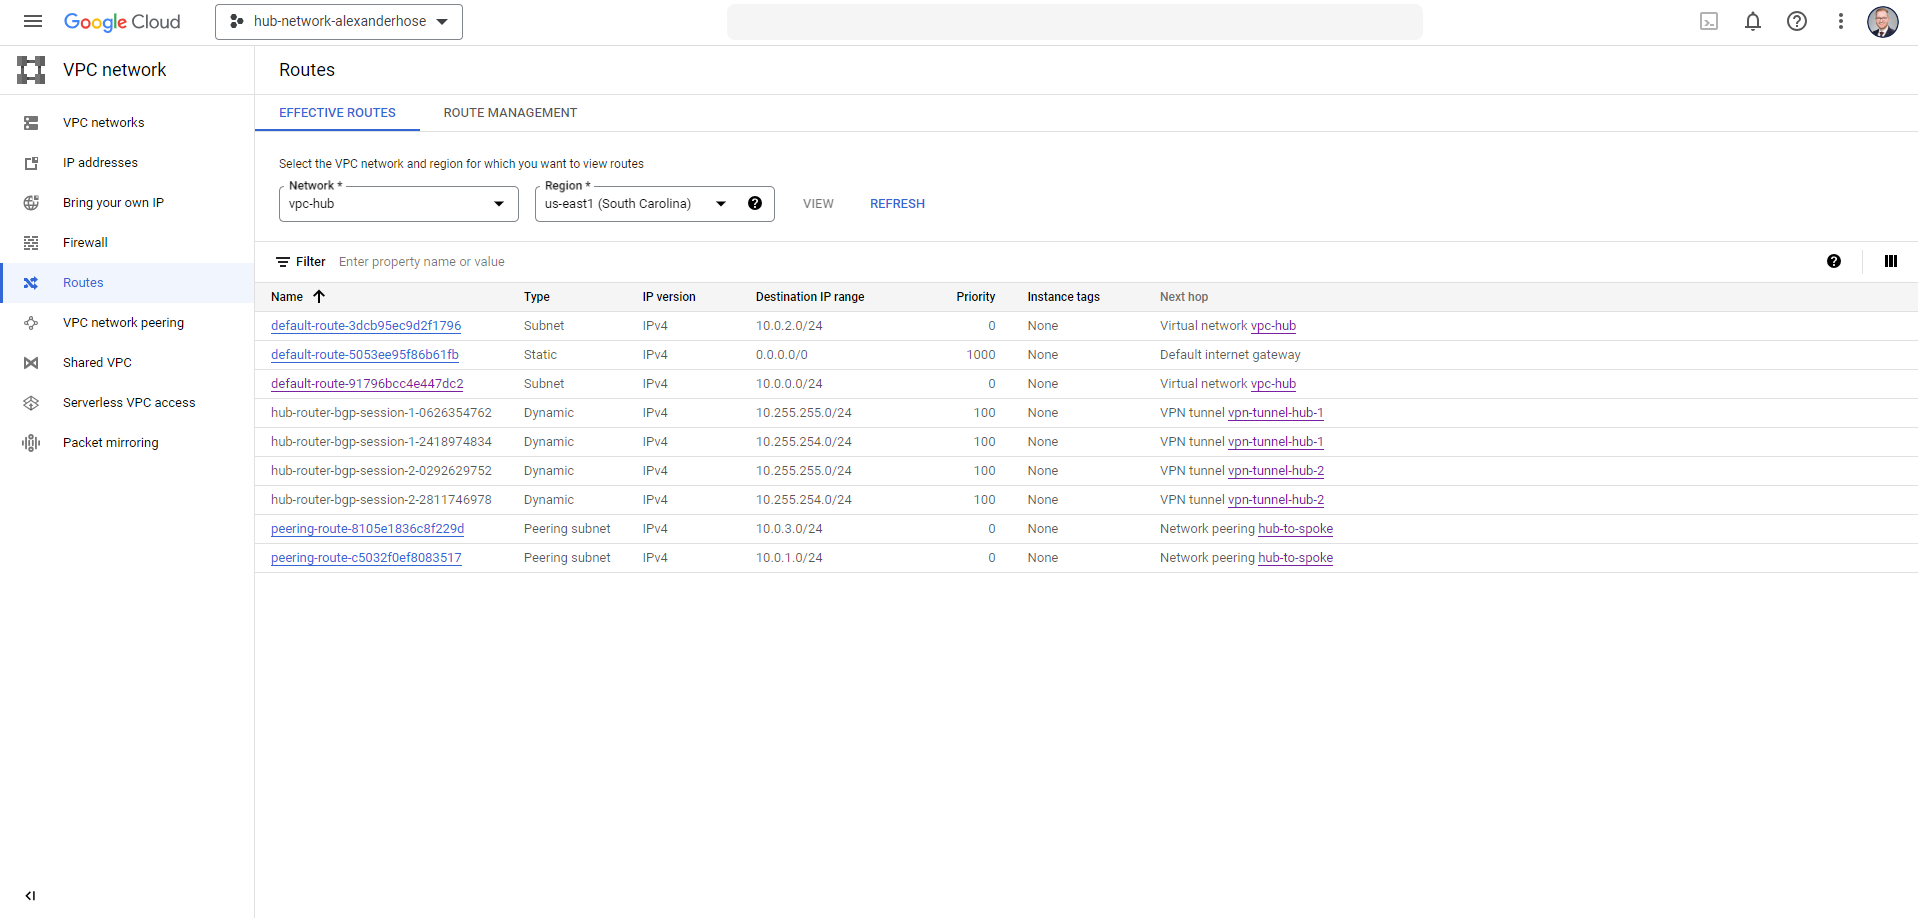
Most bigger organizations have on-premise environments that need to be connected to GCP. So let us tackle this challenge now. I have chosen the Cloud VPN Gateway service of GCP. It is highly available and scalable - the perfect solution for connecting both environments. All our traffic will flow via the hub network. We create a new cloud router first. Make sure to choose a Google ASN which is not conflict with your existing environments. The cloud router will enable us to use Border Gateway Protocol (BGP). It is a protocol used to exchange routing and reachability information between autonomous systems. This way all new subnets and routes will be automatically announced to on-premise and GCP.
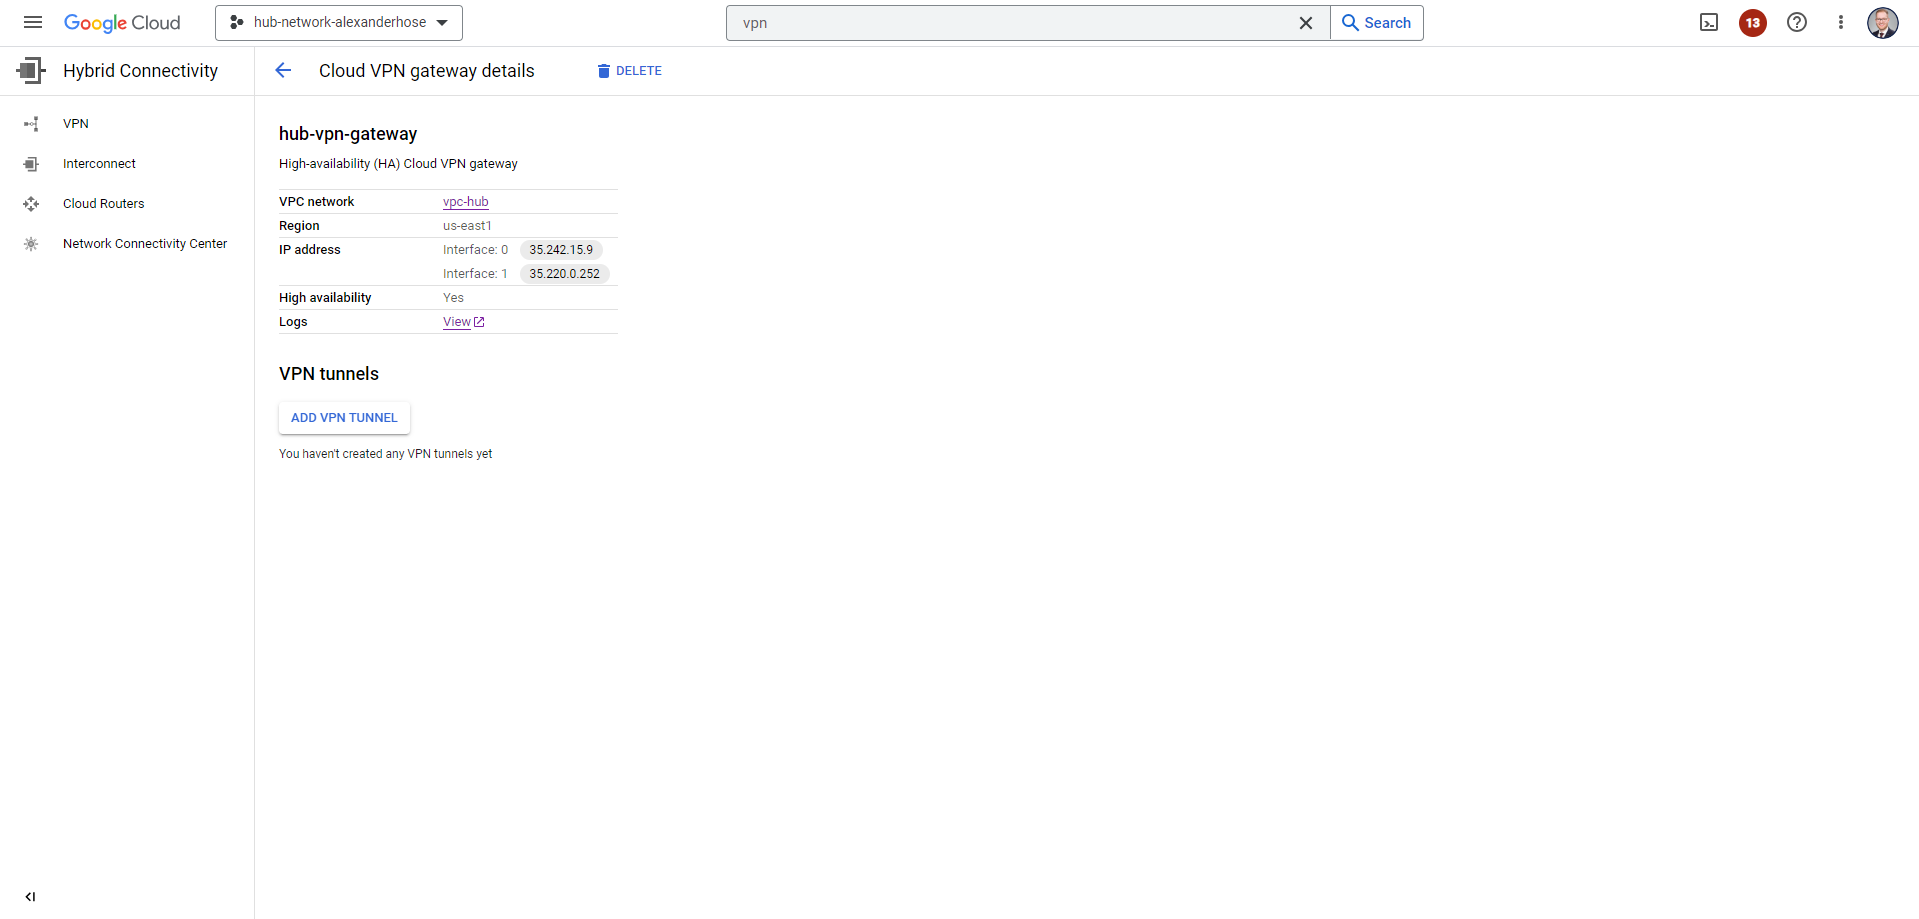
In the next step, we must create the Cloud VPN gateway, a crucial link between our networks:
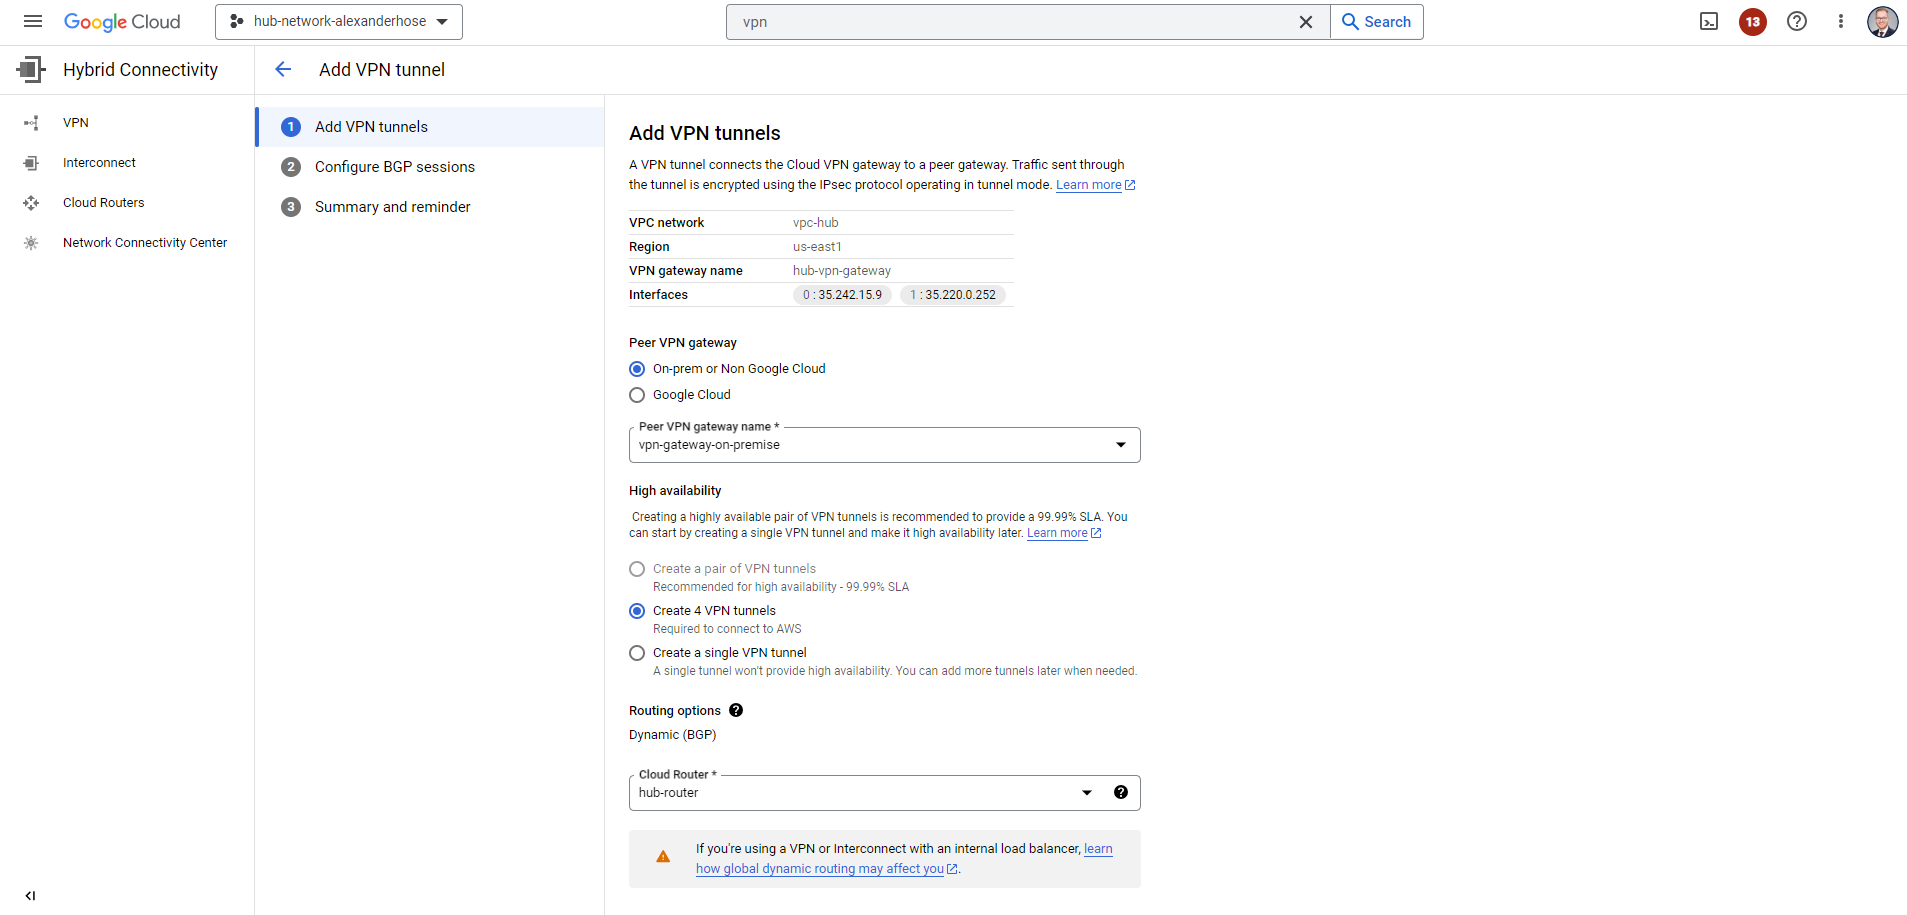
Now we can create the VPN tunnel and reference the Cloud router. Just click on ADD VPN TUNNEL of the VPN gateway you just created. Create a Peer VPN gateway and configure your Cloud router. When creating the different VPN tunnels, make sure to note down the IKE pre-shared keys, you need them later for connecting to your on-premise appliance.
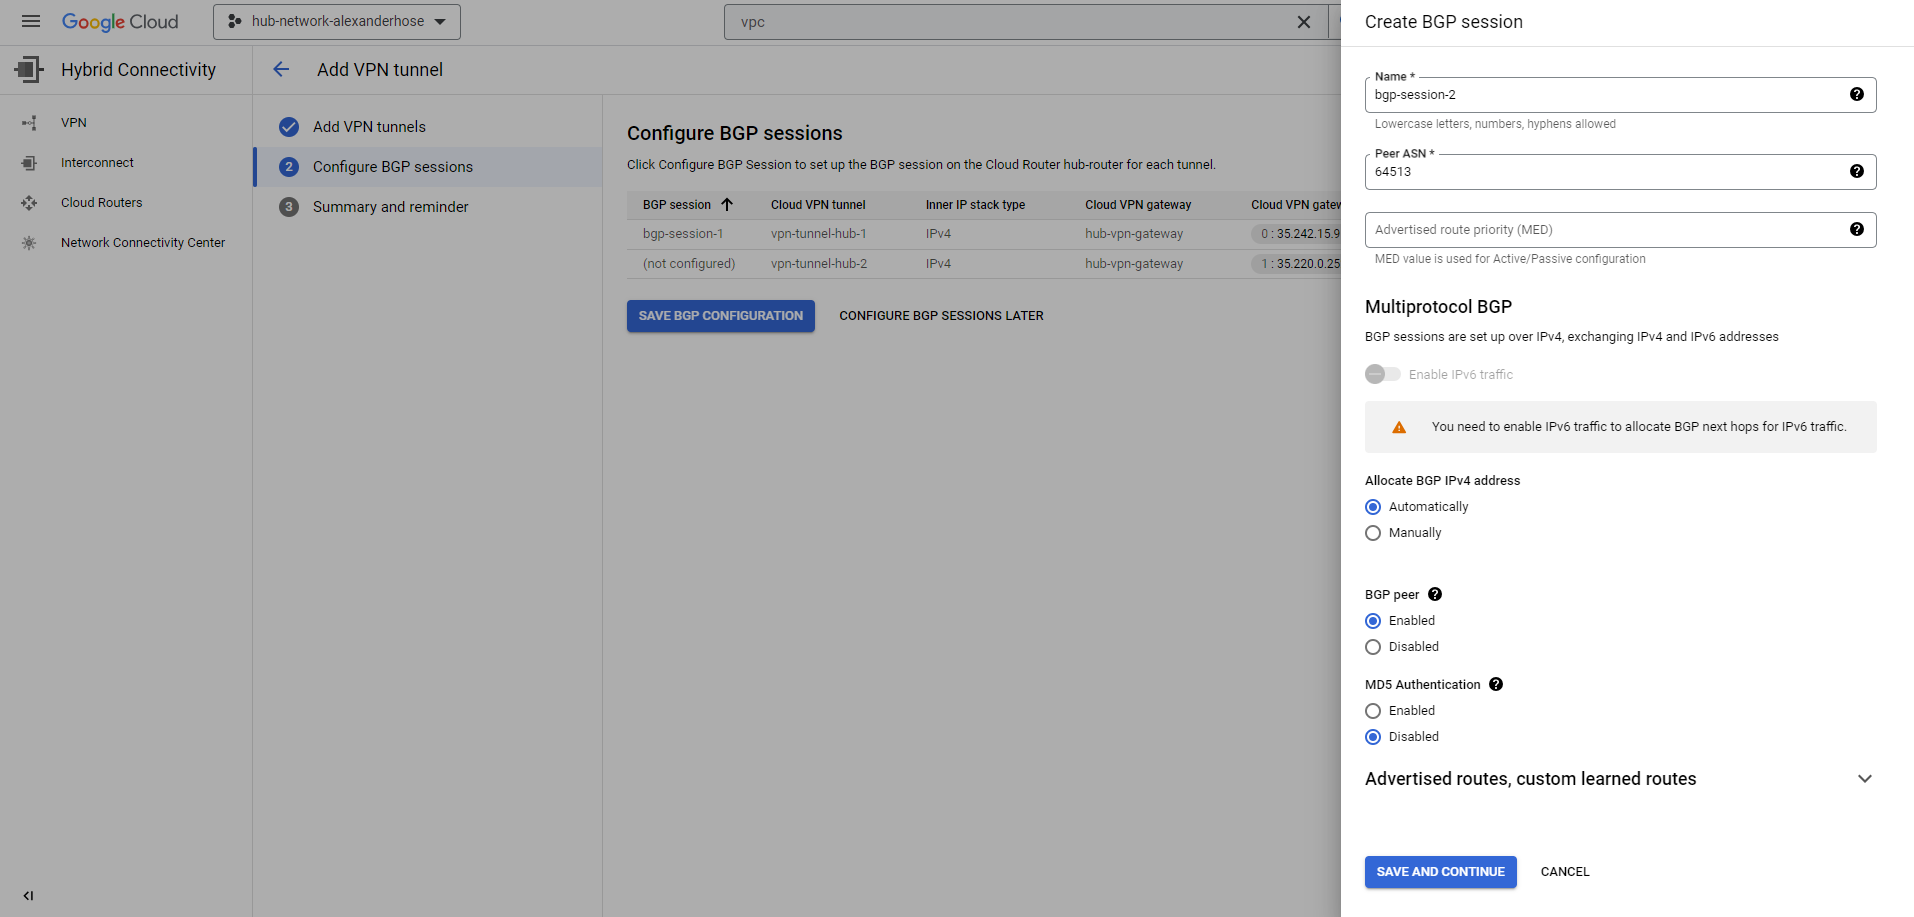
In the next step, we need to create the BGP sessions. We can keep everything automatic and later take the IP addresses from the output to configure them on-premise.
In the cloud VPN tunnels overview, you can see the different IP addresses that you need to configure on-premise. For the connection, you use the IKE pre-shared keys that you set above.
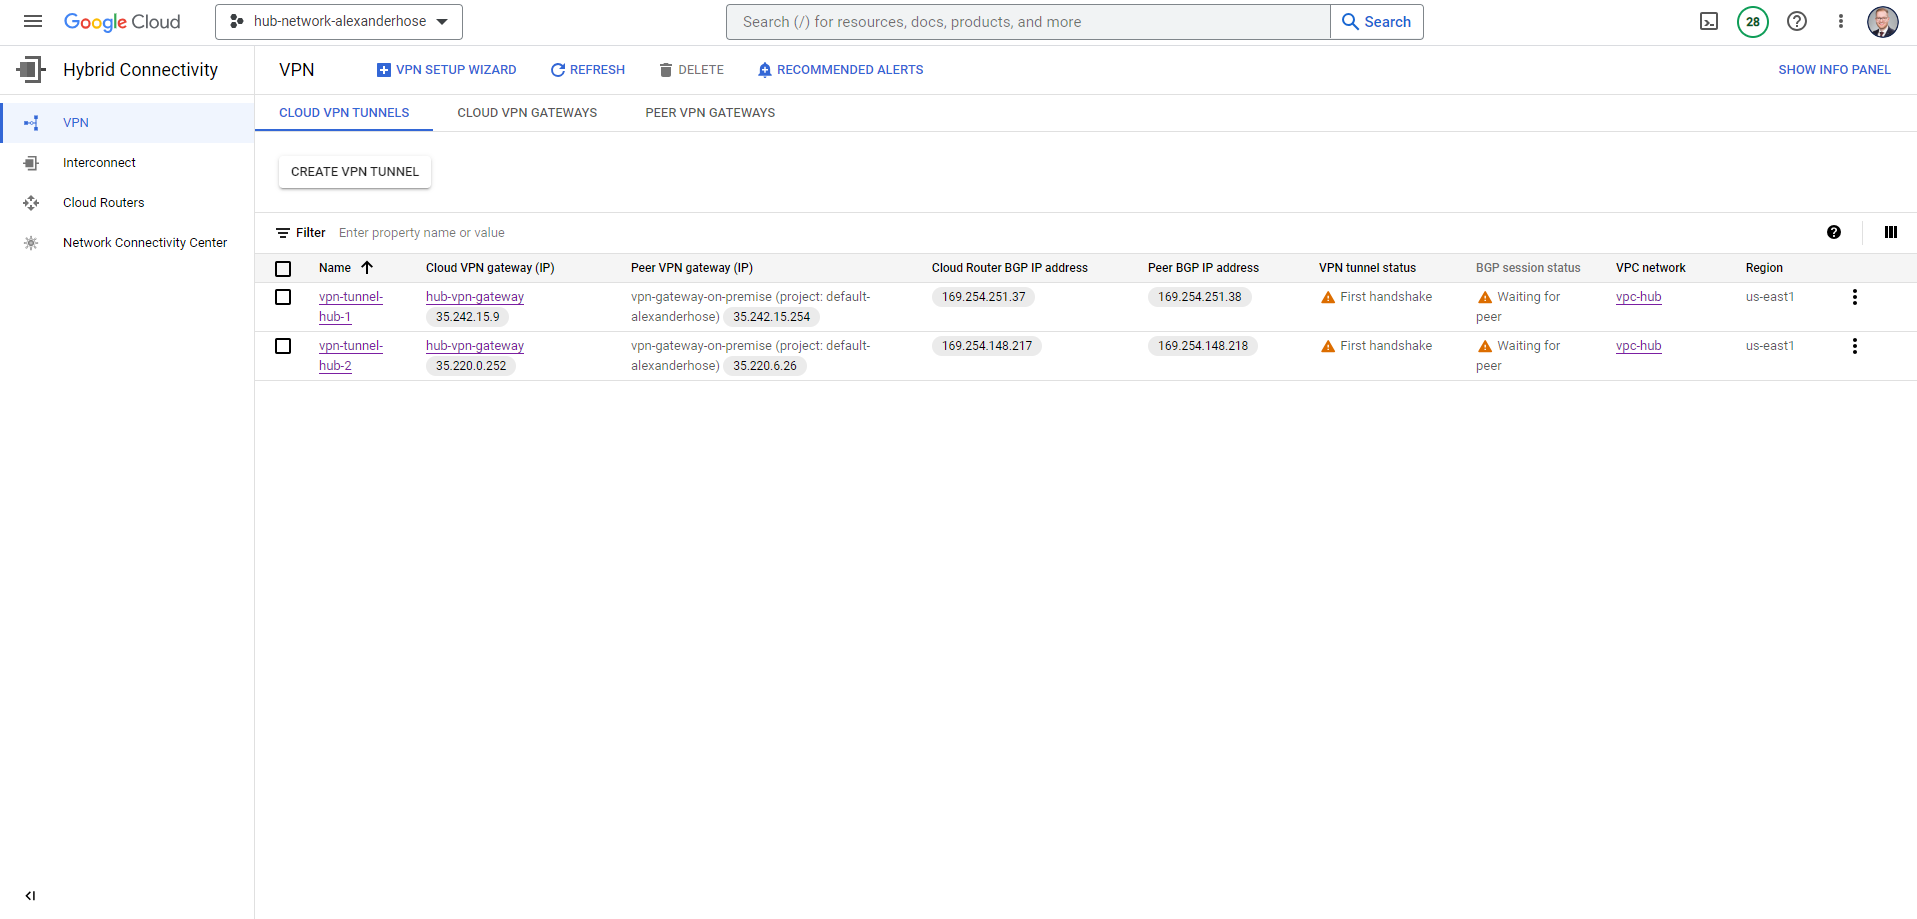
If you have done everything correctly, you will see that the VPN and BGP sessions are established.

If we create a new route on-premise, it will automatically synchronize with our GCP environment. You are also now able to connect to on-premise resources and vice versa.
🎓 Conclusion
In conclusion, the Hub and Spoke architecture in GCP offers an efficient way to scale your network. 🌐 It centralizes control, simplifies connectivity, and enables smooth expansion. However, it's essential to acknowledge that every solution has its challenges.
📉 One potential drawback can be the complexity of initial setup and configuration. Implementing this architecture requires careful planning and may demand additional effort in the beginning.
💡 Yet, by understanding these challenges and addressing them effectively, you can harness the full potential of the hub and spoke model. In the end, it's a valuable tool for building a robust, scalable network in GCP.


