


Introduction
I often see companies struggle with installing security agents on their virtual machines fleets. These agents could be Wazuh, Splunk, Microsoft Defender for Endpoint (MDE), or others. Setting them up manually or with tools like Ansible takes a lot of time and effort. It also doesn’t fully match how cloud environments are meant to be managed.
When you have a few VMs, manual setup might be fine. But if you have hundreds of VMs across different projects and regions, it becomes very hard to keep everything consistent. Even with automation scripts, there is still a lot to manage, and it is easy to make mistakes.
GCPs VM Manager and OS Policy Orchestrator give us a better way. They let you define what software and settings should be on your VMs. Once you set up the policies, they are applied automatically to all VMs, without the need for manual work. This is a more cloud-native way to manage VMs because it uses built-in Google Cloud services.
Enforcing VM Manager with Organization Policy
By default, VM Manager is disabled in GCP projects. This means that even if you want to use OS policies later, you first need to make sure VM Manager is active.
GCP gives you a simple way to enforce this: with an organization policy called compute.requireOsConfig.
When you enable this policy, every new project in your organization will have VM Manager turned on automatically.
Here’s what happens when you apply the compute.requireOsConfig policy:
- The project metadata will automatically include
enable-osconfig=TRUE. - Any attempt to manually turn off VM Manager (by setting
enable-osconfig=FALSE) will be blocked.
The policy only affects new projects. Existing projects and existing VMs are not changed automatically. If you want to enable VM Manager on them, you need to update the metadata manually.
Even when this policy is active, you can still disable specific VM Manager features if needed. You can do this by setting the osconfig-disabled-features metadata on a VM or project. This gives you some flexibility if you don't want to use all VM Manager features everywhere.
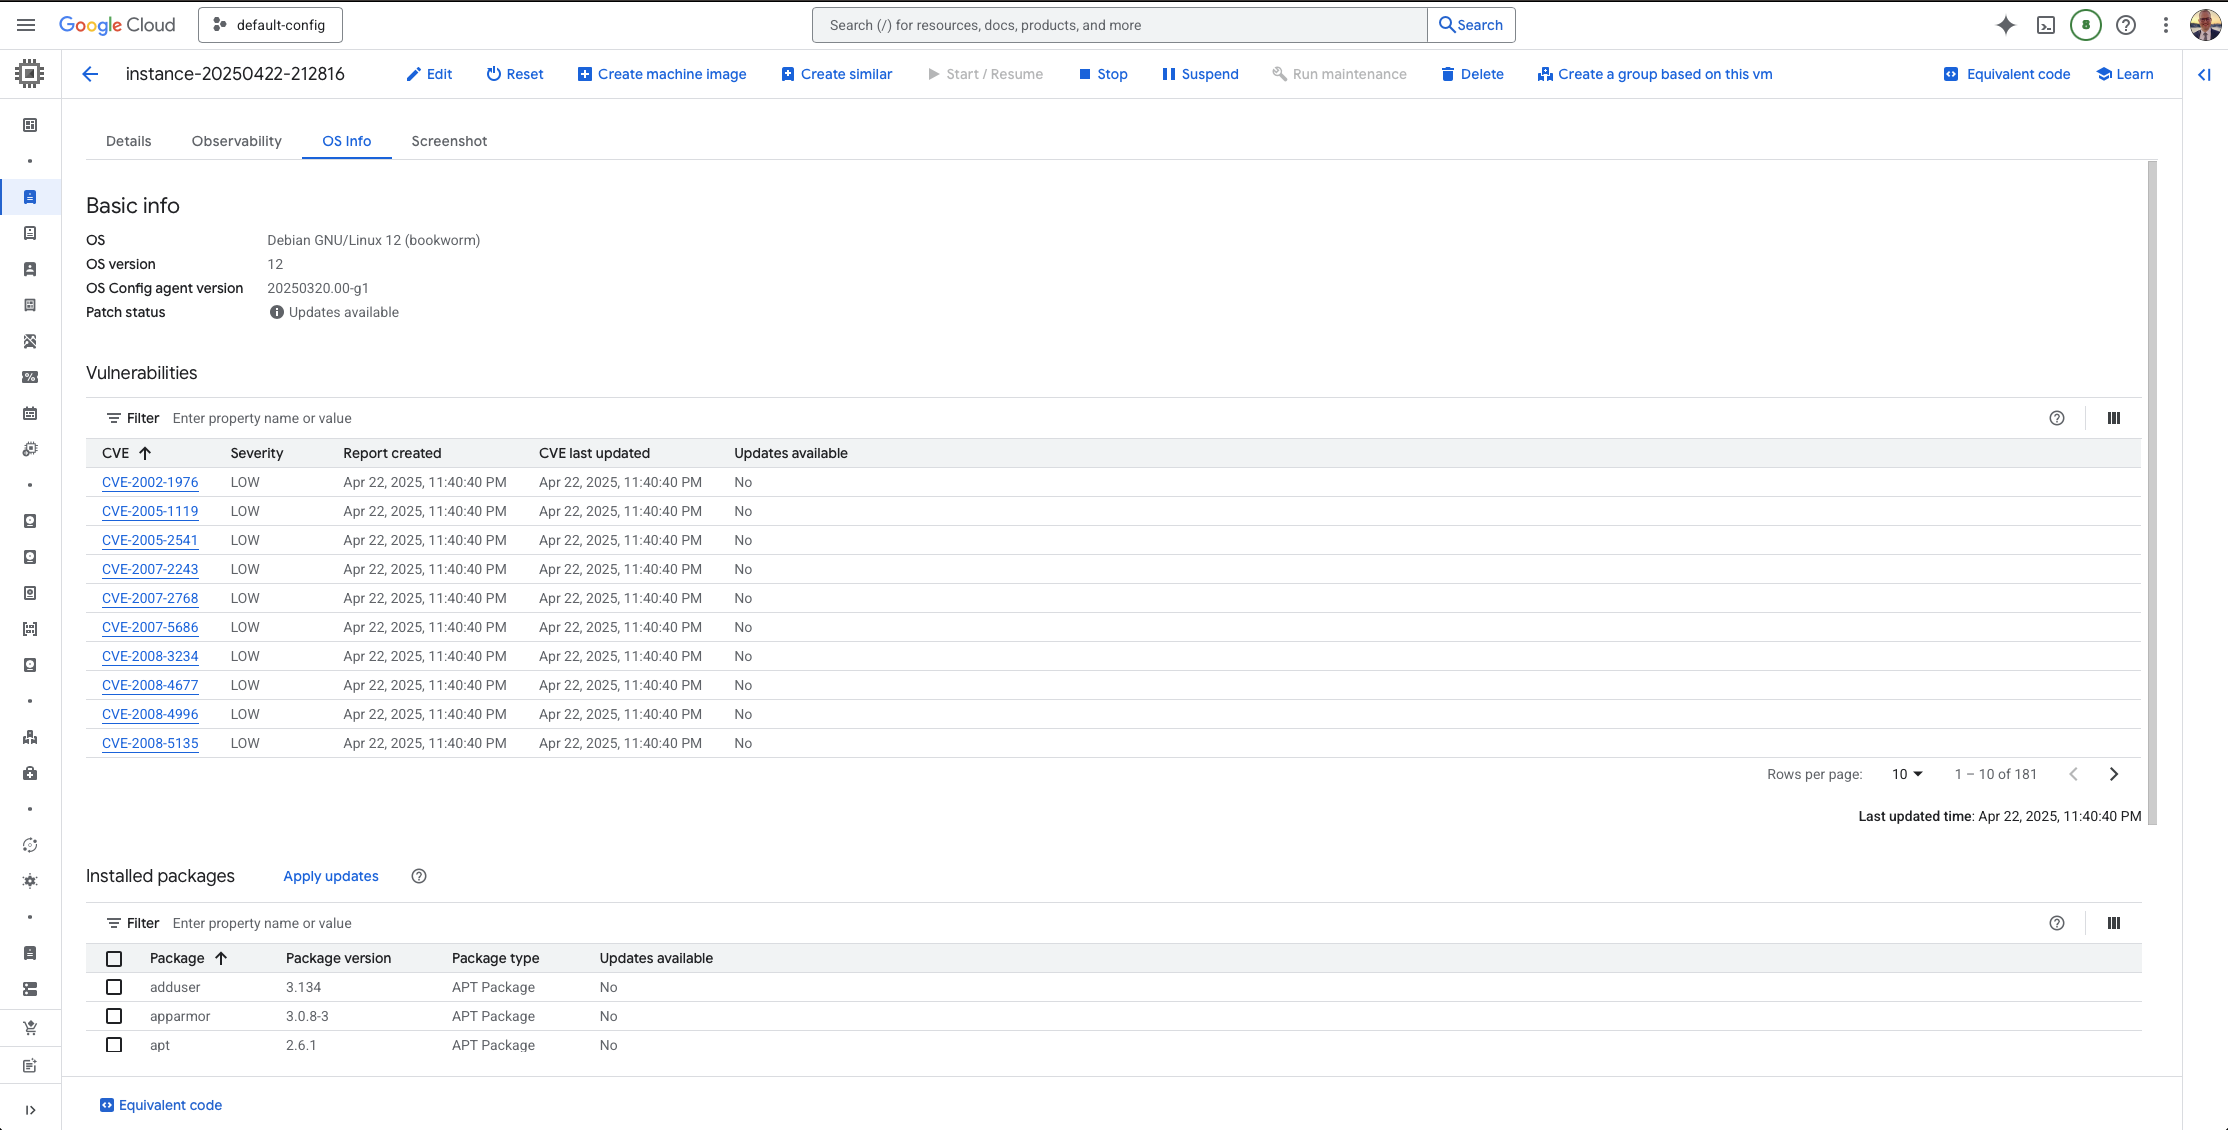
After enabling VM Manager with the organization policy, your VMs will also start reporting more detailed information back to GCP. In the Compute Engine VM overview, you will now see OS inventory data, including installed packages and vulnerabilities.
This information is also automatically synced with Security Command Center.
Prerequisites for OS Policy Orchestrator
Before you can use OS policies to manage automations, you need to make sure a few things are ready. You can manage the OS Policy Orchestrator in your Organizations main account. I recommend to perform all actions there so you can centrally manage all your policies.
1. Enable Required APIs
First, you need to enable the following APIs in your project:
- OS Config API: This API allows you to manage OS policies.
- Progressive Rollout API: This API is used for rolling out policies progressively.
You can enable these APIs using the following commands:
gcloud services enable osconfig.googleapis.com
gcloud services enable progressiverollout.googleapis.com
2. Create Service Identities
Next, you need to create service identities for the OS Config and Progressive Rollout APIs. These service accounts are used by GCP to perform actions on your behalf.
Use the following commands, replacing ORGANIZATION_ID with your organization's numeric ID:
me@cloudshell:~$ gcloud beta services identity create --service=osconfig.googleapis.com --organization=ORGANIZATION_ID
Service identity created: service-org-ORGANIZATION_ID@gcp-sa-osconfig.iam.gserviceaccount.com

me@cloudshell:~$ gcloud beta services identity create --service=progressiverollout.googleapis.com --organization=ORGANIZATION_ID
Service identity created: service-org-ORGANIZATION_ID@gcp-sa-progrollout.iam.gserviceaccount.com
3. Assign IAM Roles to Service Accounts
After creating the service identities, you need to assign the necessary IAM roles to them. This allows the service accounts to perform the required actions.
Run the following commands, replacing ORGANIZATION_ID with your organization's numeric ID:
me@cloudshell:~$ gcloud organizations add-iam-policy-binding ORGANIZATION_ID \
  --member="serviceAccount:service-org-ORGANIZATION_ID@gcp-sa-osconfig-rollout.iam.gserviceaccount.com" \
  --role="roles/osconfig.rolloutServiceAgent"
Updated IAM policy for organization [ORGANIZATION_ID].

me@cloudshell:~$ gcloud organizations add-iam-policy-binding ORGANIZATION_ID \
  --member="serviceAccount:service-org-ORGANIZATION_ID@gcp-sa-osconfig.iam.gserviceaccount.com" \
  --role="roles/osconfig.serviceAgent"
Updated IAM policy for organization [ORGANIZATION_ID].


me@cloudshell:~$ gcloud organizations add-iam-policy-binding ORGANIZATION_ID \
  --member="serviceAccount:service-org-ORGANIZATION_ID@gcp-sa-progrollout.iam.gserviceaccount.com" \
  --role="roles/progressiverollout.serviceAgent"
Updated IAM policy for organization [ORGANIZATION_ID].
4. Verify the OS Config Agent is Running
Ensure that the OS Config agent is running on your VM instances. You can check the status using the following command:
me_alexanderhose_com@instance-20250422-211723:~$ sudo systemctl status google-osconfig-agent
● google-osconfig-agent.service - Google OSConfig Agent
     Loaded: loaded (/lib/systemd/system/google-osconfig-agent.service; enabled; preset: enabled)
     Active: active (running) since Tue 2025-04-22 21:18:32 UTC; 12min ago
   Main PID: 369 (google_osconfig)
      Tasks: 8 (limit: 1136)
     Memory: 40.2M
        CPU: 304ms
     CGroup: /system.slice/google-osconfig-agent.service
             └─369 /usr/bin/google_osconfig_agent

Apr 22 21:18:32 localhost systemd[1]: Started google-osconfig-agent.service - Google OSConfig Agent.
Apr 22 21:18:33 localhost OSConfigAgent[369]: 2025-04-22T21:18:33.0195Z OSConfigAgent Info: OSConfig Agent (version 20250320.00-g1) started.
Deploying Wazuh Agent with OS Policy Orchestrator
By using OS Policy Orchestrator, you can automate the deployment of security agents like Wazuh across your environment. This is just one example - with OS policies, you can automate many other tasks too, like installing different software, configuring settings, or enforcing security baselines across your VMs.
1. Create the OS Policy YAML File
Begin by creating a YAML file that defines the OS policy for installing the Wazuh agent. Here's an example:
id: install-wazuh-agent-policy
mode: ENFORCEMENT
resourceGroups:
  - inventoryFilters:
      - osShortName: debian
    resources:
      - id: add-wazuh-repo
        repository:
          apt:
            archiveType: DEB
            uri: https://packages.wazuh.com/4.x/apt/
            distribution: stable
            components:
              - main
            gpgKey: https://packages.wazuh.com/key/GPG-KEY-WAZUH
      - id: install-wazuh-agent
        exec:
          validate:
            interpreter: SHELL
            script: |
              if systemctl is-active --quiet wazuh-agent; then exit 100; else exit 101; fi
          enforce:
            interpreter: SHELL
            script: |
              export WAZUH_MANAGER="10.0.0.3"
              apt-get update
              apt-get install -y wazuh-agent
              systemctl daemon-reload
              systemctl enable wazuh-agent
              systemctl start wazuh-agent
              exit 100
This policy performs the following actions:
- Adds the Wazuh repository to the system's package manager.
- Installs the Wazuh agent.
- Starts, configures and enables the Wazuh agent service.
2. Deploying Wazuh Agent with OS Policy Orchestrator
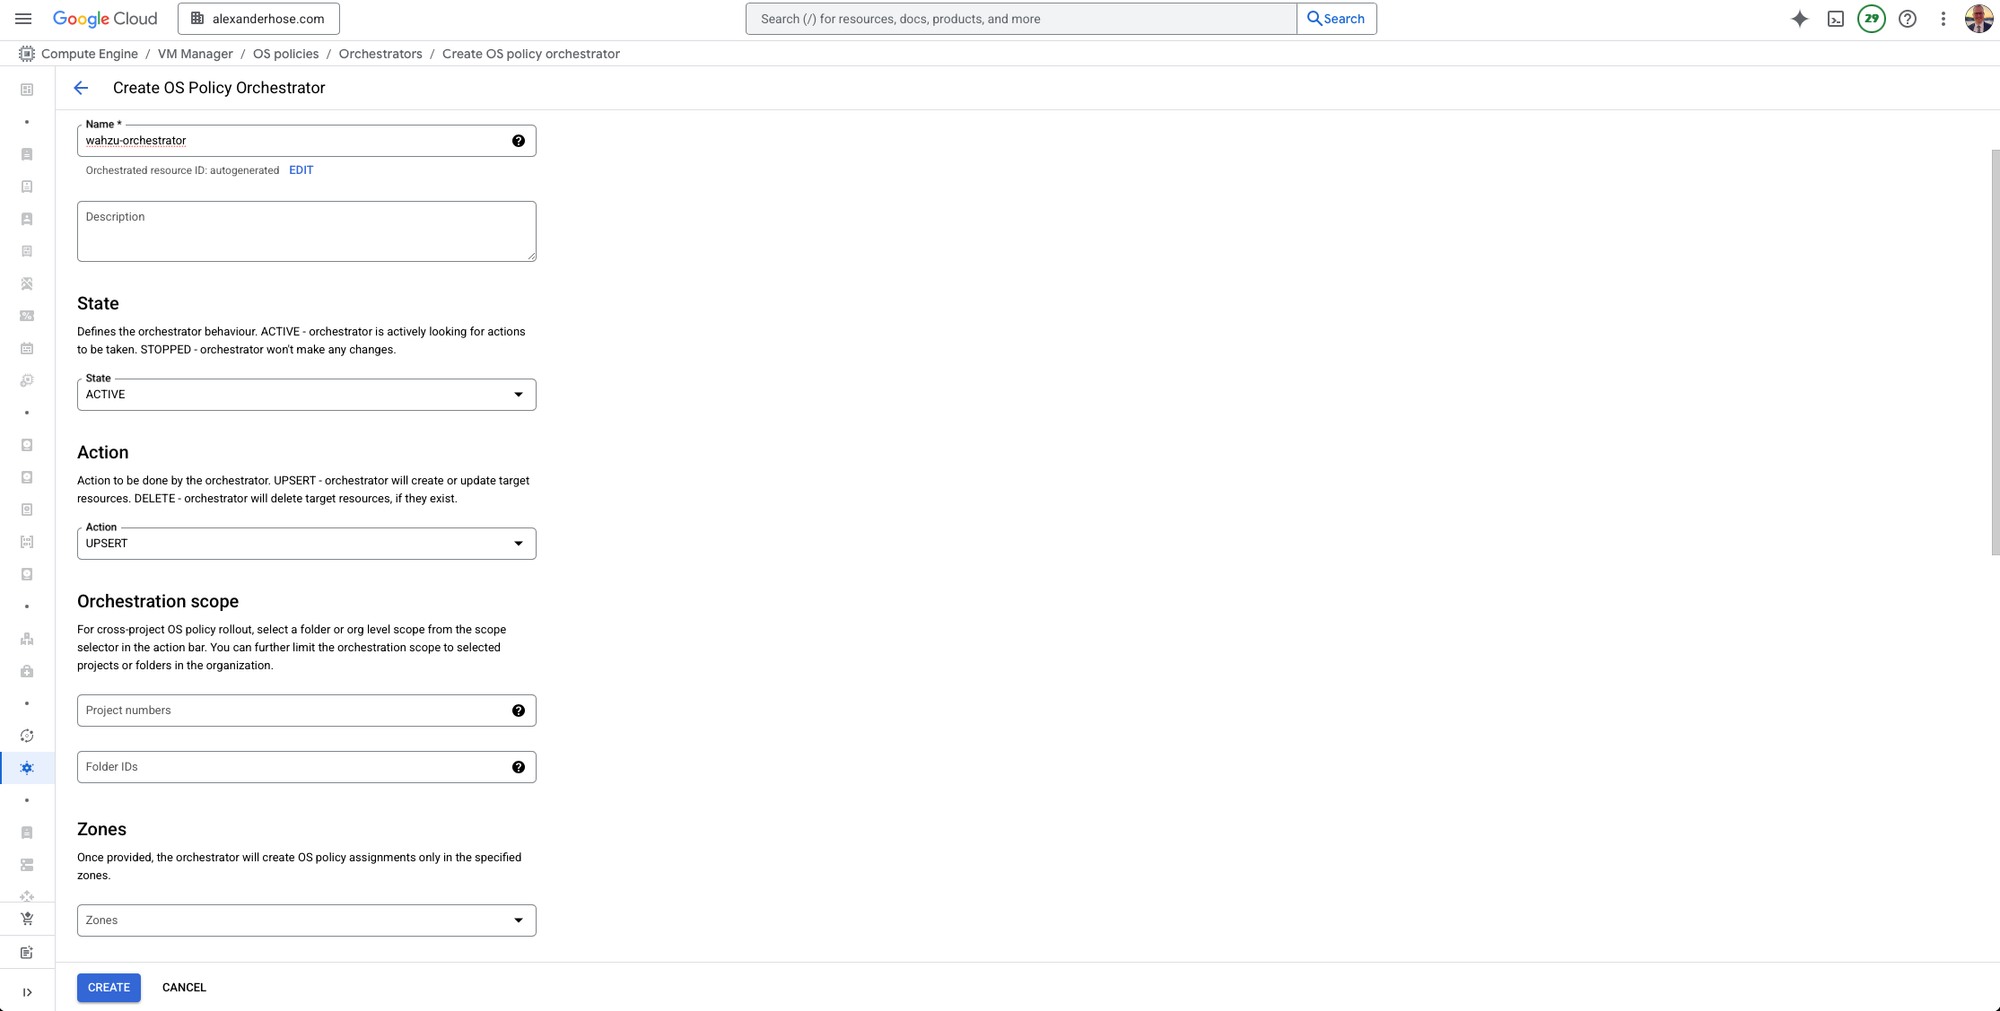
After creating the YAML file, you can apply the policy using the Google Cloud Console or the gcloud command-line tool.
Choose the Action
First we choose the action that the orchestrator will perform:In this case, we will choose UPSERT because we are adding or updating the Wazuh agent installation.
- UPSERT: This will create or update the resources on the target VMs.
- DELETE: This will remove the resources.
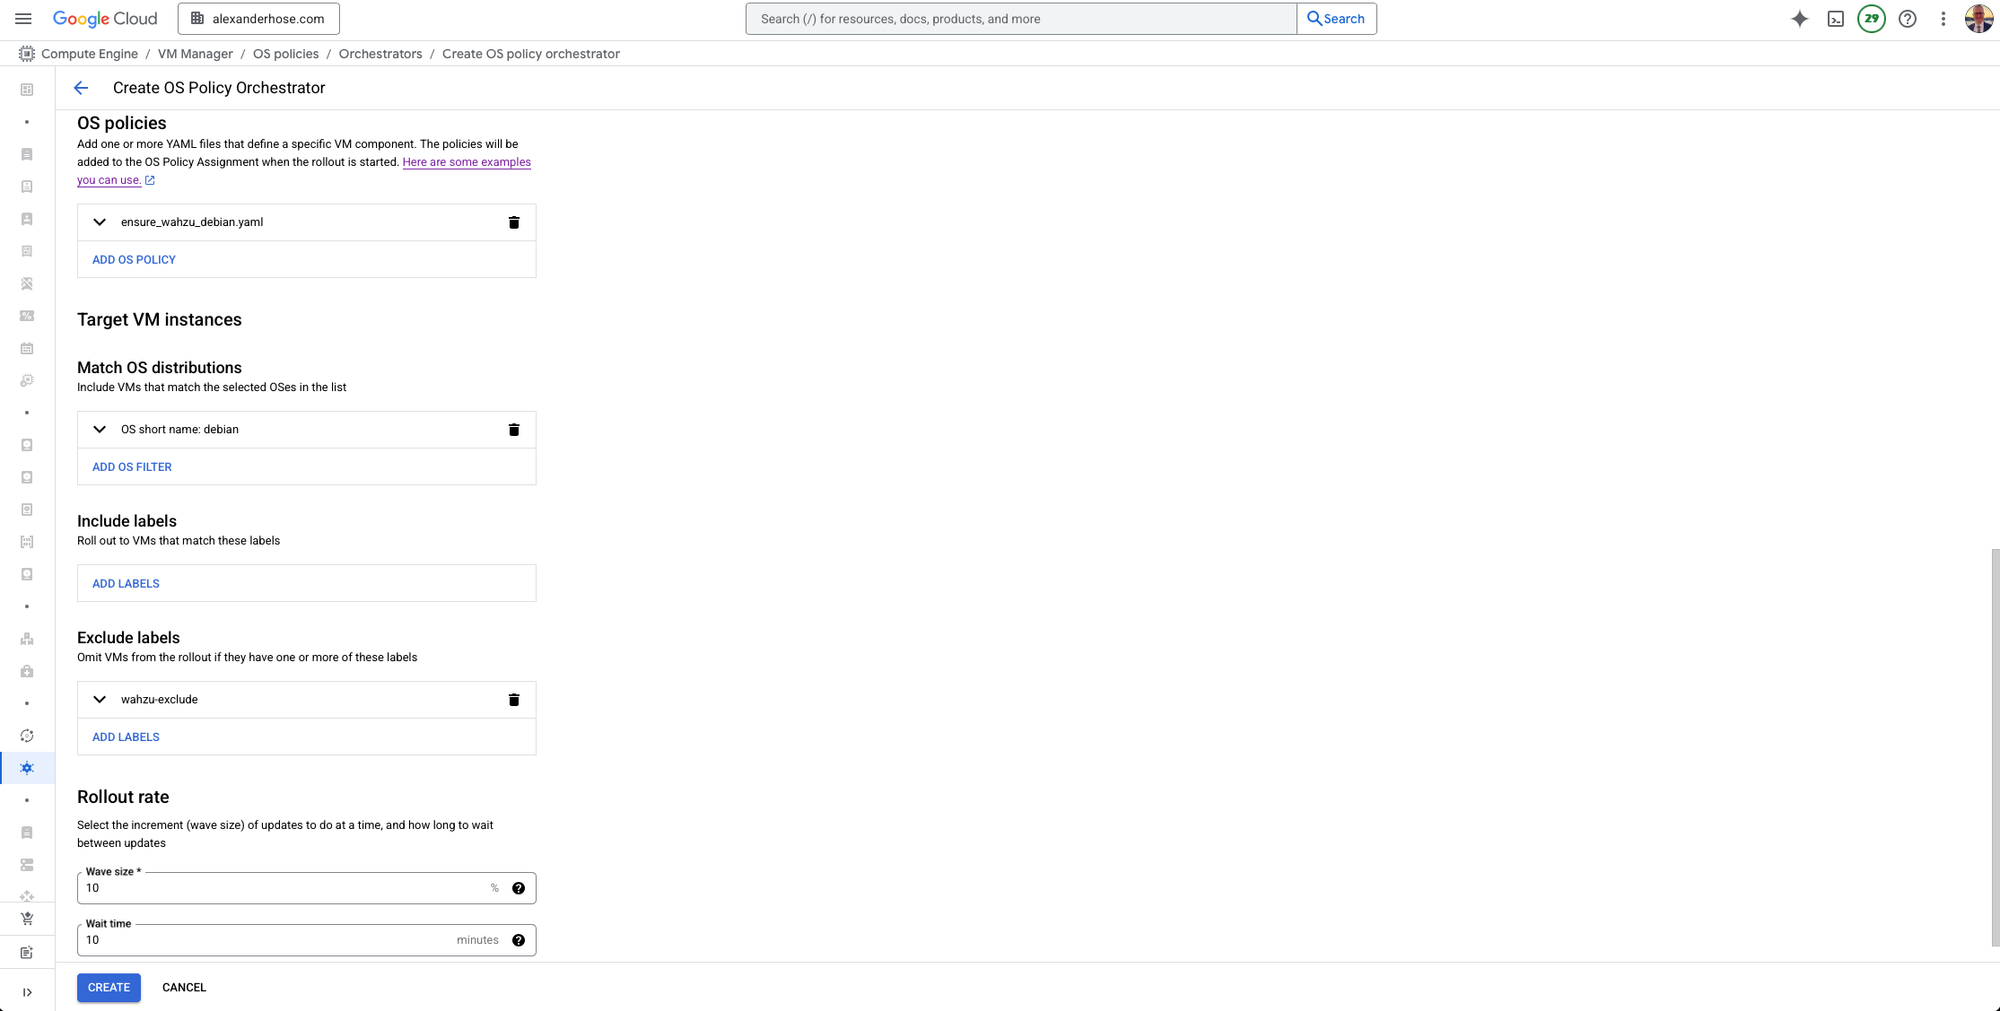
Upload the OS Policy YAML File
Next, we upload the YAML file that contains the configuration for the Wazuh agent. This YAML defines the installation steps.
Set OS Matchers, Inclusions, and Exclusions
You can specify which operating systems and VMs the policy applies to. This is useful to ensure that only specific VMs (for example, Debian-based systems) are targeted by the policy.
- OS distribution matchers: Define the operating system type (e.g., Debian, Ubuntu).
- Inclusions: Select which VMs should receive the policy.
- Exclusions: Define any VMs that should not receive the policy.
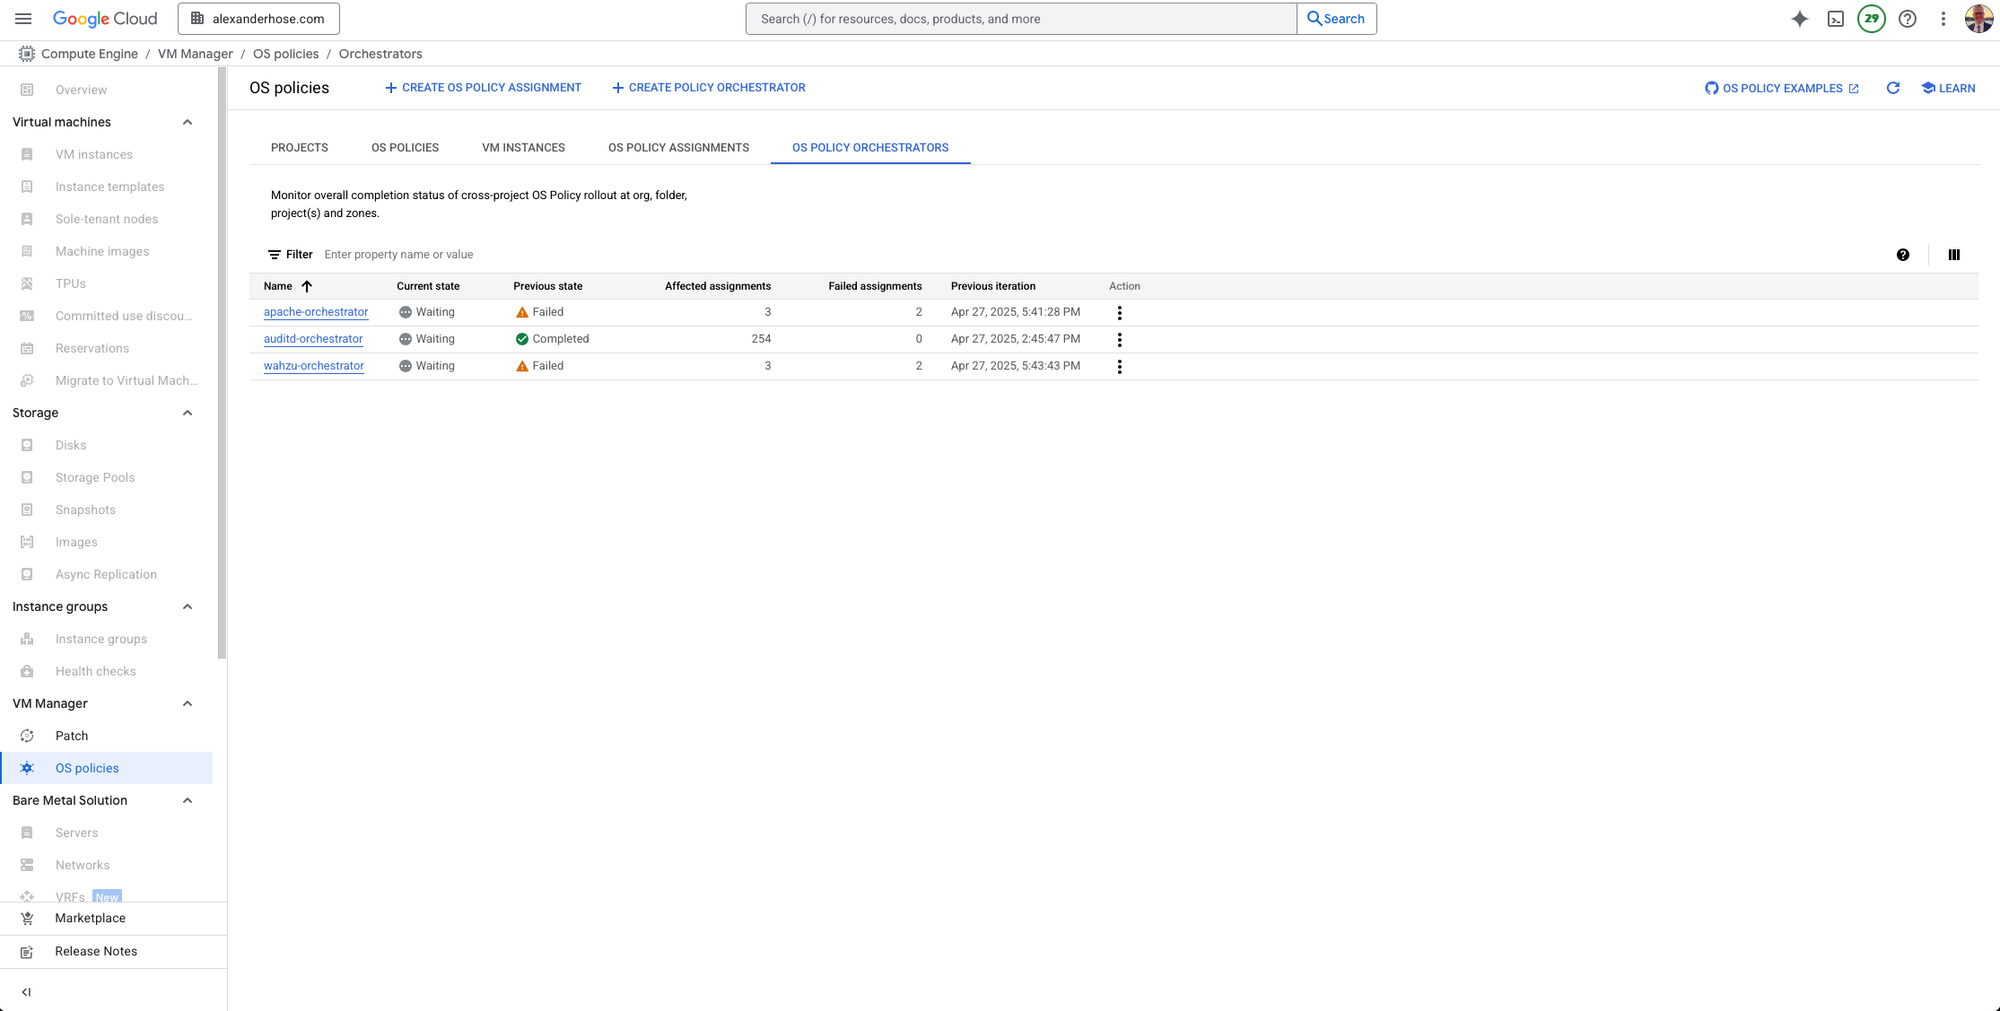
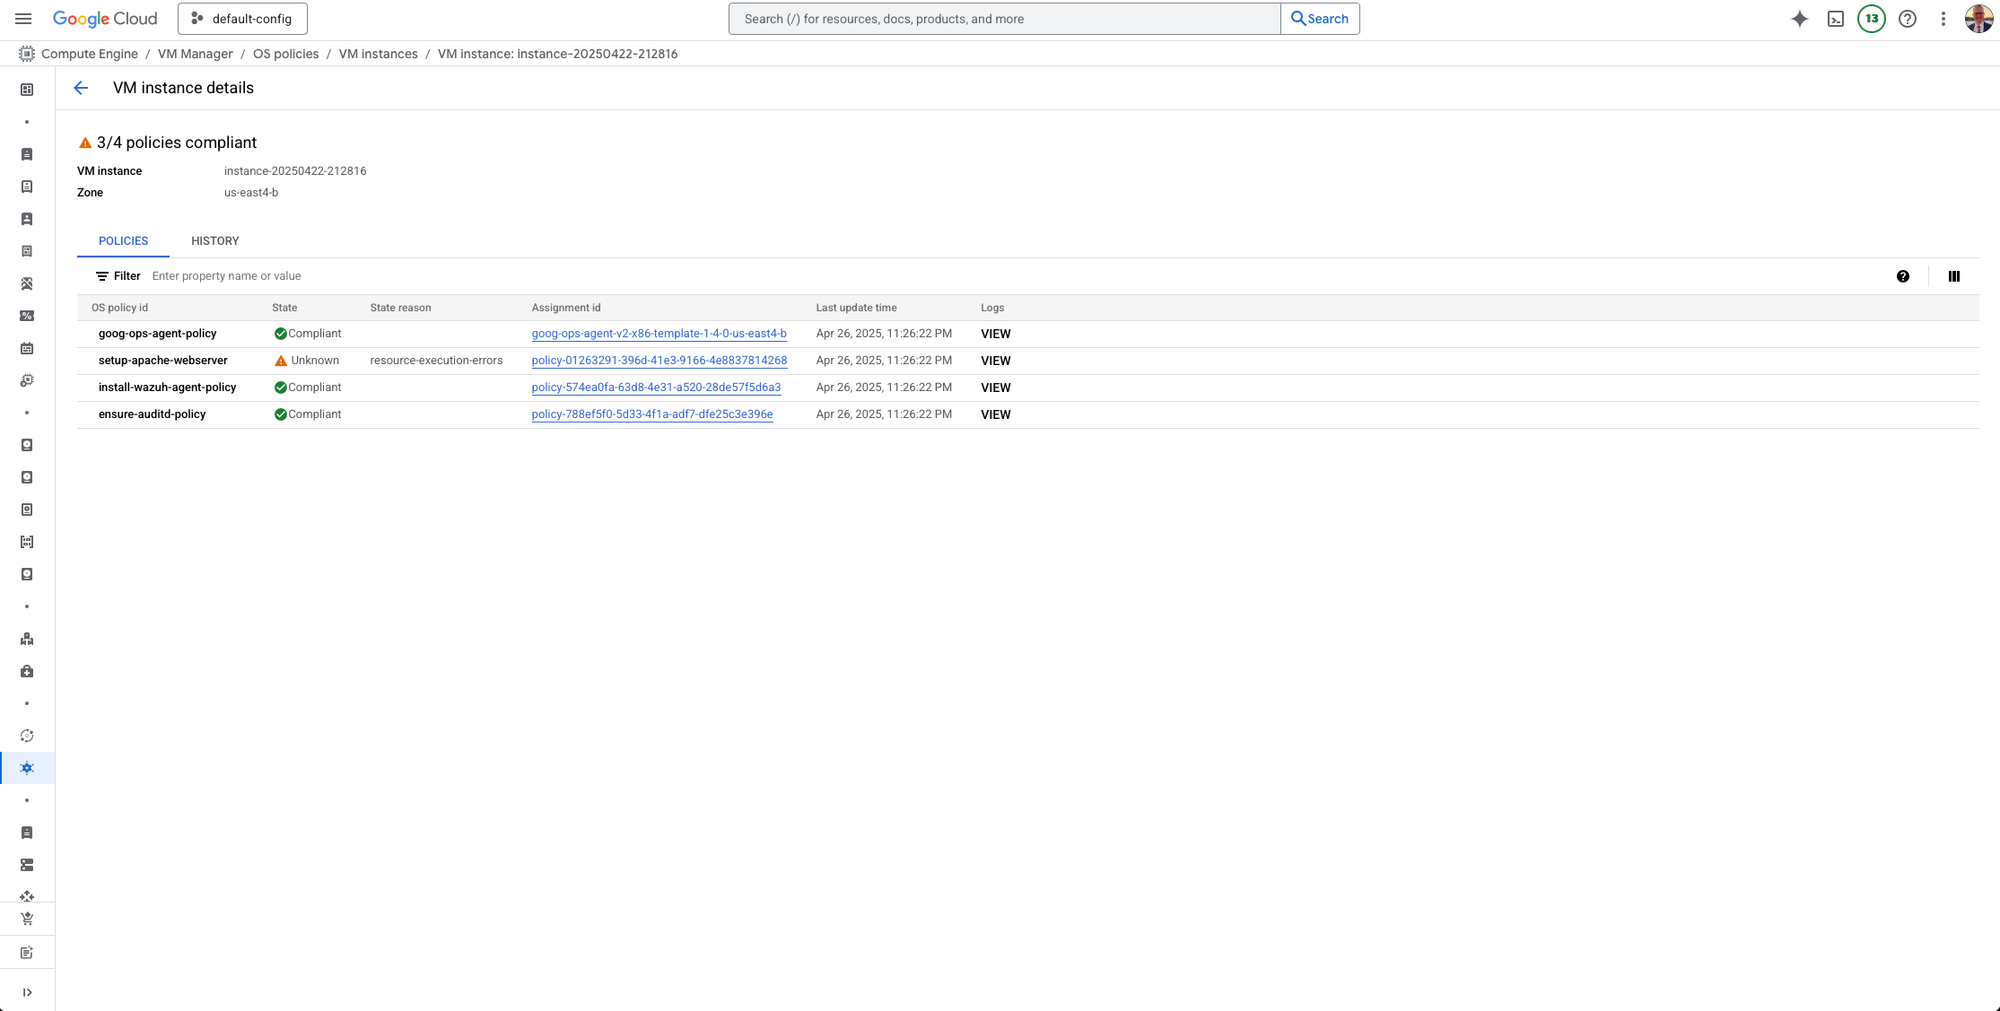
Monitor Deployment Status
After the policy is created and applied, you can check the deployment status by going to the VM overview in the OS Policies section.
Here, you’ll be able to see if the Wazuh agent has been successfully installed and is running as expected on your VMs.
Verifying on the VM
To further verify that the Wazuh agent has been installed and is running properly, you can check directly on the VM.
alexanderhose@instance-20250422-212816:/var/www$ systemctl status wazuh-agent
● wazuh-agent.service - Wazuh agent
     Loaded: loaded (/lib/systemd/system/wazuh-agent.service; enabled; preset: enabled)
     Active: active (running) since Sat 2025-04-26 21:26:08 UTC; 1min 13s ago
    Process: 6545 ExecStart=/usr/bin/env /var/ossec/bin/wazuh-control start (code=exited, status=0/SUCCESS)
      Tasks: 28 (limit: 1136)
     Memory: 38.1M
        CPU: 2.665s
     CGroup: /system.slice/wazuh-agent.service
             ├─6567 /var/ossec/bin/wazuh-execd
             ├─6578 /var/ossec/bin/wazuh-agentd
             ├─6591 /var/ossec/bin/wazuh-syscheckd
             ├─6604 /var/ossec/bin/wazuh-logcollector
             └─6621 /var/ossec/bin/wazuh-modulesd
Another Example: Deploying Apache HTTP Server
As a second example, we can also deploy other software like Apache using the same method. Here is a sample OS policy for installing Apache:
id: setup-apache-webserver
mode: ENFORCEMENT
resourceGroups:
  - resources:
      - id: install-apache2
        pkg:
          desiredState: INSTALLED
          apt:
            name: apache2

      - id: start-apache2
        exec:
          validate:
            script: |
              systemctl is-active apache2
            interpreter: SHELL
          enforce:
            script: |
              systemctl start apache2
              systemctl enable apache2
            interpreter: SHELL
You can verify that Apache is running by checking the service status:
alexanderhose@instance-20250422-212816:/var/www$ systemctl status apache2
● apache2.service - The Apache HTTP Server
     Loaded: loaded (/lib/systemd/system/apache2.service; enabled; preset: enabled)
     Active: active (running) since Sat 2025-04-26 20:53:08 UTC; 11min ago
       Docs: https://httpd.apache.org/docs/2.4/
    Process: 382 ExecStart=/usr/sbin/apachectl start (code=exited, status=0/SUCCESS)
   Main PID: 410 (apache2)
      Tasks: 55 (limit: 1136)
     Memory: 18.2M
        CPU: 184ms
     CGroup: /system.slice/apache2.service
             ├─410 /usr/sbin/apache2 -k start
             ├─411 /usr/sbin/apache2 -k start
             └─412 /usr/sbin/apache2 -k start
Confirming Results in the Wazuh Backend
Once the agent is running and communicating with the backend, you can go to the Wazuh manager to confirm that the agent is reporting correctly.

My Opinion
I really like the idea of OS policies. They provide a simple, centralized way to manage software and configurations across multiple VMs without the need for manual intervention. However, there is one challenge that comes to mind when working in a developer-centric organization. As a developer, I would want to know exactly what is happening on my machine, especially when it comes to security software like the Wazuh agent or automated hardening.
With OS policies, there's a bit of a black box. Developers might not know that the Wazuh agent has been deployed, or where to check for status. Many developers may not be familiar with GCP, and therefore, won’t know where to look for the status or configuration details of OS policies. This can create some confusion, especially if a developer tries to remove the Wazuh agent from their machine, only to find that it gets reinstalled automatically by the OS Policy Orchestrator.
While the automatic enforcement is great for security, it’s important to ensure that developers are made aware of the policies in place and know where to check if they need to troubleshoot or understand what's happening. Clear documentation and guidance would be crucial in such cases to bridge this gap.


Member discussion